Haupt. Josef Priller’s Fw 190A-5 in 1/72 scale
by Kuba Plewka
photos by Kuba Plewka and Mirek Rawinski

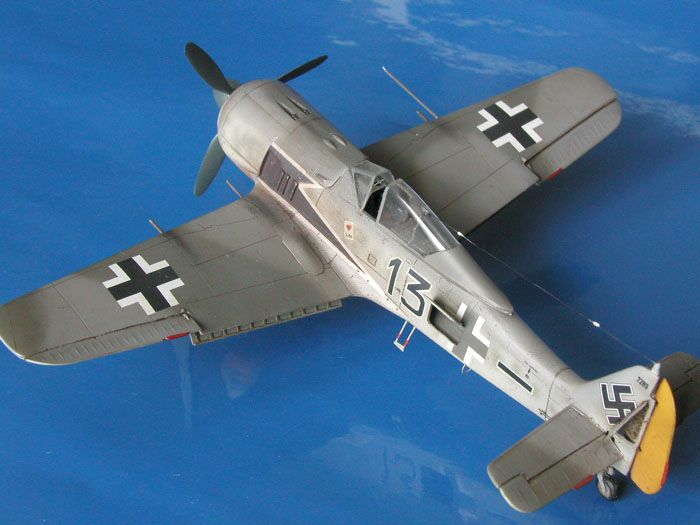
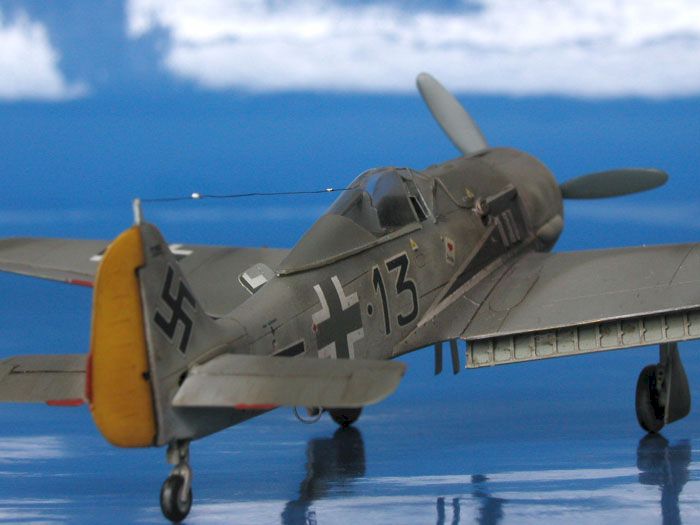
Fw 190 is my long-time favourite fighter. I thoroughly like its shape, the many paint schemes and versions. The A-5 was one of the more important fighter variants of the Wurger, and I have always liked the ”eagle – tailed” Black 13 of Pips Priller (nicknamed Jutta) so decided to build the model of his aircraft.
As the base I used the Hasegawa 1/72 Focke-Wulf Fw 190 F-8 Kit. Hasegawa has actually kitted an entire range of long-nose radial Fw 190s including the A-5, but I just happened to have the F-8 lying on my shelf, and I didn’t fancy building a ground-attack aircraft.

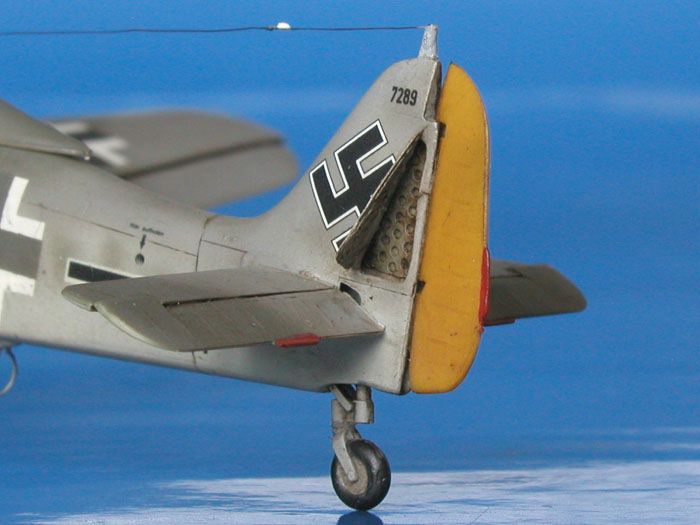
I started by assessing the necessary conversions. These included: backdating the wheels to early spoked variant; exchange of MG 151/20 cannon to lower-calibre MG-FF; changeing the shape of the top cowling to early non-bulged version; last but not least, a ”straight” outline rear canopy.
Conversion work

The cockpit was built using Aires resin kit. This is great resin stuff and well worth using.
While having the fuselage halves separate I also cut out the fuselage access panels, removed the flaps, separated the ailerons and the rudder.
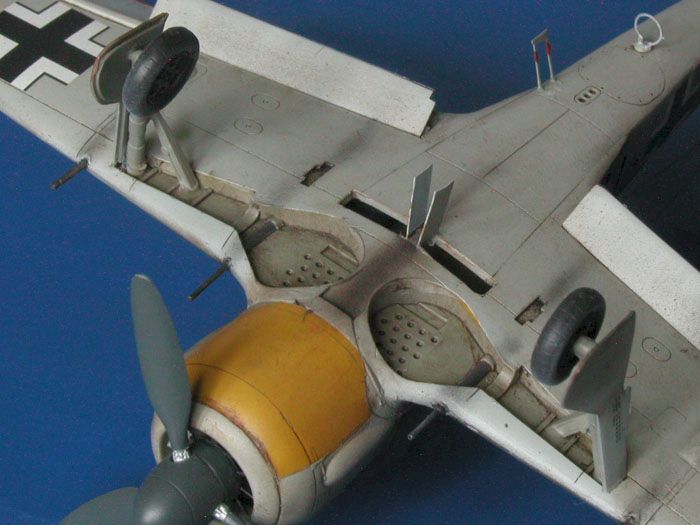
The cannon bulges under the wings were modified to the MG-FF standard using some putty, which proved reasonably easy. More difficult was the modification of forward upper cowling. The basic shape was achieved by filing and sanding. Then the two small teardrop blisters were added using Milliput putty. Shaping details from MIlliput may sound as an easy work, but believe me – it requires sculptor’s sense.
With all major corrections done to the fuselage, the replacement cockpit module was placed inside. I have also added a detailed tail wheel suspension compartment inside the fin. This was another resin part from Verlinden. It was trapped between the two fin halves, and the fuselage assembled.
The wing

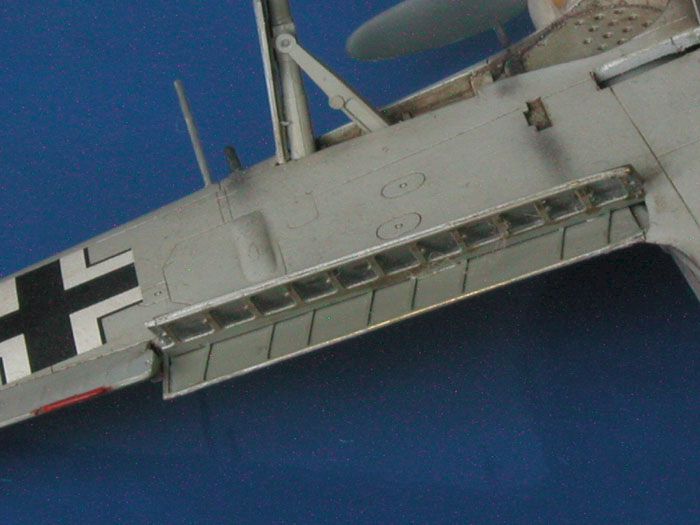
Moving on to the wing assembly, I started by removing the kit’s integrated flaps and ailerons for later replacement with aftermarket parts.
The previously mentioned Verlinden set included the ammunition containers for the fuselage-mounted MG 151s, so I also went about opening the appropriate covers in the wing lower centre section. Next I mounted the wing and attached the replacement photoetched flaps. The flaps came from the excellent photoetched set for the Fw 190 produced by Part.
With flaps mounted I moved to resin control surfaces from Aires, which were attached off-centre for added realism and to emphasize their function.
Painting
I primed the model using Aeromaster acrylic paint, applied by brush. I like using this paint for the primer layer because it has a hard surface that can be easily sanded and polished to any desired tooth/smoothness.
After priming the model, I attached the vacuum-formed canopy from Squadron and masked it off for painting.
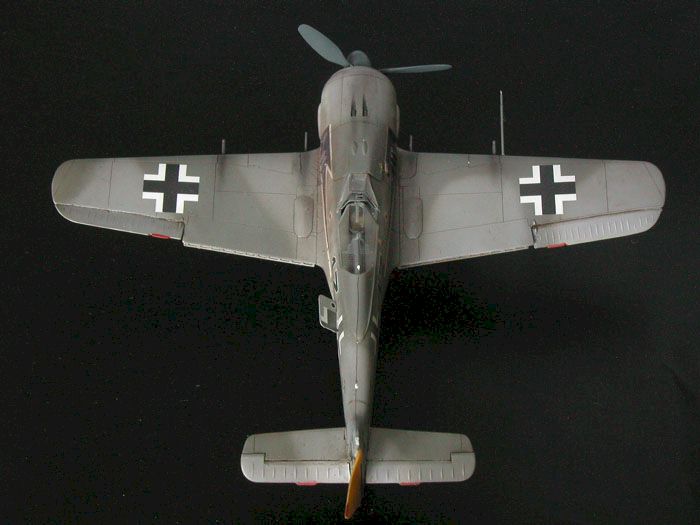
Priller’s Focke-Wulf was painted with that stanard RLM 74/75/76 camouflage with yellow (RLM 04) quick identification elements.

For painting I used the excellent Aeromaster acrylics. First I sprayed the rudder and the engine underside with RLM 04 yellow. Then the engine covers and the rudder were masked off and the undersurfaces sprayed with RLM 76 Lichtgrau.
The next step was to apply the upper soft-edged camouflage of RLM 75 and 74. Applying the fuselage mottling was fun. I applied them free-hand, and then covered the mottled areas with a very thin layer of RLM 76 to reduce contrast and additionally soften the edges. That was it!
The black ”eagle” motif at the sides of the fuselage was painted using stencils, with the white outline made of white decal stripes (which by the way were ”borrowed” from a JV 44 Dora kit!).
Decaling
On the following day I coated the entire model with Lifecolor’s gloss varnish. The decals came from Hasegawa’s set (numbers) and Techmod (crosses and swastikas). As the fuselage crosses were originally painted in RLM 74 rather than black, I opted to paint them using a stencil.

The final weathering was made using artist’s oils and dry pastels. Finally, I covered the plane with semi-gloss coat of 50-50 mix of matt and gloss clear Pactra acrylics. The underwing ammo covers were attached and the model was finished.
I intend to place this model in a diorama scene. Because the diorama part is under construction, the photos show the airplane only. As soon as the entire project is completed I hope to return with an update.

This article was originally published in IPMS Stockholm Magazine in May 2003.