
Barbapapa?
Ett projekt har börjat ta form men det är inte vad det kanske ser ut som.
Barbapapa?
A project has found its shape, and it’s not what it might look like.

Då jag är inne i äggplanssvängen och en helikopter ibland kallas för äggvisp så var det väl lika bra att bygga en.
Jag hade räknat med att få en del kritik från samlare eftersom jag utgick från en gammal Tamiya Vertol 107 i skala 1/100.
Since I am in deep with egg planes and a helicopter is sometimes called the EGG BEATER I could just as well to build one.
I will probably get some criticism from collectors because I started with an old Tamiya Vertol 107 in 1/100 scale.

Jag kapade den i småbitar och monterade ihop den med ett plastägg. Jag började med att limma ihop kroppshalvorna och kapa bort nos och stjärt. Medan det torkade fick ägget toppen bortskuren och ersatt med en bit plasticcard. Stjärten såg smal ut mot ägget så jag sprättade
upp fogen igen och behöll bara den bakersta delen hoplimmad, jag böjde ut resten för att den skulle bli bredare vid skarven mot ägget och limmade ihop dom.
I cut it into small pieces and assembled it together with an plastic egg.
I started by glueing the body halves together and cutting the nose and tail off. I then cut the top off the egg and replaced with a piece of plastic card. The tail was looking narrow on the egg so I broke the joint and only kept the rearmost part glued, I then bent the
rest out so it got wider at the joint to the egg and glued them together.

När jag letade i skrotlådorna hittade jag delar från en gammal Airfix och Fujimihelikopter i 1/72 och kom på att det skulle bli ännu mer karikatyrartat om jag blandade in delarna därifrån. Jag tyckte inte om det kilformade ”aktertornet” så jag bröt bort stjärten igen
och limmade ihop halvorna en gång till. Stjärten monterades tillbaks på ägget och sedan limmades nosen på plats.
When I was looking in the scrap boxes, I found parts from an old Airfix and Fujimi helicopter in 1/72 scale and thought that it would look even more caricature like, if I mixed in the parts from them. I did not like the look of the wedge-shaped ”aft tower” so I
broke it off and the tail halves were glued together again. The tail was mounted back on the egg and then I glued the nose in place.

Sedan monterades Airfix luftintag på aktertornet och även sidokåporna från Fujimi
Then I assembled the Airfix air intakes on the aft tower and the side housings from Fujimi.

Den bortkapade toppen av ägget användes till att förlänga undersidan av bakkroppen. Jag bestämde mig för att använda Airfix cockpitglas för ett bredare utseende på nosen. Små plastbitar monterades för att stadga upp det hela.
The remainder from the top of the egg was used to extend the underside of the tail. I decided to use the Airfix cockpit glass for a wider look of the nose. Small plastic pieces was attached to steady the whole construction.

Jag tyckte att taket såg för platt ut så jag bestämde mig för att sänka det och fick skära bort mer av ägget. Då skulle det bli lite sluttande istället. Efter detta var det dags att fylla ut undertill i nosen för att jämna ut det bak till ägget.
I thought the roof was to flat so I decided to lower it so I cut away more of the egg side. This would make the roof slightly sloping instead. After that it was time for a filler for the nose to smooth out rearward towards the egg.

Nu började det verkligen se ut som helikopterversionen av Frankensteins monster med alla skarvar.
Now it really looked like the helicopter version of the Frankenstein’s monster with all the cuts and scars.

Mer små plastbitar användes för att göra bygget stabilare innan jag lade på Miliput för att fylla ut och få ett rundare utseende på alltihopa. Men vad har Barbapapa med detta att göra? Jo när jag spacklade och slipade undersidan tyckte jag att formen påminde om
Barbapapa så jag målade upp den så för att retas lite.
More small plastic pieces was used to make everything more stable before I put on Miliput to fill things out and have a rounder appearance of everything. But why did I mention Barbapapa in the beginning. Well while filling and sanding the lower side of the body it reminded me of Barbapapa so I painted it just to be annoying.

Efter en massa spackel ser den lite trevligare ut.
With all the putty on it’s looks nicer.
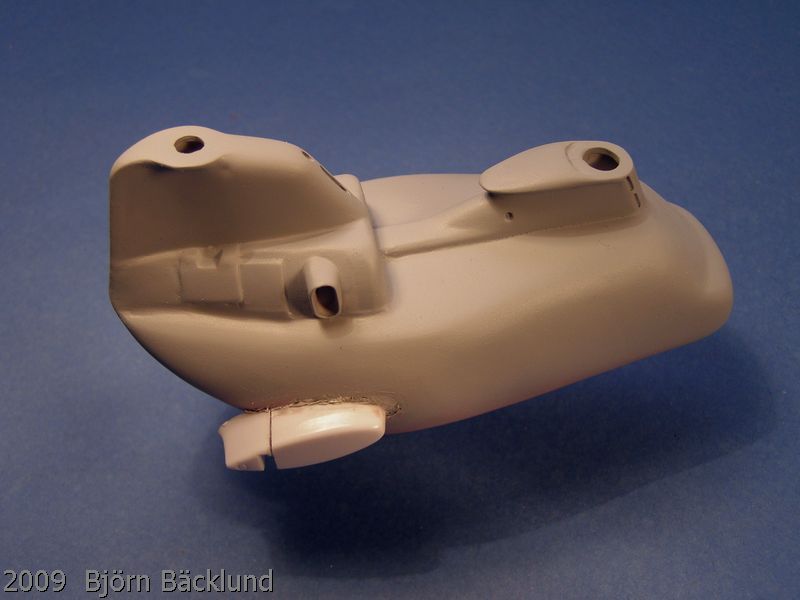
Bulorna vid bakre landningsställen är nästa steg.
The sponsons at the rear is next.

Jag börjar med delarna från Tamiyas byggsats.
I start with the parts from the Tamiya kit.

och lägger till delar från Airfix som kortats 10mm.
and adding parts from Airfix. They were shortened 10mm.