by Martin Waligorski
based on the discussion forum posting by Rickard Malmborg
Modern kits built and painted as per instructions reflect the original in pristine condition. In contrast, real world objects most often show the effect of aging and weathering. For example, surfaces become bleached, tarnished, painted, scuffed, corroded, knicked, scratched, stained, and otherwise modified under the influence of the environment. In the eyes of the viewer, these changes in appearance can enhance the value of the object since they emphasize its longevity and history. Weathering is a term associated to the process of making the model look like it has been used.
One area which especially calls for some subtle weathering are recessed joint and panel lines on the model. This is for the two main reasons. Firstly, in normal lightning conditions, such recesses on the original object would often create some shade and thus appear darker than the surrounding surface. Secondly, crevices is where dirt and grime would assemble and stay on the real object. Both of these effects need some help from the modeller to look ”right” in scale.
The obvious conclusion for many modellers is to pay special attention to the recessed panel lines on a model. The basic idea is that the model would look more lifelike if its panel lines appear darker than the overall finish.
There are many ways to enhance panel lines and other structural recesses on a scale model. The effect will vary depending on the technique used, but all of the described processes will have the effect of making the painted surface of the model look more alive. This article provides a basic review of the mostly used techniques.
Pre-shading
Pre-shading requires an airbrush. The idea is to paint shades along the panel lines first using a strong color shade so that they will still show through the final paint finish. In most cases modellers use black or dark grey to do this. Obviously, the kit itself must be moulded in a light neutral colour, otherwise the whole procedure must be pre-emptied by a few coats of light grey primer.
Later, when applying the actual camouflage finish to the model, care should be taken to apply the paint in thin coats, ensuring that the underlying shaded areas partially show through and affect the tone of the top colour.
Although it may sound tricky for the uninitiated, the whole routine is easily controllable with an airbrush, especially with the top-coat paint diluted to an extra thin consistency.
Overall, a straightforward and effective technique.
Post-shading
Airbrush is a tool of choice also for post-shading. Like tha nema implies, shades along panel lines are applied last — on top of the camouflage, much like real dirt or dust. It is recommended to try a darker shade of the camouflage color used, or a very diluted grey.
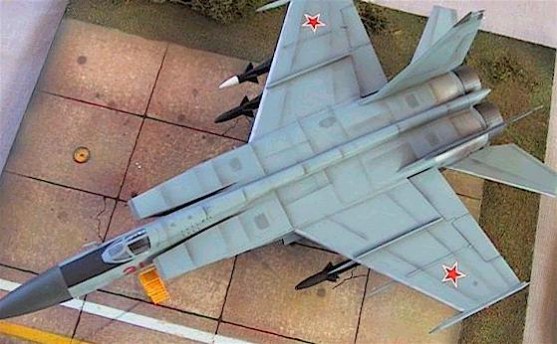
Some modellers use straight-edge paper masks along the shaded lines to emphasize the effect further. This might be useful for example on aircraft models to simulate the effects of air flow, or to emphasize sharp division line between adjacent panels.

Post-shading technique with straight-edge masks was used on this Mig-25 model to accentuate division lines between panels.
Good results with post-shading are easiest to obtain on top of single-color finishes.
Ink pens or pencils
This is a somewhat old but useful technique, popular in the early days when recessed panel lines were new in the industry. The idea is to draw along panel lines with a thin ink pen or pencil.
The effect with ink pens can easily be exaggerated. Therefore it is wiser in most situations to use grey rather than black ink to avoid too heavy contrast. However, you might want to accentuate some places more than the other, like lines around hatches, moveable surfaces on aircraft, an so on.
Using lead pencils is easier. Lines can be drawn along a ruler.  The base surface should be matt to provide enough ”tooth” for the pencil to leave a permanent trace.
Using lead pencils, consider their hardness. Hard ones (H range) will produce lines with shiny metallic look, while the soft variety (B range) will result in dark grey shade. Pencil lines must generally be airbrushed over with matt varnish, otherwise they will stand out because of the metallic shine of the graphite.
Pencils are great means of adding new panel lines where they do not exist on the model – being a less error-prone alternative to scribing.
Marker pens
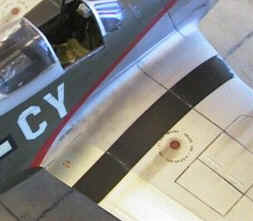
On the subject of pens, a water-based transluscent marker pen in grey color can also be used as a shading tool. Water-soluble markers work like watercolor – the more layers you apply, the darker the shade. The color can be further diluted by dipping the tip of the pen in water, and removed from the model by wiping off with the wet Q-tip. These qualities make it an ideal tool for applying subtle wash effects without the risk of exaggeration. I use textile marker pens for this purpose, of the type which features a soft but pointed brush-like tip. They have a benefit of being very controllable tools for achieving subtle effects: you simply draw on your weathering, and you don’t even need a ruler!
The entire process has been previously described on these pages in the article Fw 190 Inside Out (Searching for perfection with Revell’s Focke-Wulf Fw 190 A-8)
Wash
Basically this technique is about brushing on some thinner with tiny amount of color pigment mixed in. When you mix a wash, use a lot of thinner and just a little paint. The right proportion is a drop or two of paint in a spoonful of thinner. A wash of dark color – black, grey or brown – is a great way of simulating shades and dirt in places like hatches, wheels and grille of armoured vehicles. The same technique can be used to enhance all recessed panel lines.
A wash can be made with any sort of paint which has been sufficiently diluted so that the pigment can run freely to all crevices on the model. Here are some commonly used variants:
- Artists’ oils diluted with thinner or turpentine
- Just your ordinary hobby enamel paint, like Humbrol, extra diluted
- The same with acrylic hobby paint, like Tamiya. Diluted with water or Ajax glass washing liquid.
- Watercolor or acrylic paints diluted with water.
- Coffee or strong tea ( lovely dirty rust washes on matt surfaces )
- Ink diluted with water
A word of caution: in some combinations, wash solvent might attack the base paint. For example, if you use synthetic turpentine on top of the acrylic finish, it will almost certainly dissolve base paint coat. A good advice is that whatever you try for the first time, try it first on some piece of painted scrap plastic.
Also, a wash will adhere differently to gloss and matt surfaces. Sometimes it may be hard to make the wash stay where you want it on a glossy surface. In such case you will need to reapply it as many times as it’s needed, or paint the model with matt or semi-matt varnish before you apply the wash.
Dry pastels
Dry pastel chalks are commonly available in artists’ supply shops. The suitable type is dry pastel chalk, not crayons. Good stores will stock both sets and loose chalks in more shades that you will ever need.
For this technique to work, the model must be ready painted and varnished to a completely flat finish. Matt surface is necessary for the pastel pigment to adhere. The process itself is straightforward. First, a piece of pastel chalk is ground to powder. The powder can then be picked up by a dry paintbrush or Q-tip, and gently smeared onto the surface of the model.
A new coat of clear varnish will be required to seal off the pastel powder – otherwise you will sooner or later get a lovely set of fingerprints on your model!
Pastels work best for simulating exhaust stains, gun powder residue, and dirt in general.
Drybrushing
Drybrushing is a way to highlight raised details.  A brush with slightly stiff bristles is dipped in paint, then brushed off onto a piece of paper towel or cardboard until it is nearly empty. The brush can be then lightly scrubbed over the raised detail you want to highlight. The sharp edges of the detail engraving will tend to scrape what little paint is left on the brush onto the detail.
For drybrushing, you will normally require a lighter tone of the base paint your model. Dry-brushing will case raised edges to appear lighter. This looks natural, as raised objects often appear to catch more light also in the real world.
Dry brushing with silver/aluminum can be used to simulate paint chipped edges, for example around the edges of access panels, hatches, etc, or to highlight bolt/rivet detail.
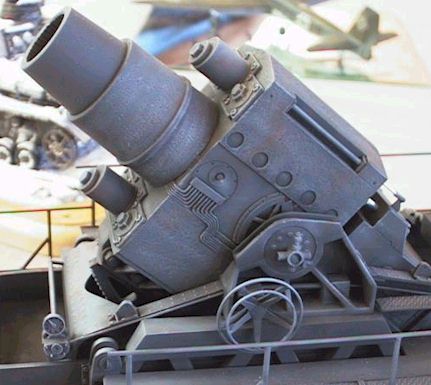
Proficient drybrushers also use this technique to color fine details such as emblems and scripts on cars, or the engraved numbers on dashboard/cockpit instruments etc. One of the most effective advanced uses of drybrushing is simulating surface texture of cast iron – shown on the adjacent picture of a German heavy mortar.
Summary
Weathering is perhaps the most artistic moment in model building. It takes a bit of practice to achieve the best results. One of the subtle decision points which require some experience is knowing how much weathering is enough? Have fun experimenting and remember – if it looks right, it is right!
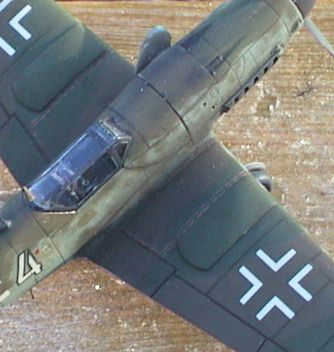
A combination of panel enhancement techniques described above make this single-tone grey finish look all else than dull. Weathering like this may require a few attempts to master.
This article was originally published in IPMS Stockholm Magazine in January 2001.
