Hawker Typhoon by Monogram in 1/48
by Frank Spahr

The Project
Oh yes, I am aware that there´s a far superior kit by Hasegawa of this massive ground attack fighter-bomber, but having recently revisited my attic stocks, I decided to build it the sooner the better. I found the copyright note on the inside of the wing, and in a way, it is an anniversary for this kit. I was still in primary school when these moulds were crafted.
Given the age, the kit is fairly well detailed, panel lines are raised but finely moulded and there is only a minimum of flash. The cockpit was in the most need of detailing. For this work I invested in a True Details photetched brass set . The decals were somewhat basic and seemed to be quite thick. So I bought an Aeromaster decal sheet as well, having the interesting situation that all three, the kit, the brass and the decals were equally priced. All in all, the total cost was about what a Hasegawa kit costs bar anything.
On second sight, I thought that building this Tiffy might be fun. I decided to go wherever my whimsy took me, since there is not much of an investment in the kit. If you bugger it, well, see my article on other cheapies.
The Aeromaster sheet leaves you the choice between six individual planes, all Mk. IBs, two of them with the earlier style canopy and the remaining with the later bubble canopy, which is included in the kit.
Leafing through the choices showed me that Aeromaster chose some interesting subjects, and only watching out for small print in decals no. 24 & 25 made me arrive at a decision. I can appreciate the kind of character expressed by these lines.

Moreover, the plane featured several locomotive silhouettes as kill marks, a nice tiger on the starboard side, yellow spinner, black-and-white Typhoon ID-stripes (more about those later) plus invasion stripes. That heralded a masking orgy …
Before beginning, a few words about this significant aircraft:
History
Hawker Typhoon, designed by Sir Sydney Camm, was intended as a successor to the Hurricane as an interceptor with improved performance. It also came to be looked upon as a counterpart for the new German fighter, the Fw 190. In the end, the Spitfire was successfully improved to counter the 190, and the characteristics of the Typhoon – very rugged construction, but comparatively poor performance at higher altitudes – led to it’s career in the roles of low-level-interception and ground-attack.
Having mostly overcome teething troubles caused by the Napier Sabre engine, Typhoons did a hard job in defending Britain from German raiders, prepared the Invasion by low-level attacks, amongst others on the German radar chain and V-1 launch sites. Further on they accompanied the Allied troops from the beachheads of Normandy right into Germany, taking part in the Battle of Falaise, operation Market Garden and the Battle Of The Bulge.
Soon after VE day, the Typhoon force was put out of service and mostly scrapped.
Versions
The first production variant was the Typhoon Mk. IA, outwardly  mostly similar to the prototype, with the exception of two small rear windows deleted. This left the pilot with very little rearward view. Armament consisted of twelve .303″ calibre Browning machine guns, since the belt feeds for the intended cannon armament were in short supply. When this was remedied, the cannon-armed Typhoons were designated Mk. IB. They had an armament of four 20mm Hispano cannon protruding from the wings with faired barrels. Moreover, the IB had a redesigned canopy with lighter braces that improved overall view. During the production run, this was replaced by a bubble type canopy, as also happened with the Mustang, the Thunderbolt and the Spitfire.
The Typhoon´s most formidable weapon became the 27 kg rocket projectiles. Eight of them could be carried on the earlier, heavier, and more drag-inducing Mk I or the lighter Mk II rocket rails.
The building

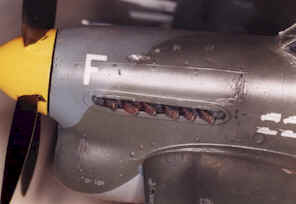
I started things the destructive way: chop away anything that doesn´t fit and see how you can replace it. That rather soon did away with the kit exhausts. I replaced them with self-made exhausts from brass tubing, mounted on sheet styrene (not glued, but heated and forced into the plastic). The stubs were painted with Testors burnt metal and dry-brushed with rust, then attached from the inside the fuselage with some styrene serving as spacing.

Many pics in the Squadron In Action booklet show Typhoons parked with fully extended flaps. I cut away the kit ones, intending first to thin down and re-atach them, but I soon realized it was better to replace the parts with sheet styrene. This was cut and cut and bent to form with th additon of 1x1mm styrene ribs.
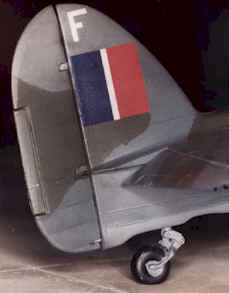
I also cut away the rudder and elevators, filled the space between the halves with dental resin and sanded it to shape. I attached the control surfaces at slightly-off angles.

I also removed the cowling flap and replaced it by a sheet part, mounted at an angle as I have seen seen on many photos.
The gun barrels were detailed with sections of hypodermic needles that were melt into the barrel tip with the aid of a spirit burner, a technique which I find easier than gluing for most brass parts.

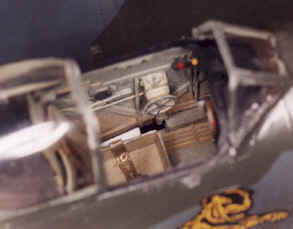
I installed the True Details cockpit following the instruction. By the way, with my limited True Details experience, it seems to me that they make better instruction sheets than etched brass, whereas Eduard produces incredibly fine, detailed and flimsy brass but saves on the instructions. I added some tubing and wiring of my own, painted the interior an appropriate shade of green and weathered with some pastel chalks. I mixed that Interior Green myself after RAF wreckage parts I saw and photographed in a Danish museum at Bangsbogard near Frederikshavn.
Concerning the eternal question of which type of instrument panel is best, I am ever more inclined to advocate the Eduard method with holes and a slide film glued behind them. I used the True Details panel anyway and drybrushed it in silver.
Once I lay my hands on a punch and die set, I will try the following method I saw described in a German modelling magazine: Photocopy the instrument decal (when there is one, in this case there wasn´t), mount it on a piece of styrene sheet, punch the dials and mount the decal on another piece of sheet behind it. You get depth plus finely detailed dials all in one.
Painting
I had to do some sanding and filling, doing the latter mostly with dental wax. The paint job was conducted as follows:
- A coat of Testors aluminum metalizer (so that the bare metal may shine through in the weathering process)
- A coat of grey-green primer – in the hope that it will keep the paint from parting from the metalizer upon the slightest provocation
- White on all areas that would receive stripes later on.
- Black for the invasion and Typhoon recognition stripes
- Yellow for the wing leading edge recognition stripes.
- Sky for the fuselage band that replaces the rearmost white invasion stripe (!).
- Medium Sea Grey for the lower surfaces.
- The common RAF pattern of Dark Green and Ocean Grey for the upper surfaces.
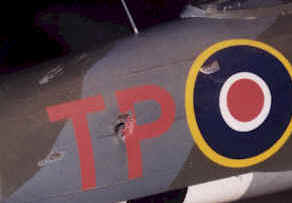
Typhoons had their own recognition stripes – those were direly needed because of the Typhoon´s resemblance to an Fw 190 making it a possible victim of anything friendly that could fire – Spitfires, AA guns and the like. After some unsuccessful initial trials, the black-and-white-system was adopted, standing between the early war British fighter recognition schme of a half black, half white and the D-Day stripes. This plane had both.
 All masking was done with Parafilm M. All paint apart from the metalizers was Xtracolor, and it worked fine as always. It leaves a nice, glossy surface that is perfectly suited for applying decals. I also used masks for the camouflage scheme, since most photos I know show pretty sharp demarcation lines.
Finals
Next came preparation for the decals.
I am convinced (and I tried some methods) that a high gloss surface gives the best results with virtually all decal types. So I was especially delighted when a friend brought me a bottle of Future floor wax from the US. Having asked Martin Waligorski how to work with it (thanks for the advice, Martin), I filled the stuff into my airbrush and began, but, well, I must have done something wrong, and the stuff did not form an even surface. Glancing sadly over all those bumps and dimples, I let the plane rest for a while, sanded the surface lightly with #1000 paper and recoated it with Testors clear gloss.
That worked fine, and I applied the decals using Microset and Microsol. The decals are a bit on the thicker side and did not react all too well to the softeners. So far, I have had the best results with some decals from Italeri kits, notably with the PBJ (naval B-25) and the EA-6A Intruder. My worst experience was with Hasegawa decals for the Fw 190 A-5. They were so thin and fragile they tore upon a fly´s cough.
I sealed the decals with gloss varnish again, then with a coat of matt varnish.
After some days of rest, I removed the masking from the canopy and started with the weathering. I used my X-Acto knife to chip away the paint on worn areas into varying depth, sometimes to the primer, sometimes to the metal coat. The edges of the propeller blades were given a very thin rubbing of steel metalizer. For the rest, I used pastel chalks.
Several ”damaged” areas had been thinned out with a carbide bur from the inside before assembly and were cautiously damaged by X-Acto action from the outside.
Conclusion
The effect of my detailing efforts can be judged from the following pictures.
As always, I saw some flaws only when the pics were ready (Murphy’s laws again). I will surely correct the paint job on the spinner and in some other places. What still remains to be done is exchanging the rockets with aftermarket parts. For the time being, I used the kit assemblies, but didn´t glue them. So this kit isn´t finished yet, strictly speaking …

Resources
- Base kit: Monogram 1/48 Typhoon Mk. IB
- True details Typhoon cockpit detail set #26014
- Aeromaster decal set Storms in the Sky 48-059

This article was 2000.originally published in IPMS Stockholm Magazine in December 1999.