by Bob Laskodi
C’mon people, rigging a WWI airplane is not rocket science, and takes no more modelling skill than filling a seam! You can do this! Rigging Truthfully, rigging an airplane is not difficult. It is time consuming and tedious.
First…
First you need a plan. You should have a rigging plan in place before you even start construction of the model so you can pre-drill holes and plan for obstruction problems. Study the instructions carefully and figure out where every rigging wire needs to go. Each kit will be different and will have a different plan. I use three basic rigging techniques (and all were used in this model):
- Straight wire/stretched sprue
- “Pull tight rigging”
- “Shrink rigging”
You can use different rigging techniques on he same model, as shown here.
Stretched sprue
The straight wire/stretched sprue method is very simple, just cut the wire to length and glue in place with white glue. Take a pair of dividers and measure the approximate length needed, dry fit in place, and trim to fit. I use straight wire of .006 diameter exclusively as I can’t stretch sprue worth a darn.
I really try to avoid this method since it is not very strong and wire is relatively expensive, however most modellers I know use this method exclusively. I’d still fall back on it when it would not be easy to use the “pull tight” or “shrink” methods. Typically, it would be on the landing gear bracing.
Pull-tight rigging
My favourite rigging method is the “pull tight” technique. I use .006-fishing line painted silver and use a ”through-hole” rigging method with a “start hole” and “exit hole”.
Most of the time my “start hole” is used on the top wing and “exit hole” is used for the bottom wing so these holes are not easily viewed. I basically drill a hole with an #80 bit (the smallest, about .0135) only part way through the wing (“start hole”) and all the way through the wing at each of my rigging exit points.
Holes for rigging wires were drilled out prior to assembly and painting. Note that the start holes run only half-way through the wing profile, thereby leaving the upper side of the wing intact.
I try to minimize the number of exit points and run as many lines through them when possible. 
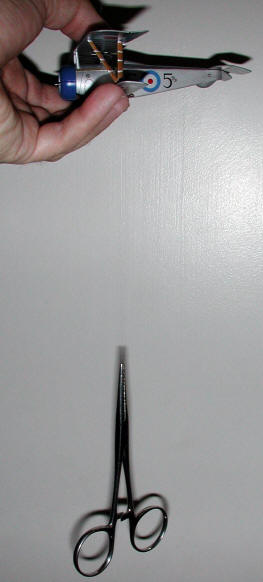
After securing one end of the wire to a partially drilled hole (not all the way through) (“start hole”) with superglue, I then run the line out through the “exit hole”. I weight the end of the line with a pair of hemostats to pull tight by letting it hang down (see picture) and apply a small drop of superglue to secure it. Let cure for about 30 seconds and then unhook the hemostats and proceed to the next wire. Repeat until done!
After letting the entire rigging cure for at least an hour, I then take a brand new Exacto blade and trim flush with the wing surface. I then sand the exit holes flush and apply a spot of touch-up paint to cover. I also will sometimes cover the exit holes with small pieces of scrap P/E brass.
I also use this method for running the control wires to the elevators/ailerons. In that case there is no “exit hole” just pull the wire tight against the control horn and secure with superglue. That’s it, simple, cheap, and fast. In addition, it also provides a small amount of structural integrity.
I can rig a whole airplane in under an hour! Can’t do that with wire or stretched sprue!
Shrink rigging
The “shrink” method is used when it would not be practical to use the “pull tight method”.
This technique also uses a “start hole” drilled partially through the object and an “exit hole” drilled all the way through. In this case though, the “exit hole” typically enters the fuselage. Again, painted fishing line is used and the end is secured to the start hole with superglue. The wire is then threaded through the “exit hole” and left as tight as possible. There will be some slack in the wire, but try to minimize it as much as possible. Secure the “exit hole” wire with superglue and let cure for about an hour.
Now for the miracle of modern science, to tighten the wire! Fishing line has the same property as stretched sprue in that if heat is applied it will shrink. I use a soldering iron as my heat source since it provides a consistent amount of heat in a small area. Others use cigarettes, incense sticks, burned out match tip, heated nail, or any other scheme that can provide heat to a small area. Using the heated tip of my soldering iron, I wave the tip gently under the wire (careful, don’t stay in one place too long or you will melt it!) and it magically tightens.
Experiment with all three of these rigging techniques to find the one(s) that best serve your modelling needs.
This article was originally published in IPMS Stockholm Magazine in August 2004.


