Swedish version of the German Leopard II
by Kjell Svensson
English translation by Anders Isaksson
History
The Leopard II was developed in the seventies after the joint US/German effort to develop a new main battle tank, the MBT-70, was brought to a halt and the project cancelled. The new main battle tank was developed by Krauss-Maffei AG, now Krauss-Maffei Wegmann (KMW), of München, Germany. The first production Leopards were delivered to the German Army in 1979. Over 3000 were produced. The tank is in service with the armies of Austria, Denmark, Germany, the Netherlands, Switzerland, Sweden and Spain.
Stridsvagn 121 is the Swedish designation for the Leopard II, of which Sweden received 160 as the first part of an agreement on purchasing the new Leopard Improved (Stridsvagn 122).
The vehicles arrived in Sweden in 1994. The tanks originate form different production series (losung) meaning that there were (and are) a number of external differences between specimen from each series. Among the vehicles shipped to Sweden there are vehicles from losung 1 manufactured in 1979 up to losung 5, which rolled off the assembly line in 1987.
A Strv 121 on board Scania tank transporter.
Paint Scheme
Swedish Leos are sometimes painted in a single Dark Green shade but often finished in a standard Army three-color camouflage of Black, Dark Green and Light Green. The running gear is always painted overall Dark Green.
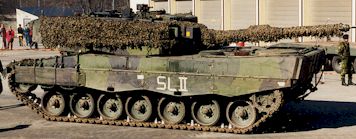
Finding suitable marking decals for your Strv 121 model can be a problem, but fortunately there are not many used on the real tank. Apart from the id number only the stowage bins are marked. They feature the numbers 1, 2 and 3. On exercises the radio call sign (e.g. GB, SD etc.) is made from tape and often applied to the sides of the tank.
A realistic alternative is to cover the tank with camouflage netting or pine boughs but this means that little of this cool paintwork will be left visible, which can be a bit ungratifying.
A Strv 121 with the call sign markings. Often used on exercises, the markings are made of tape. The markings on this particular tank reads SL II (representing the call sign Sigurd Ludvig 2). Also of note is the camouflage netting covering the turret.
Strv 121 in Detail
If you would like to model the Swedish vehicle, be aware that there are  external differences in detail and equipment between the Strv 121 and Bundeswehr Leos. I’ll try to point out all the necessary modifications using some close-up photographs and Italeri Leopard II kit as a reference.
It should be noted that the Italeri kit is not 100% correct and there are a few details that were changed during the modernization roundup done to all vehicles between 1995 and 1998.
Quoted part numbers refer to parts of the kit.
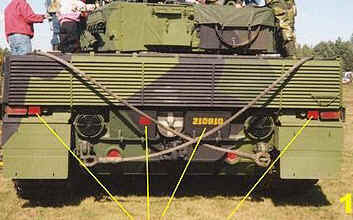
The rear plate (part A47) of the Italrei Leopard kit has two circle-shaped reflectors that should be changed to rectangular, measuring 6 x 4 mm in 35th scale. An extra reflector on the left box should be added. A mounting plate for the id number is located on the right. The numbers are printed in yellow and range from 210801 to 210960.
Photo: Kjell Svensson
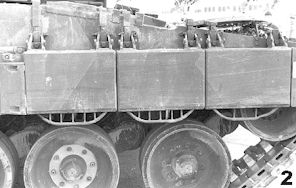 On the right side (part C23) each of the second and third handles should have three small pieces of plasic rod added. The full-size device prevents one from climbing the vehicle with the risk of injury, should the driver simultaneously open his hatch.
Photo: Kjell Svensson
A notch should be cut out from both of the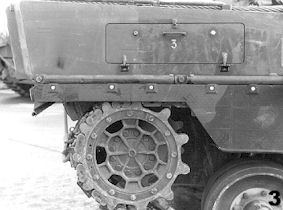 rear side plates (parts C22 and C23). This prevents snow and mud from clogging the drive sprocket.
Photo: Kjell Svensson
 On the left front fender a few spare parts for the tracks are missing. They should be located between the rear view mirror and the ice cleats (parts B44). The same goes for the right front fender.
Photo: Kjell Svensson
The front needs three white reflectors, one on 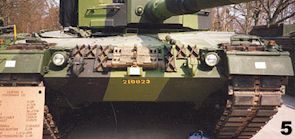 each fender and one placed in the middle on a small bracket in front of part B37. A bracket for the id number plate should also be added to the right fender. As with the rear plate, identification numbers are painted in yellow and range from 210801 till 210960.
Photo: Kjell Svensson
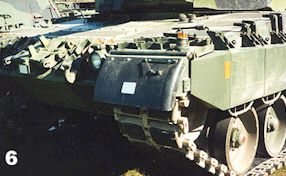 If you want you can substitute both front fenders and use the Swedish variant show here. These fenders have a more rounded appearance and the real ones are made of rubber. At the moment of writing, this particular modification has not yet been performed on all vehicles.
Photo: Kjell Svensson
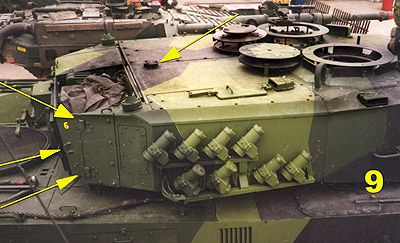
Some more work will be required on the turret. The left side 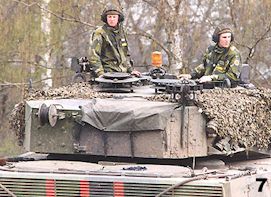 of part C49 has a small box that needs to be removed, and four brackets attached where the box was located.
By the way, the molded content in the stowage bin has never looked good on Italeri’s kit. The nice thing is that this previously open bin in real life now is covered by a plastic tarpaulin, hiding what is inside. This cover is permanently fastened to the turret roof. The other end is tied down on the side and to the rear of the stowage bin.
The modeller who wants to put in a little more work should cut away the molded rolled tarps and make new walls inside the bin from plasticard. The bin is then filled with the correct stuff, a model 201 jerry can for drinking water, neatly rolled tarpaulin, length of rope and a few other accessories. The wading trunk (parts B75 and B76) is not used in Sweden. I haven’t spotted the original German cable drum (parts B77 and B78) on any of the Swedish vehicles. Swedish Leopards feature a narrow variant show here, but most often the cable drum is not used at all. Photo: Kjell Svensson
The antennae (parts B79) are exchanged for new 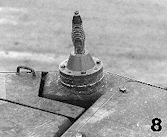 mounts and new rods. Length of the mounts are 7 mm and the antennas are 60 mm – in 1/35th scale, of course.
Photo: Kjell Svensson
On the rear of the turret roof (part C47) is a small circle-shaped lid where the wind-meter was located on the Leopards from losung 1. As the Swedish Army uses vehicles from both losung 1 and later series, the lid can remain on the roof or be removed. The two hinges and a lifting hook is missing on the side of the box (see also picture 12 below).
Photo: Kjell Svensson
On the other side of the turret there is a 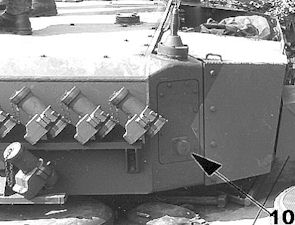 circle-shaped plug on the lid below the antenna mount.
Photo: Kjell Svensson
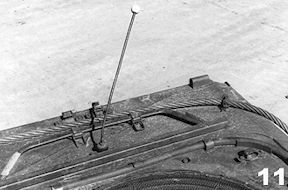 A driver’s visual aid is mounted on the rear right side of the hull. The knob is often white, sometimes red.
Photo: Kjell Svensson
The object shaped as a half-circle is part of of the small wading 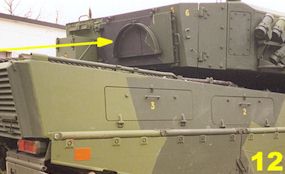 equipment and is usually located on the rear right side of the turret. The correct 1/35th scale dimensions are approximately 17 mm wide and 9 mm high.
Photo: Kjell Svensson
This article was originally published in IPMS Stockholm Magazine in August 2000.


