Modelling the classic M113 out of the box – almost
by Anders Isaksson
photos by Mattias Linde
History
In January 1956 the U.S. Army initiated a program to design and build a lightweight APC (Armoured Personnel Carrier) for armour and infantry units. The new APC had to be amphibious and capable of air-drop operations as well as having good cross-country mobility and be acceptable to multiple functions.
In September of 1956 the successful contender , the ordnance division of FMC Corp, was contracted to build the new APC which used aluminium for armour protection. The first production M113 rolled of the assembly lines in June 1960.
The first M113s arrived in Vietnam in 1962. Initially nick-named ”The Green Dragon” by the enemy, the M113 served in all areas of Vietnam throughout the war and was to become one of the most successful armoured vehicles of all time.
Construction
The Tamiya kit of the M113 has been around for quite a while and during the years it has been released in a number of different versions. The ACAV (Armored Cavalry Assault Vehicle) version was first produced by Tamiya in the latter half of the 80s. With a full interior including the engine and a number of accessories as well as three decent figures the kit offers many possibilities.
The kit was built almost straight from the box, with the only detailing being done to the drivers instrument panel. A new panel was cut from plasticard and new dial faces were drilled out. A few knobs and buttons were added from sliced styrene rod. The decals for the dials were glued to the back end of the new instrument panel, and the panel was glued in front of the driver.
The remaining interior was assembled without any further modifications. I decided to omit the engine since I was not going to display the engine hatch in the open position. The finished interior was airbrushed in matt white mixed with a little green using Tamiya colors. Details like the driver’s periscopes and the seats were picked out with various colors and the area recieved a dark wash to add shadows and bring out detail. The floor and lower sides were then ”metalized” using Humbrol aluminium applied with a fine brush.
With everything painted the hull was closed up by attaching the roof. Alongside the construction of the interior I had completed all other subassemblies including the turret, and I was now ready to paint the exterior.
Paint and decals
The entire model was airbrushed with a mix of Tamiya olive drab and black. When the paint was completely dry it was followed with a dark wash and dry-brushing with lighter shades of Humbrol colors to bring out detail.
As with my previous M48A3 Patton (described in part I) the markings were taken from Verlinden’s Vietnam Armor dry transfer set.
Weathering
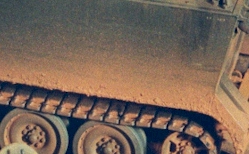
Weathering was done in a similar manner as with the previously mentioned  M48A3, so I will not describe this process again. However, after airbrushing the red brown color on the lower parts of the model I dipped a small brush in the original Tamiya olive drab and used it to streak along the sides to represent scratches from travelling through the dense jungle.
Final details
The running gear was finished by painting the tires and attaching the wheels to the hull. The tracks were painted and attached around the running gear. To achieve the correct sag I used thin black thread to tie the upper and lower parts of the tracks together. By running the threads behind the wheels I managed to conceal them almost completely. This operation was a bit tricky and took a great deal of time, but in the end it was well woth the effort.
I finally made an antenna from stretched sprue and glued it to the antenna mount just aft of the driver’s hatch. But the antenna is not visible in these pictures since it came off during transportation of the model.
The base
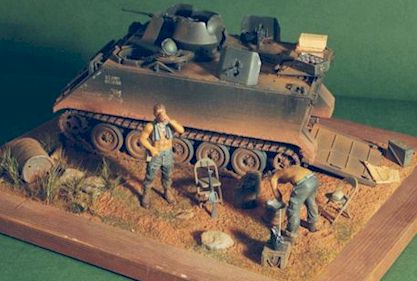
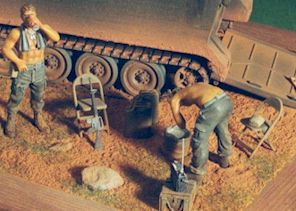
To display my M113 I decided to make a simple diorama. The base is simply a picture frame of suitable size with the groundwork made from plaster of paris. While the plaster was still wet the base was covered with ground coffee to add a little structure. A few stones and an oil barrel was pressed into the ground work to add a few details and the M113 was used to male impressions behind its final position on the base. When completely dried, the base was painted with a mix Tamiya colors producing a shade of red brown.
After the paint had dried I attached a mix of elk hair and  static grass with white glue. The grass was then dry-brushed using various green colors. The crew members are resin figures from the Verlinden range. The accessories on and around the M113 are a combination of items included with the kit and stuff from various Verlinden sets. The chairs are from the set of table and chairs supplied with the Tamiya M577 Command Post. This simple furniture is also included with a separate figure set from Tamiya.
The driver’s helmet resting on top of the driver’s hatch is a metal item from the german firm J. Peddinghaus (I believe it is no longer in business). I used pieces of fine metal wire to detaile the helmset with a microphone and a spiral cord, running from the helmet to the instrument panel inside the M113.
All accessories were painted in appropiate colors using mostly Humbrol enamels. I attached the M113 and all accessories to the base using white glue. In the same manner as with my M48A3, I finished the display by applying a generous amount of red brown pastel powder. This simulates the typical dusty environment evident in photographs from Vietnam as well as visually tying everything together.
This article was originally published in IPMS Stockholm Magazine in December 2000.
