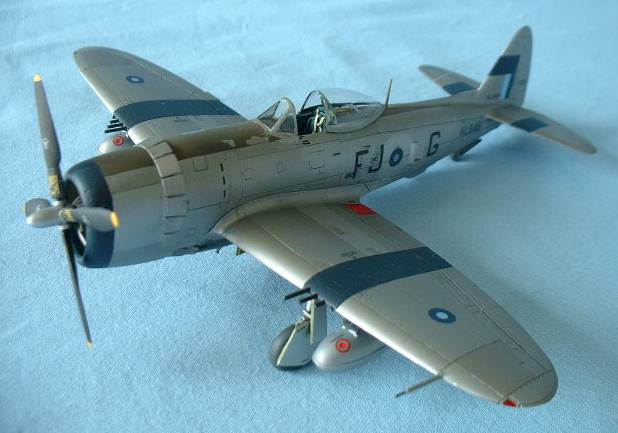
Thunderbolt II from 261 Sqn RAF
by Leonard Thomson

This is the Revell (Germany) kit of the P-47D Thunderbolt in 1/72 scale. I had heard very good reports about this kit from Drewe Manton, and spotted one in the shops for something like £2.99. Very cheap. I have been impressed with Revell’s recent releases in this scale, but had never been too interested in the Thunderbolt. An idea started to form in my head.
Most of my modelling is of RAF subjects, they used Thunderbolts in Burma, and I wanted to try Alclad II for the first time. Seemed like a good opportunity.
The kit
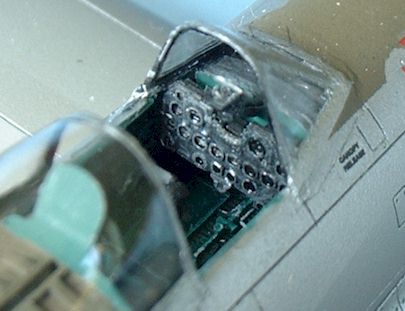
The kit is beautifully engineered and fits together like a glove.  I added an Aries cockpit set, which is aimed at the Hasegawa T’bolt, but it suited this kit nicely. A Squadron Clear Vax canopy was also used. In my opinion, vac form canopies should be used on all models!
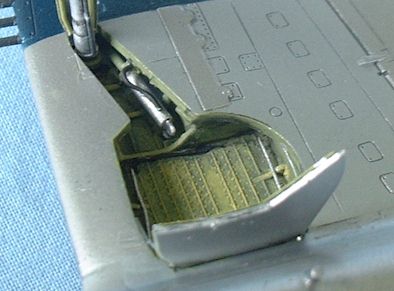
Construction was pretty quick, due to the good fit, and only a little filler was used here and there, at the wing roots etc. I added a little detail to the wheel wells, to better represent the retraction jacks.
Painting
As I said, I wanted to use Alclad II for this model so I looked around for a suitable scheme. KL849, FJ*G is featured in Camouflage and Markings, RAF Fighters 1945-1950 by Paul Lucas. This attracted me, as it had the brighter circles where the original roundels had been removed, and the paint for the anti-glare panel was peeling a little.
The whole model was primed using Halfords grey acrylic primer, sprayed straight from the can. This took me about 3 minutes. A very light rub down with 12000 grit from Micromesh left the whole model as smooth as silk. Now on to the Alclad II.
I loaded the airbrush with Alclad II Aluminium and sprayed the whole airframe. It was dry in about 5 minutes. And it is rock hard. A little black enamel was mixed with the remaining aluminium, and this was sprayed on selected panels after masking with Tamiya masking tape. A little more masking, and some other panels were sprayed with white aluminium, again from Alclad II. This also included the circles where the old roundels would have been. This whole process probably took me 2 hours maximum. That is how good Alclad II is.
The anti-glare panel was sprayed using Humbrol 155 Olive Drab. A little more masking and the theatre bands could be sprayed. These were in the same dark blue as used in the roundels and fin flash. This was mixed by eye using Xtracolor Oxford Blue and a little black.
A little touching up, the wheel bays were painted and it was ready for decalling. The roundels came from a Hasegawa Spitfire VIII kit (these had the correct shades of blue), the code letters were made from those in a Fujimi Spitfire XIV kit. They were the correct size and style, but the wrong letters! A little ”cutting and pasting” and I had the letters I needed. Stencils came from the kit.

And finally…
Another experiment! I wanted to try a sludge wash to highlight the panel lines. Some grey ”sludge” was mixed from washing up liquid, a little water, and a couple drops of Citadel colour acrylic paint. This was applied over all the panel lines. Twenty minutes later, it was wiped of using some paper kitchen towel. Looked fine!
The undercarriage, wing pylons and drop tanks were added. A final spray with Xtracolor matt varnish toned down the glossy decals and theatre bands.
This model featured two techniques that were new to me. Alclad II and the sludge wash. Both worked fine and I am now looking around for some other natural metal aircraft. Now, where did I put that Super Sabre……..?

This article was originally published in IPMS Stockholm Magazine in August 2003.