Getting in terms with Airfix 1/72 Buccaneer kit
by Jan Forsgren
photos by Jan Forsgren and Martin Waligorski

The mighty Buccaneer was an aircraft so tough as to be apparently forged from solid steel. Now almost 10 years out of service, it still ranks as the best-loved post-war attack aircraft in the UK. So much so that on the night when the Bucc was officially retired in March 1994, one of the officers in the Officers Mess RAF Lossiemouth pointed out that ”The only replacement for a Buccaneer is a Buccaneer”.
The Buccaneer, designed to fulfil a Royal Navy requirement for a long-range carrier-based attack aircraft, first entered service in July 1962. From its first operational missions to its last in 1994, it remained one of the fastest low-level aircraft in any service. This was due to its high-thrust engine, small wings and extremely robust construction which gained it many nicknames such as the Brick.
Back in the early 1960s, the first production Buccaneer S.1s were underpowered, criticized and unappreciated by their users. Only three years later, with the arrival of Spey-engined S.2s, the full potential of the airframe was revealed.
The Royal Navy’s requirement for a bomber to fly subsonic, under-the-radar missions to penetrate enemy airspace without detection proved successful and the Bucc better suited for that role than the Mirage III or F-4.
In the 1970s, a political decision was made to retire Royal Navy’s large carriers and fixed-wing aircraft. The S.2 examples were progressively transferred to shore bases and to the Royal Air Force. The RAF re-designated some of the aircraft as S.2As and later, after more modifications, as S.2Bs. A small number of new production S.2Bs were also built, beginning in early 1970, and all earlier unmodified Buccs were updated and redesignated S.2C and S.2D.
Meanwhile, the Buccaneer Mk 50 version had been supplied to the South African Air Force (SAAF) in 1965, these fitted with a supplementary twin-chamber rocket motor in the aft fuselage to facilitate takeoffs from hot, high-altitude airfields. It is in South Africa that the Buccaneer first saw combat in the 1970s, but it was not until the very end of its career that the Buccaneer was able to prove itself in the service of its home country. In 1991, after almost 30 years of service, Operation Granby in 1991 was the last active deployment of the Blackburn Buccaneer. Thirteen modernised RAF Buccaneer S Mk.2B aircraft fought very successfully from Bahrain for the duration of the Gulf War.
Construction notes
Here is a little information about construction and painting of my Airfix Buccaneer.
By contemporary standards, the Airfix kit has many shortcomings, both in mould quality and accuracy. The kit appeared in the late 1980s and is of ”typical Airfix quality” that would have been excellent in the 1970s, but ranks as below average today. The panel lines are raised and detail is nothing to write home about. The decals are better replaced. One advantage of the kit is that it includes a healthy dose of underwing stores in the form of wing tanks, optional parts for radar guided Martels, TV guided Martels, Sea Eagles and a data link pod. It also includes optional parts for the flush or bulged bomb bay door. Some of the shapes in the kit are inaccurate, the most notable being the engine air intakes and nose.
I started with correcting the shape of the nose radome. This was carefully measured from available photographs and its shape modified, using a lot of Milliput.
I cut off the wing tips, then the flaps to remodel them in dropped position. The wing and flap geometry turned out to be very complicated, something that in my mind is typical for British aircraft design :). After repositioning the flying surfaces, the wing tips were reattached.
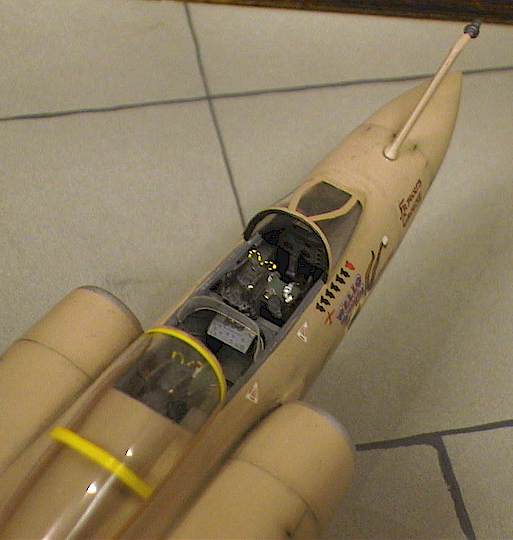
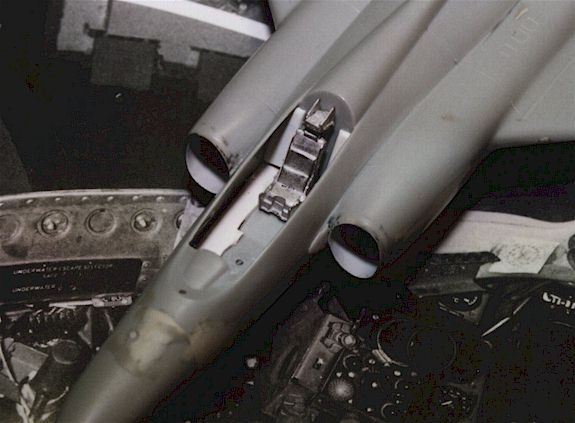
Before joining the fuselage halves, I added inner engine detail. The inlet air duct was built from plasticard, ending with a brass turbine from Airwaves. This can be seen to some degree on the photo below. Also, note that the thick intake lips of the kit were shaved off and replaced with new ones shaped from plasticard.

Airfix has modelled the upper rear end of the fuselage as a separate piece. This is unfortunate as there is no positive location for this part and there is a risk for the entire empennage to end up off-centre. I resorted to homemade location tabs and multiple dry-fitting before committing myself to permanent assembly of this section.

I have sanded off and rescribed all the panel lines. Actually, I do advocate restraint in panel scribing for the best scale effect. Contrary to the current trend in kit manufacturing, all the panel lines on 1/72 aircraft should really be very thin and without any prominent groove. My solution is to scribe lines very thinly, and resort to painting/shading techniques to emphasize them. Some of the panel lines have also been drawn by pencil after the paint application.
When assembling the main airframe components – fuselage with wings or stabilizers – I use a simple jig to ensure correct alignment. On a hard surface, I fix the fuselage in an exactly upright position, mate the wigs/stabilizers and then support them with a paint jar or other suitable item with just the right size to ensure that all angles are straight. I then let the model rest until the glue has cured. Adjusting the jig can take some time, so I never use superglue for wings and stabilizers but rather resort to liquid poly with its comfortably long bonding time. It is OK to use Mk. II Eyeball to check if the angles are correct, but take your time, the saddest thing in aircraft modelling is to get a perfectly painted model only to discover that the components are skewed!

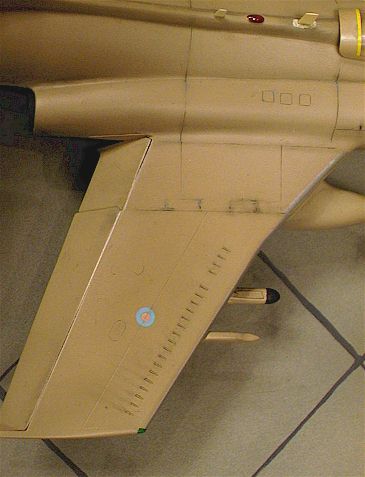
Still at the tail area, I have replaced thick trailing edge of the rudder with a strip of thin plasticard blended in with Milliput. I have also modified both the forward and rear cones at the top of the fin.
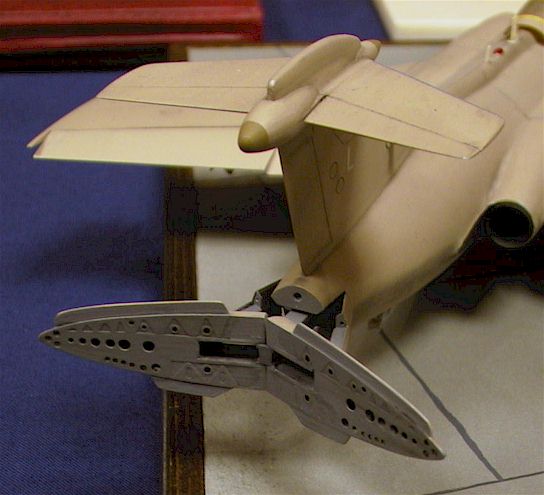
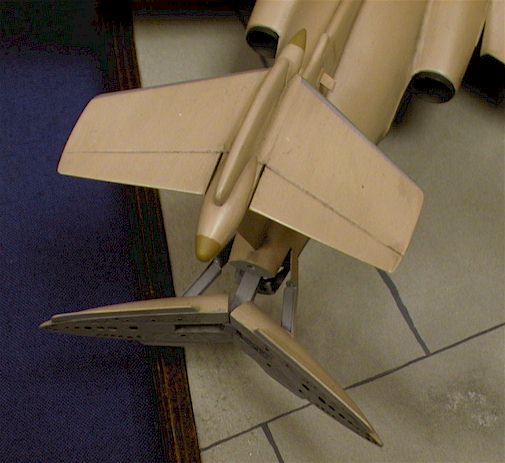
The prominent split-tail air brake was modelled open. The details of this area were plain wrong in the kit, so I scratchbuilt the inner structure and hydraulics using mostly copper plate and plasticard.
The tail hook and its supporting braces were white metal parts from Aeroclub.
As for the cooling air inlet at the base of the fin, this was reshaped to its correct form, and the adjacent blade antennae added from thin plasticard.
Only now my attention turned to the cockpit. In a model like this, cockpit interior can be built from the outside and this is what I did. Guided by photographs of the real thing, I furnished the interior with plastic bits with the addition of a few photoetched panels.
One thing that should be noted with the Buccaneer is that the forward seat is offset a little to port, while the rear seat is offset to starboard. The seats themselves were white metal items from Aeroclub. I completed them with straps added from strips of lead foil (Bordeaux 1993) and Reheat buckles.

More antennae were added around the airframe, all scratchbuilt items. The camera blister under the nose was also scratchbuilt. In-flight refuelling probe was another white metal part from Aeroclub.
Now was the time for the final bits. Airfix chunky undercarriage parts were replaced with white metal ones from Aeroclub. Wheel well interior had to be scratchbuilt and detailed. The undercarriage covers were replaced with new ones made from 0,2 mm brass plate.
Underwing pylons were also scratchbuilt. AS for the stores, I have chosen the following configuration often seen on Gulf War missions:
- Station 1: AN/ALQ-101(V)-10 electronic countermeasures pod
- Station 2: External fuel tank
- Station 3: AN/ASQ-153 Pave Spike laser designator
- Station 4: AIM-9L Sidewinder
Additionally, there are radar warning pods under each wing.

Painting
I finished my model as a Gulf War machine, RAF Buccaneer S.2B serial no. XX885/L nicknamed Hello Sailor/Caroline. It also carried the name Famous Grouse after a well-known Whisky brand. On the nose there is also a strike mission tally and a silhouette of an An-12 Cub, one of two such aircraft that this Buccaneer pointed with a Pave Spike and that were bombed by another Bucc during a mission on Shayka Mayhar on February 27, 1991. The decals for this machine came from Modeldecal.

For the painting, I used Xtracolor enamels. Xtracolor paints are glossy, so the decals were applied directly on the paint coat. Then followed the multiple layers of Johnson Klear which were gently sanded after each application. This procedure was repeated until no trace of decal film edges could longer be seen on the model.
Having the basic paint scheme ready, I applied a wash of black-brown oil colour mixed with turpentine, applied by brush over the entire model. As mentioned before, the wash added emphasis to panel lines and more variety to surface in general. After some 10 minutes the excess wash was wiped off with a soft rag. This step allows precise control over the degree of weathering left on the model – in this case, quite plenty of it!
The ”dirt” was now sealed with a layer of Tamiya Clear acrylics mixed with Tamiya Flat Base. Additional touches were made with dry pastel chalk applied by soft brush in the areas that required more dirt.
Now was the time for the final layer of matt varnish, but this time it was applied by carefully wiping the surface with a cotton rag soaked with varnish, to get that right degree of shine.
Conclusion
What can I say? It’s been lot of work, but what an aircraft!

This article was originally published in IPMS Stockholm Magazine in December 2003.