Hasegawa 1/700 Japanese battleship Ise
by Anders Lindgren

The Imperial Japanese Navy had a tradition of producing innovative battleship designs which were the equal, or better, of many of their foreign contemporaries. When Nagato was commisioned in 1920, she was probably the most powerful battleship in the World, a supremacy gained again twenty years later by the gargantuan Yamato. The battleship was a predominant element of all naval tactics of the time and Japan’s older capital ships, too, had been successively modernized during the interwar period, most of them staying fully capable for a modern naval war.
The revolutionary development of naval aviation, of course, changed all that, so that battleships in general were reduced to the role of anti-aircraft screening for the aircraft carriers, with their demise as a consequence.
One of the older battleships in the Japanese fleet, Ise was dating back to 1917. She was the first of the class of two ships, the other one, Hyuga, being commissioned a year later. The class was an development of the previous Fuso and Yamashiro battleships.

Ise and Hyuga stayed in service throughout the interwar period, being extensively modernized. During Ises major refit between 1935 and 1937, her hull was extended 37 feet, deck armour more than doubled in thickness, and provisions made for three Nakajima Type 95 spotter seaplanes. Her main armament was actually reduced from the initial 12 x 14″ in six turrets to 8 x 14″ in four turrets, but the elevation of the new guns was increased for improved range. The ship also received all-new boilers and turbines, raising the top speed from 23 to 25 knots despite increase in displacement.
In such condition, Ise entered the war in the Pacific. Her career was somewhat undistinguished. She was a part of 2nd Battleship division that took part in the invasion of the Aleutians, that’s all I could find about her combat record.
Following the disastrous loss of four carriers during the Battle of Midway, the two perfectly good battleships were converted into hybrid battleship/seaplane carriers, with a flight deck aft replacing the two aft turrets
Judged from today’s point of view, it was an act of sheer desperation. In their new roles the ships were practically useless, neither being practical carriers nor effective combat ships. At the same time they were docked for conversion they could have made the difference in the sea battles around the Solomon Islands, against South Dakota and. Because of severe shortages of skilled air crews and fuel they also never received their air groups. In their only sortie in this configuration, the Battle of Leyte Gulf, both ships were part of the decoy force and had no aircraft on board.
Immobilized in the naval base of Kure, Japan, Ise and Hyuga were finally sunk on July 28,1945 through air attacks.
The model
The kit is kind of old-new. Years ago, Hasegawa had issued a 1/700 Ise in the 1944 configuration with aft flight deck. The kit was one of the company’s earlier efforts in the Waterline Series and had a number of omissions and inaccuracies.
Recently, the same basic kit has been revised to represent a full battleship as it looked in 1941. The one-piece hull seems to be the same, but the rest of the kit is largely new. It is still not a highly detailed model, lacking surface detail on turret tops and the decks. On the other hand, it does not have any fit problems, no gaps, no putty or filling being required. And for the detail, any model in this scale would benefit from extra detail, so why bother?
Construction notes
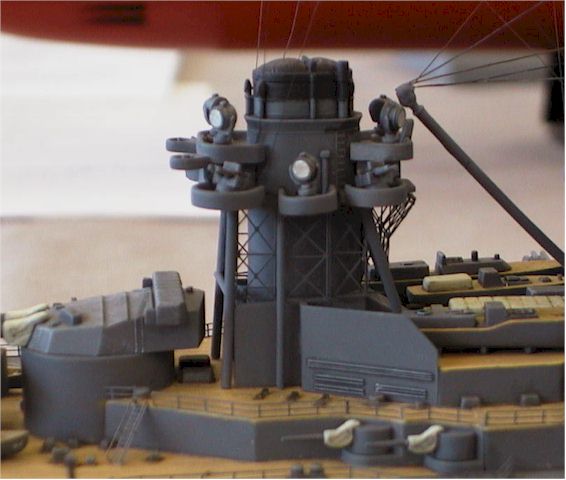
What you see on the pictures is the Hasegawa kit with the addition of photo etched (PE) details from Tom’s Modelworks and some black sprue that was used for the rigging. The good thing with the PE from Tom’s Modelworks is that it is quite affordable. The details might not be as good as some of the more expensive competition but in this scale you will almost need a microscope to notice the difference.

The construction started with assembling the hull. The hull consists of four parts: two deck pieces and two halves that make the hull. After gluing the pieces together some Milliput was used to fill the seams. The Milliput was carefully applied and most of the excess was removed with water before the putty had hardened. The most problematic area is the seam between the hull and the deck. Great care must be taken when sanding this seam so the raised divisions between the deck planks are not sanded away.
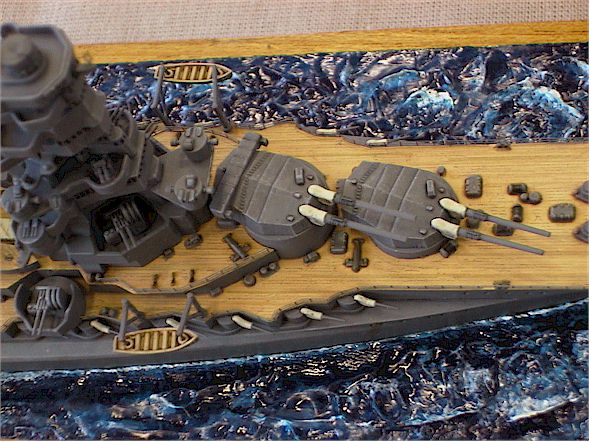
Next the superstructures and main artillery was assembled. Some putty was needed at the superstructure.
Each of the major subassemblies was then painted with a paint mixture that is supposed to be close to Kure grey. Kure grey was a colour carried by the Japanese warships built at the Kure shipyard. The paint used was Gunze acrylic.
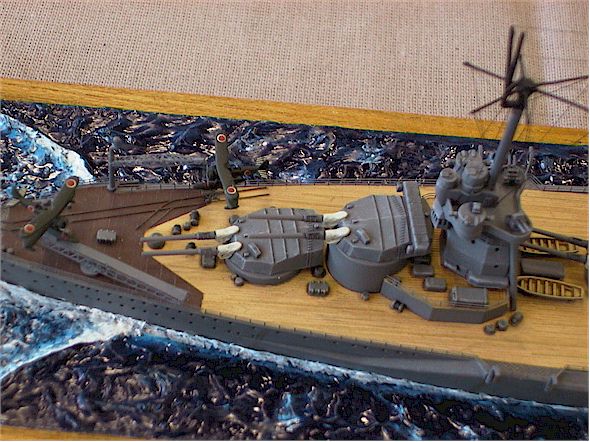
The deck of the ship was the next challenge. Work started here with masking the ship sides and parts on the deck that were supposed to be grey. In order to be able to follow the deck outlining, thin strips of Tamiya masking tape was cut and applied. When the outline of the deck was masked it was a simple job to cover the rest of the grey parts with tape. After this tedious masking it was time to load the airbrush with some paint. Five different shades of wood colour were mixed. The painting started with spraying the lightest shade over the deck. When the paint had dried thin strips of masking tape was used to cover individual planks. After applying the tape the next shade was sprayed. The process of applying thin strips of tape was repeated. This was done for all five shades of deck colour. When all is dry the tape strips are removed. The deck was then sprayed with a thin mist of the lightest shade to decrease the contrast between the planks. Now the raised divisions between the planks made it easy to use a blunt pencil to make the divisions grey. Finally the deck was flat coated.

When the deck was done, the ship sub assemblies were put together and the model was starting to look like a mighty Japanese battle ship. The small parts such as guns and boats were left to be applied later.
The whole ship was washed with oil colour and dry-brushed to bring out all the details. Some oil- and rust-streaks was applied to get a worn look of the ship. Rust would for example typically run from the anchor opening and down.
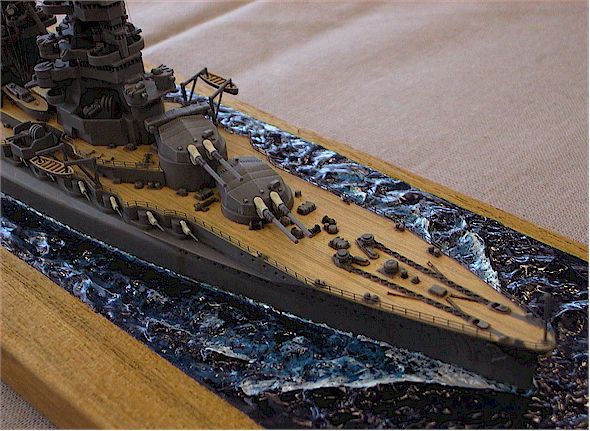
Modelling water base
It was now time to prepare the base of the model. The base would make handling of the model easier when all the small pieces and rigging would be applied. A piece of teak wood was cut to appropriate size. Then the edges were masked off with tape and the top surface of the piece painted blue. When the paint was dry the ship was secured to the base with two screws.
Next phase was to make the waves. I made some extensive research to get an idea of different methods of making waves and also of how the sea looks around a large ship underway. An acrylic gel (Liquitex) was used to build the waves. The gel was applied with a flat brush. A large sharp wave was built up around the bow of the ship. When the gel was dry it was pained with a blue-green colour. To paint the foam lighter shades of the blue-green sea colour was used. Several shades were used to get realistic transitions from darker to lighter areas of the foam. The tip of the wave was sparingly painted with pure white. Foam/waves were painted around the bow and at the stern of the ship.
The fiddly bits
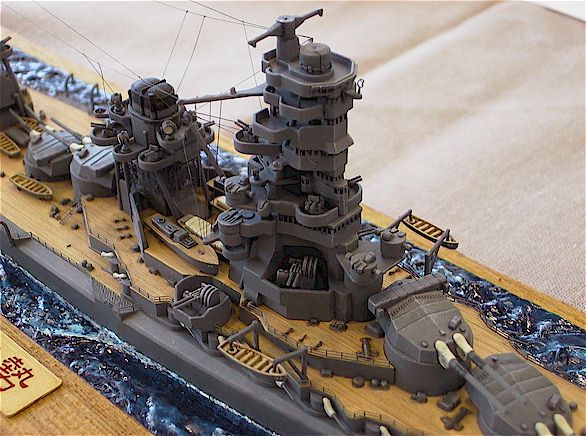
When the ship was secured to the base it was time for the PE. Before cutting the pieces from the fret they where painted with airbrush to get a thin layer of paint that did not hide any of the details.
The railing was applied in small sections with one or two bends as a maximum. The pieces were put in place and adjusted with a pair of tweezers and cocktail sticks. When a piece was in place, it was affixed with superglue carefully applied with a cocktail stick
The trickiest part was the catapult assembly at the stern. Several attempts had to be made before the thing finally looked straight.
Some of the paint on the etched parts had been worn off during the assembly due to all the handling. Some touch-up was made with a small paintbrush. A cote of clear flat varnish was airbrushed to cover up traces of glue that was left after gluing the PE.

Rigging
The last part of the construction was to rig the ship. For this black stretched sprue was used. The sprue was pulled to very thin dimensions and then attached with superglue. In order to tighten the rigs. I used the classic method of a just blown out wooden match held close to the taut line. I found that this method requires some training and several rigging detail had to be remade when too much heat melted the thin lines.
When all the rigging was done the last task was to apply the Japanese flag at the stern of the ship. The flag was a decal that was applied to some aluminium folio to be able to get the look of a moving flag.
The project was a very enjoyable experience that can be recommended to any modeller to get a brake from all the airplanes and tanks.

This article was originally published in IPMS Stockholm Magazine in November 2003.