by Tim Campbell
The P-51 – in all its variants – has long been a favourite aircraft of mine, ever since building the 1/72 Matchbox P-51D Dooleybird as a boy. I had watched a wonderful display by a P-51A at last year’s Paris/Le Bourget airshow, and when I saw the Accurate Miniatures P-51A at a sale price, I just had to give the kit a go.
The kit is well packaged in a very solid box, the level of detail on the grey sprues being very high. No flash was to be found anywhere, and the parts are very finely moulded. The cockpit detail is very good and the wing trailing edges are nice and thin.
Accurate Miniatures include two different sets of tyres – unweighted and weighted. Before I go off on a rant about the over-bulged resin wheels so widely available (yes ”True” Details, that includes you), I have to say that the Accurate Miniatures offerings are very restrained. What is good is that the wheel centres are provided separately – painting integral wheel/tyre parts is not my favourite exercise.
A few things to note are that the flaps are moulded as part of the wing, the radiator exit flap is moulded (closed) as part of the fuselage and the tailwheel doors are moulded in the open position. It’s not a big job to cut these parts out and re-position them if you need to. I didn’t bother.
The box contains a false bottom where the transparencies (”Moulded with Pride in Korea”, no less!) and decals reside – a good idea. The instruction sheet graphics are not up to the standard of others, but the text instructions are excellent, giving plenty of detailed advice and warning of possible problems. Just follow them – they do give you some handy hints.
I was passing through the wonderful Luchvaart Hobby Shop (near Amsterdam’s Schiphol airport) and I picked up the Verlinden Engine set (#1260) and the True Details cockpit set (#48485) for this kit. I thought the engine would look interesting and I assumed the cockpit would be a vast improvement over the kit’s offering. This was to be my first resin detail set, and while the Verlinden engine set is good, the True Details cockpit set does not honestly offer much over and above that included in the kit – but one lives and learns. The sidewalls and floor offer a slightly higher level of detail – but nothing you could not add yourself if you had some basic reference materials. The resin radio (or batteries, I can’t remember) rack is beautifully moulded, even down to the wiring, but these extra details are completely invisible once you have added the armour plated seatback and the seat.
Cockpit and fuselage:
The first task was to separate the resin sidewall detail from its thin backing sheet – easily done by sanding off the excess. I painted the sidewalls interior green (initially with a mix of Tamiya yellow and green but found Revell’s enamel SM360 to be suitable after a dark wash and drybrushing) and picked out the details in black and silver. I carefully drybrushed the sidewalls and floor with silver just to get a ”worn” look.
The instrument panel is provided as a transparency, and after painting around the dials (which really wasn’t very difficult), I applied the supplied instrument decal to the rear of the panel. I added a piece of white plastic card behind the decal as it did not match up perfectly with the dial faces in the panel. The result is perfectly acceptable, the white card filling in the occasional tiny gap where the decal did not match up.
As I was adding the engine, the next task was to remove the lip from around the front of the fuselage, and to sand away some of the excess plastic from the interior of the lower wing section. Verlinden say to remove 3mm from the forward part of the wheelwell bulge, but I cannot see this being achievable unless you wish to go right through to the wheelwells! I removed as much as I dared (until I could see light through the plastic) and then thinned down the resin firewall at the same time. This turned out to be a good enough fit – not perfect, but satisfactory.
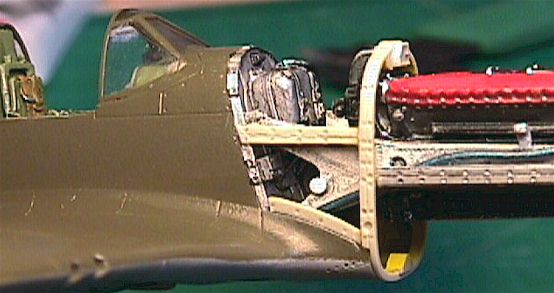
After attaching the battery and radio racks, instrument panel,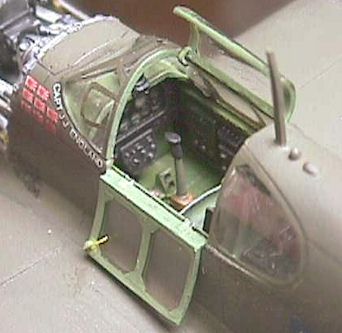 radiator exit flap insert, sidewalls and tailwheel to the starboard fuselage side (each time dryfitting the port fuselage side to ensure that everything was level) it was time to attach the floor. Having dryfitted the fuselage, it was clear that if I attached the floor to the starboard sidewall it would not be centred in the fuselage, so I elected to leave it out at this point.
After attaching the fuselage halves (with Humbrol Precision poly cement and CA for the resin parts), I attached the cockpit floor from below with CA. This did not line up very well with the pins on the sidewall (which I knew anyway) but was satisfactory. The firewall was then attached to the front with CA. Just a touch of filler was required here and there on the fuselage seams (I used Tipp-Ex correction fluid here) to blend the two halves together.
Wings
The next stage was to attach the wings. Don’t forget to open the holes for the drop tank pylon – I’m sure you can guess who didn’t! I made the holes later after looking at drawings and photos. The upper wing sections were a little warped, but once glued to the lower section (with Humbrol’s Precision Poly for the leading edges and plenty of Revell’s liquid cement for the trailing edges), they were perfectly fine, although there was a slight wing root gap on the starboard side. This could possibly be due to me not aligning the fuselage and lower wings correctly, but I can’t see where I went wrong. A little bit of Tamiya filler solved the problem anyway.
The radiator inlet was then attached. This is the worst-fitting part of the kit, but a bit of patience and some filler will give good results. Next time I would shim this part with thin styrene sheet as I think it would mean less sanding and rescribing.
Engine
After attaching the tailplanes, sanding down seam lines and rescribing damaged panel lines, I turned my attention to the engine, the painting of which was aided by Martin Waligorski’s very useful walkaround photos in the November 1999 release of the IPMS Stockholm magazine. The Verlinden engine set is nicely done, and just requires some careful cutting and sanding to remove the pieces from their casting plugs. The exhaust stacks were badly moulded with large resin blobs (which would have been impossible to remove) but a quick e-mail to Verlinden resulted in me receiving perfect replacements within the week (good customer service). Please excuse the MB Mk16 seat in the foreground – I thought I had taken a photo of the engine on its own!
I replaced the moulded hoses and tubing with 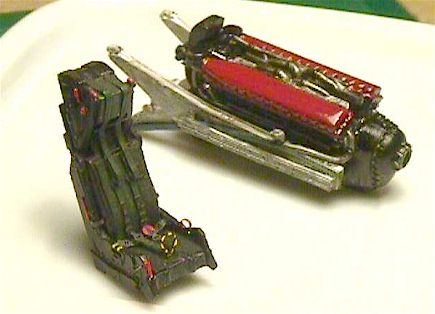 insulated and bare electrical wire as the separation along the bearers was not brilliant, and replacement was easier than repair! After painting the engine and its bearers, I decided not to attach this to the firewall just yet – it would be easier to paint the model in its current state. I’m not too happy with either the colour or the placement of the exhaust stacks, but I just couldn’t get them right, and in the end I decided to leave them as they are.
I suppose I should have done more research and added lots more tubing and cabling to the lower engine bay, but I’m very happy with the result, having stayed within my limitations on this model. I consider myself an average model maker (with average skills and patience) and previous experience has shown me that I get more pleasure from my completed kits than the ones that have ended up ”stagnant” for months for want of an exact colour reference or the correct photo-etched seatbelt.
The windscreen, canopy and fuselage side windows were attached with white glue, as I wanted to remove them afterwards for painting and cutting to display an open canopy. The transparencies were masked with Maskol.
Painting
I didn’t need to worry about masking the tailwheel too carefully as I dropped the model, causing this part to break off! I just stuffed the tailwheel opening and the main gearwells with wet tissue paper. After undercoating with a grey car primer, the upper surfaces were airbrushed in Olive Drab (Tamiya XF-62) with the lower surfaces in Neutral Grey (XF-53). I used a card mask along the fuselage sides (lifted slightly off the surface to give a slightly feathered demarcation) and Tamiya masking tape for the wings.
I have to be honest here and admit to a ”bad paint day”. I initially painted the model with Lifecolor acrylics, but wasn’t happy with the olive drab tone, so I decided to spray a very light coat of the darker Tamiya olive drab over this. After this was all dry, I had to lightly wet-sand in a couple of places where I had overdone it with the paint. However, the Tamiya paint (thinned with isopropyl alcohol) must have reacted with the Lifecolor paint (thinned with their own alcohol-free thinner) as the latter started coming off in sheets!
After plenty of swearing, I protected the cockpit with tissue paper and sprayed the model with oven cleaner. After a night in a plastic bag, I was able to scrub the paint off with a toothbrush, and I started again, this time with Tamiya acrylics. I have since tried Lifecolor acrylics thinned with alcohol (for a faster drying time) and have had very good results, but it would appear they don’t like mixing with other acrylics containing alcohol unless you also thin the Lifecolor with alcohol.
Once the paint was dry, I removed the transparencies, peeled off the Maskol and re-masked with Bare-Metal Foil (which I find gives excellent results) before spraying the frames. That might all sound a bit daft, but I get very hit and miss results when painting canopies still attached to aircraft! Once the paint was dry, the masking foil was removed and any excess adhesive was removed with a cotton bud moistened in WD-40. The windscreen and rear side windows were dipped in Klir before being reattached with Humbrol’s Clearfix (my preference for transparencies) and any slight gaps were filled with thick paint.
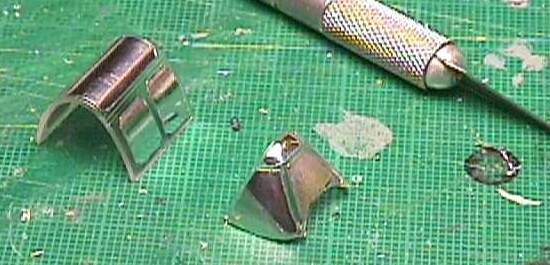
The centre canopy section was cut so that I could position it open (as I had seen in the ”In Action” book). Since this would now be very visible, I added internal framing with strips of clear decal sheet painted interior green. Once dry, this was dipped in Klir as well and put aside until the final stage.
I should perhaps have paid more attention to Accurate Miniatures paint recommendations (Tamiya XF58 and XF-20) rather than the Tamiya paint description, as the colours I used now seem a little dark, but there you go. I’m afraid I’m not too fanatical about exact colour matching and there seem to be numerous interpretations of ”Olive Drab” and ”Neutral Grey” anyway. Accurate Miniatures include a superb paint cross-reference chart (including FS numbers, ModelMaster, Humbrol, Gunze Sangyo, Tamiya and Polly S), so there should be no problem in matching the colours to your paint of choice.
The box art shows a silver band at the top of the tail/rudder, but this does not show up in the Squadron/Signal ”P-51 In Action” book photos of the same aircraft, so I ignored it. Also, the photo of a completed model on the base of the box shows the spinner to be aluminium in colour (rather than the yellow of the box art). The exact colour was hard to determine from the monochrome photos in the book but I preferred yellow in this case.
The wingtip lights were painted silver before applying 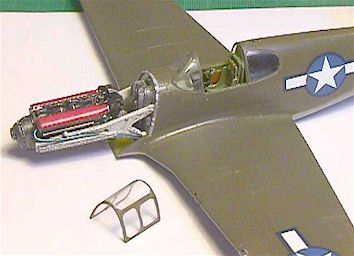 clear red and green to give a better representation than the solid colours suggested in the instructions. I was planning to drill the underwing formation lights out and fill the holes with Clearfix before painting the inside silver and then the outside in transparent colours, but this doesn’t work too well when you have already attached the upper and lower wing sections!
After airbrushing with a couple of coats of Klear, I applied the decals. These went on beautifully, with the usual applications of MicroSet/Sol helping them bed down nicely. I sliced through the decals along the panel lines and this worked better than I expected for the weathering later on.
The next step was to attach the engine to the firewall and add the structural struts to this area. I drilled out the holes in the firewall a bit to give me a little room to correctly align the engine and then attached it with gel type cyanoacrylate.
Weathering
I debated with myself about whether to attempt this step, as I am officially rubbish at weathering, but somehow things turned out OK in the end. First I applied a wash (just some very dirty enamel thinners rather than anything I mixed up specially) to the panel lines, with heavy application in the gear bays. The trick seems to be to go slowly, waiting for each application to dry. If it needs more, then go over it again.
After I had cleaned off any excess with white spirit, the model 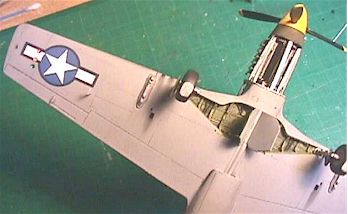 was sprayed with Humbrol’s Mattcote. I then gave the whole airframe a good rub down with kitchen towel. My aim here was just to get rid of the dead flat appearance, which doesn’t look right to me on model kits. This worked, giving a slight sheen, but also wore away a little of the paint on panel line edges and raised-detail areas, just enough to give the aircraft that ”used” look. This was pure luck but I would do it again next time! I applied pastel dust with a cotton bud (Q-tip) to the exhaust area (brown and black) and cannon traces (black).
Verlinden supply only the front and upper cowling sections. I left the kit like this, but I may make the lower engine panels from plastic card (heated and then stretched over a former made from the kit parts) or from aluminium cut from a drink can. This would at least cover my lack of extra detail.
I drilled a hole in the engine front, added some Contrail tube to the spinner and push-fitted this onto the engine.
I had to attach the tailwheel again, so I drilled out the tailwheel mount (still glued inside the fuselage) and replaced the two broken struts with Evergreen rod and brass wire.
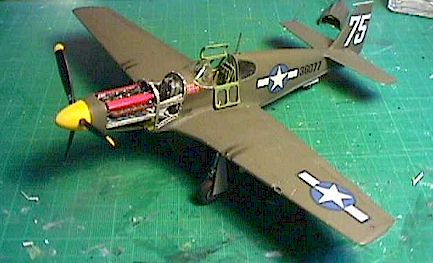
The main undercarriage (oleos covered with Bare-metal foil), gear doors, supports and other ancillaries were added – canopy handle from stretched sprue, top hinges from brass wire and port hinges from masking tape, and the model was done (although I haven’t added the antenna wire in this photo). I left the fuel tanks off as I liked the ”cleaner” look.
All in all a very well made and accurate kit, requiring very little of the modeller to obtain a decent result (a good job in my case!). My only real complaint about this kit is that the flaps are not supplied as separate parts (to allow positioning them dropped) and that the radiator exit flap is moulded as part of the fuselage.
This was a very enjoyable model to make, and I think Accurate Miniatures have done a fine job. Were I to make another P-51A, I wouldn’t bother with the cockpit detail set – just add the seatbelts of your choice to the kit seat (or get a seat from Cutting Edge or Ultracast), and make the armour plate from plastic card.
This article was originally published in IPMS Stockholm Magazine in December 2000.
