Academy 1/72 Republic P-47D Thunderbolt
by Martin Waligorski

Working with one of the recent updates of this site I noticed to my dismay that although I constantly keep writing articles for this magazine, it’s been over three years since I have shown any of my own models on these pages! Please be assured that I do build models, and occasionally get a few of them finished, too…
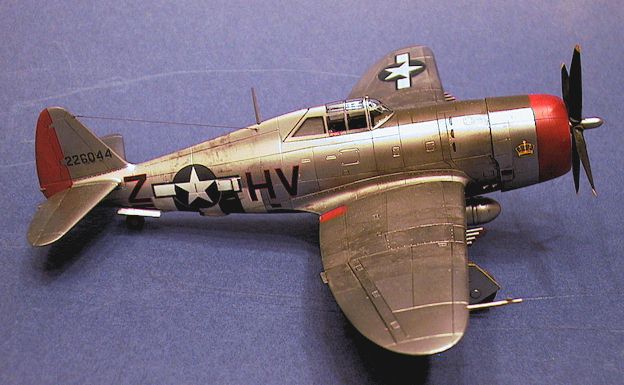
My latest finished project has been a P-47, and since this is perhaps the last occasion to impress anyone with a non-Tamiya 1/72 Thunderbolt, I’d better give it a go… so here it is: my Academy “Razorback” P-47D.

A little bit of history
I won’t tire you with quoting general historical background of the P-47, this has been done so well by many writers before me. However, I cannot resist a short comment on the origin of the nickname Jug. Opinions vary as for where that name comes from. The most prevailing opinion seems to be that this is a short form of Juggernaut. This word comes from India and is one of the names under which Vishnu, in his incarnation as Krishna, is worshiped by the Hindus. In Western languages, it found its use as a poetic metaphor of an overwhelming, advancing force that crushes everything in its path. Supposedly crews gave that name to the P-47 in admiration to its strength and ruggedness.
It’s a romantic story, but I find this explanation very hard to believe. Juggernaut? This could possibly be an invention of some war correspondent or a post-war publicist. What bothers me is that a word such as this doesn’t seem to match the Army mentality – either today or that of the 1940s. It is enough to browse through other nicknames of US aircraft to see that they were always picked from an entirely different vocabulary: Iron Dog (P-39), Son of a Bitch 2nd Class (SB2C), Spam Can (P-51), Turkey (TBF), Baltimore Whore (B-26) or Pinball (RP-63).
Greg Goebel of the Air Vectors states that the nickname Jug was not in common use during the war and that the only nicknames the P-47 had during the conflict were ”Bolt” or ”T-Bolt”. That may be true. Another explanation is that the Jug refers to the aircraft’s resemblance to a beer jug commonly seen in English pubs. Squadron’s P-47 in Action claim that it’s the aluminium milk jug that triggered the association. Perhaps we will never know for sure, but my two cents’ worth is that it never had anything to do with Hindu mythology!

Is this a Jaggernaut? Doesn’t look that to me… a milk jug, maybe.
The kit
In the Gentlemen’s scale of 1/72 we have been blessed with a good choice of P-47 kits. By now you have probably heard of Tamiya’s latest offering, which I expect to be no less than formidable. Other alternatives out there are Hasegawa (both Razorback and Bubbletop), Academy (ditto), Revell (late P-47D/M) and Italeri (P-47N).
The Hasegawa kits are the oldest and simplest of the lot, being one of the first tools of that company featuring recessed panel detail. They are generally correct in outline, even though the panel lines have are drawn in a grossly simplified manner – if you care about such things. These kits are also very easy to build. One problem is that only the Curtiss propeller is provided in the box; another is the empty cockpit and wheel wells crying for some additional detail. The bubbletop version’s canopy is also incorrect in shape, lacking the characteristic ”collar” of the lower frame.
The Academy kit is like Hasegawa on steroids – the same shapes, sizes and parts breakdown, but a lot more interior and surface detail, plus more options – a choice of Curtiss and Hamilton Standard propellers, solid or spoked wheels, underwing stores. In summary, excellent kits that are a pleasure to put together. Common to all Academy and Hasegawa kits is one dimensional error, albeit easy to correct, main undercarriage legs which are way too long.
In 1999, Revell of Germany released their own rendition of a bubbletop P-47, the kit allowing building a late D or M models with the broad-chord Curtiss propeller. This kit has been widely praised ever since for its great engineering, the level and finesse of detail which is superior to all other Thunderbolt kits in this scale. Unfortunately, it suffers from visible dimensional errors: too deep belly, too long tail and too narrow fuselage which combined make the finished model look out of proportion.
Recent addition to the family of P-47 kits is Italeri’s P-47N, but I cannot comment on it since I haven’t yet seen it.
Picking the subject
I like the look of Razorback T-Bolt over the bubbletop version, if for no other reason than for that magnificent Art Deco windscreen. The choice of kit was therefore simple – Academy.

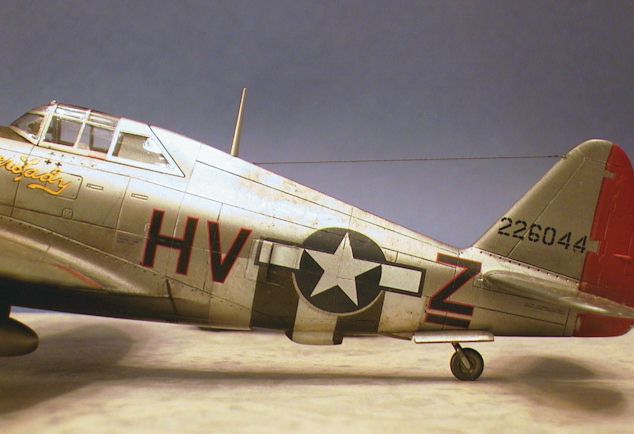
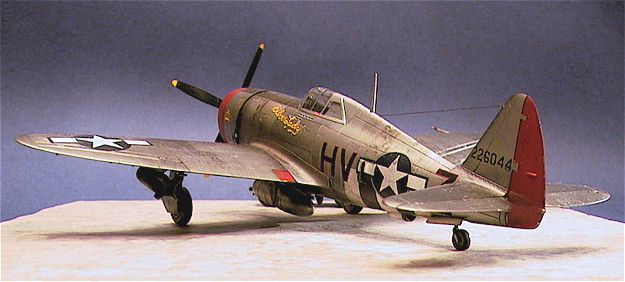
My subject is a P-47D-22-RE ser.no. 42-26044 Silver Lady from 61st Fighter Squadron, 56th Fighter Group, operating from Boxted in England during 1944. This aircraft was originally assigned to major Leslie Smith, but during the summer of 1944 it was flown by an array of other pilots, including James M. Jure, Robert J. Rankin, Cleon E. Thomton, Witold Lanowski and Mike Gladych.
For painting, I thought that a natural metal finish combined with colourful markings would look presentable, and having discovered the scheme of Silver Lady on the Techmod decal sheet I thought it would fit the bill well.
Every modelling project is as an opportunity to learn something new, and this time, my main interest was combining natural metal finish with weathering techniques. Because of this I opted to leave all the resin accessories for the P-47 I had lying in my drawer for later to facilitate quick construction of the model.
I even decided to go one step further and limit myself purely to the out-of-the-box build so that I could enter the model in OOTB categories in contests. In the event it proved more difficult than I thought – I guess it is not quite my way of doing modelling. The only additions, most of the times permitted by contest rules, were the photoetched seat belts, antenna wire and puttied-over wheel hubs. In the end I also couldn’t resist sanding down the ”flat” on the tyres somewhat to reflect the weight of a loaded aircraft.
Building the model
All I can say is that the Academy kit is outstanding in terms of fit. In mere two evenings I had the airframe of the model assembled and polished for the metal coat, a personal record! The only minor flaws of the moulding were the slight sink marks on the lower surface of the flaps, but nothing really serious so they could be left as they were.

The only minor difficulty during assembly was shortening the undercarriage legs. To get that proper “sit” of the Bolt these items need to be shortened considerably. After some measurements, lot of dry-fitting and advice from Darrell Thompson (who has done it before, thanks Darrell), I cut the legs down to 19,5mm measuring from the highest to the lowest point of the part, and I think that I got it about right for a fully fuelled and armed aircraft. Shortened legs were somewhat difficult to align, so a slow-setting glue and Mk. 2 Eyeball were promptly used to ensure prefect symmetry and correct angles.
Academy provides both solid and spoked wheels in the box, however the solid ones feature funky hub centre detail that shouldn’t be there. I simply filled these with putty and sanded smooth.
Painting
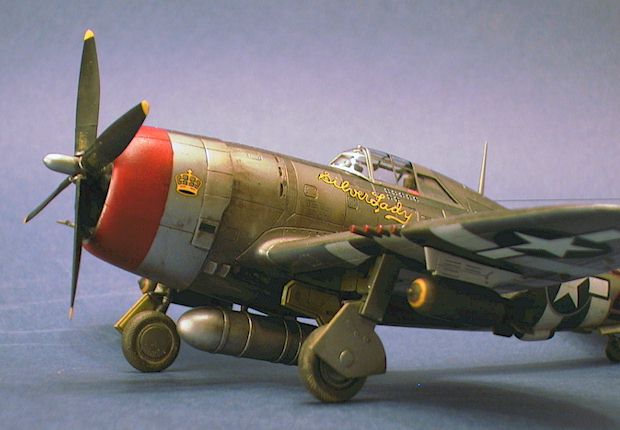
As I mentioned, the weathering was perhaps the most interesting phase of this project. It is now widely accepted that scale models should be “weathered” to reflect changes to the factory-new finish due to use, accumulating dirt and exposure to the elements. That applies easily to any painted surface, but have you ever thought if and how a natural metal aircraft gets ”weathered”? Does the metal get scratched or worn off in areas? I wanted to go one step beyond the conventional wisdom which tells to apply as smooth and glossy silver metal finish as possible.
Whatever the weathering, I started with a solid, shiny natural metal base finish. It was applied with Alclad II Aluminium, used “by the book” over a mirror-gloss black undercoat. When the Aclad coat dried, I tried to emphasize selected panels with Alclad’s Dark Aluminium, but for whatever reason the effect was not noticeable. Therefore I repeated the task with Tamiya Titanium Silver, applied with mists of varying density. Titanium Silver is Tamiya’s “new” silver acrylic and I can recommend it without hesitation, it gives a perfectly smooth surface in class with Alclad, without the latter’s smelly fumes. Admittedly it is a little less glossy, but it really could be used for a good NMF finish on its own.
The remaining colours were a miscellany of different paints. The red rudder and front cowling are Xtracolor Post Office Red. The anti-glare was shaded with two Olive Drab shades, that of Gunze and Tamiya. The invasion stripes were Gunze paints, mixed to own interpretation of off-black and off-white. The wheel wells were painted with a mixture of Tamiya Chromate Green and yellow. Lastly, cockpit interior was another household interpretation of Bronze Green, Zinc Chromate and grey.
The Techmod decals looked great and worked satisfactorily, if not quite responsive to MicroSol. The national insignia were taken from another sheet by Supercale. I prefer the “used” look of white star insignia on Superscale sheets over the surgically white shade of many other decal brands of today.
The canopy received the usual bath in Future floor wax. After leaving the coating to set for about a week the framing was airbrushed on using Eduard’s canopy masks. These masks are a real time saver.
Weathering
I find myself using airbrush for more and more for weathering work in favour of other techniques, so even this time.
The whole idea with the project was depicting a dirty aircraft – Go dirty or go home! Well, not just dirty in general, but using the knowledge of the subject and the available references. I have spent quite a lot of time studying photos of various natural metal aircraft for signs of use so I felt prepared.

Most Thunderbolts had a prominent dirty stains aft of the overpressure valves of the supercharging system (the ones in front of the wing roots). These were promptly applied to the model, but the is more. Oil leaks at the lower cowling, dust and mud at the lower wing surface in the vicinity of the undercarriage, mud in the tyre threads, gasoline stains on the extra tank were added one-by-one until a convincing overall effect was achieved. The trick is using right colour shades for the different stains (not just Tamiya Smoke 🙂 and achieving patterns that are random yet follow the laws of physics.
The weathering was applied with the airbrush, combined with various brush techniques. For example, the oil stains were sprayed on in a mist form, then worked on with a microbrush and Q-tip moisted with thinner. The latter could be done pretty heavy-handed, as the Alclad proved completely impervious to both acrylic and enamel thinners
The main subject focal point of the weathered model were to be the washed-away invasion stripes on top surfaces of the wigs and fuselage. As is widely known, the D-Day stripes were initially painted both top and bottom, but after the invasion the orders soon changed, calling for removal of the stripes from top surfaces of all aircraft. This sounded easier than it was done; in the field, different units coped with the task in different ways, sometimes washing away the stripes, sometimes overpainting them. Photo evidence shows that both methods were applied also on natural metal aircraft, the paint used being either aluminium or any other colour at hand. Washing away the stripes, it was difficult to achieve entirely clean results, whereupon leftover stains were a common occurrence. It is the latter effect that I wanted to replicate on the model.

Somebody had a hard job rubbing away these stripes…
To achieve the ”washed-away” appearance, the stripes were masked as for regular painting – first the black, then white ones. The stripes were airbrushed using a very thinned paint, resulting in a mere ”filter” on top of the metallic surface. Even with this technique, the pure black and white would produce too much contrast, so I substituted these colours with dark grey and Titanium Silver. Without much delay, the masking was then removed and the paint partially diluted and removed with a technique called sponging – touching the surface with a cotton swab soaked with thinner in a tapping motion. The results can be judged from the photos, I for one was very pleased with the way they turned out!

Using a sponging technique the effect can be worked until it it disappears, so knowing when to stop is essential. I was after a subtle effect, yet one which suggested the shape of the original stripes.
Additional scratches and patina on the metal surfaces, especially the areas near the wing roots which were walked on the real aircraft, were produced using a pencil. First, the scratches were drawn randomly (and densely) on the surface. Then , they were smoothed out by rubbing with a tip of the finger. The result not only looked good, but also proved resilient to handling even on a smooth Alclad surface, so no extra clear coat was necessary to protect the pencil work. I was grateful for that as any clear coat would mean substantial risk of spoiling that elusive look of the metal.

Scratches and marks at the worn area at the wing root were done with pencil and a fingertip. Note also the oil streaks behind the engine,
A dark wash was applied to control surface division lines and various vents around the fuselage to enhance the impression of depth. I have refrained from some general shading of panel lines, I just didn’t feel it was necessary and besides, it seldom looks natural to me.
Finals
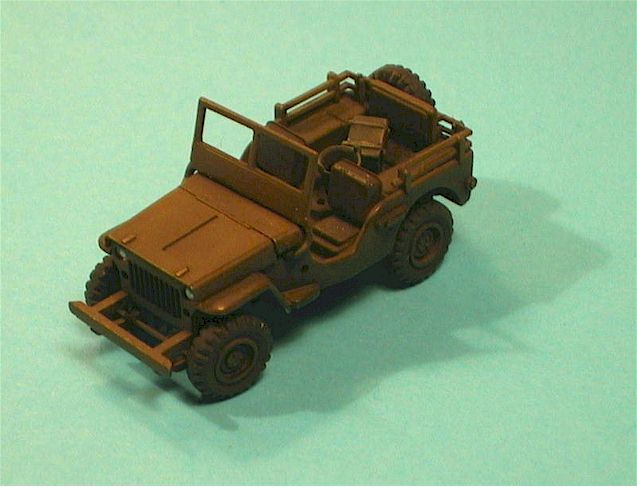
Although I don’t display my models on diorama bases, I like to add a detail or two to put the model into context. The Jeep shown on some of the pictures is an Academy 1/72 model, finished out-of-the-box sans the oversized steering wheel which was replaced by a photoetched part from the spares. I also scratchbuilt some stuff to put into the car: an oil-soaked rag, a wrench, an old bucket, wooden toolchest and some papers.
I applied the antenna wire from fine monofilament, only to learn afterwards from a discussion forum that by 1944, P-47s in Europe had HF radios with whip antennae only. I always knew there was a good reason why I should keep buying all those reference books!
This article was originally published in IPMS Stockholms Magazine in June/July 2004.