by Wolfgang Henrich
About the subject
Gerhard Fieseler was credited with 22 aerial victories as a fighter pilot in World War I, but this is not what he is remembered for in the first place. His glory days came after the war, as he became one of Germany’s greatest aerobatic pilots of all time. He won several times the German championship, the 1932 European Aerobatic Championship and the 1934 World Aerobatic Championship. All these remarkable prizes were gained flying an aircraft of his own construction, the F2 Tiger biplane designed and built by Fieseler Flugzeugbau.
After 1934 Gerhard Fieseler retired from aerobatics to work full time with his company. One of his first minor commercial success was the F5, a 1933 built sports plane, powered by a Hirth HM60 inline engine. Similar in configuration to the contemporary Klemm 25, it was quite different from it in handling because of its shorter wings and more advanced abilities. But it performed well in the hands of more experienced pilots.
If you’re into modelling of German light aircraft of the 1930s, you are likely to find yourself building a Huma kit. This one was one of their earlier offerings, and as such, it comprised of a single tree of 20 pieces of engraved soft, white plastic and a big instruction sheet. The kit was somewhat basic and needed a little bit rescribing as there were some panel lines that were not fully engraved.
Comparing to my limited references about the type, overall dimensions of the kit seemed to be okay.
Simplifications of the kit include a missing exhaust, no struts provided for the horizontal stabilizer and omitted control surface actuators. These parts should be added to give the model a more complete look. Wheels, with their covers and undercarriage spats were all moulded in one piece which looked a little bit rough.
The parts had some flash which had to be removed. There were no sink marks except for the wheel housings which had to be filled lightly and sanded.
Building the Huma kit
The interior contained 7 pieces, a floor, two seats, two sticks and two flat instrument panels for which decals were provided. All in all a very basic interior, fortunately the cockpit openings of the model are small so little of it would be seen anyway. The interior items were painted RLM 02 with the seats in tan as to my knowledge they where fabric-covered .
The interior was placed into the fuselage and the fuselage halves glued together. The tail, horizontal stabilizers and wings were all solid pieces and in need of some sanding to get sharper trailing edges. Special care had to be taken with the wings as the alignment pins were not properly aligned. I cut mine off and butt fitted the parts. With the soft plastic used by Huma, the glue worked especially well. I used a little bit more glue than usual in the major seams so that a little excess was squeezed out at the joint lines. After drying, these areas were sanded, resulting in nice smooth joints.
The Engine front with the propeller and the cooler openings were separate parts. The cooler openings were not very well done and needed some reworking with needle file and some sandpaper. After that I fixed tiny bulkheads made of sandpaper on the inside of the engine front cover to simulate the coolers behind the openings. The entire engine unit was then glued to the fuselage and needed only a little bit of sanding to fit well. To complete the engine assembly, a hole was drilled in the left lower engine cover and a round plastic rod placed in it to represent an exhaust pipe.
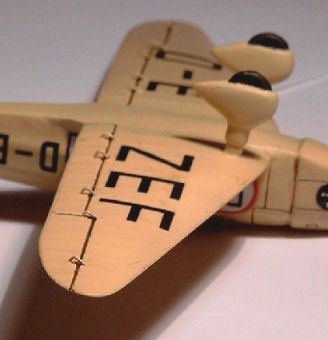
After that, I drilled five little holes in each wing where  actuators for the control surfaces would be placed. Two for the ailerons and three for the flaps. The actuators were fashioned from 0.5 mm copper wire.
The struts supporting horizontal stabilizers were made from a flat piece of plastic sprue heated over a candle and pulled. Finally, the tail skid and main wheels were fitted.
Paint scheme
The aircraft was painted in RLM 05 Elfenbein overall. JPS acrylic colours were used. The propeller was painted in two different shades of brown to get that wooden look. After that a gloss coat of Gunze Clear Gloss was applied.
After the paint was thoroughly dry, the decals were applied. I always use my own decal solvent, a mixture of 70% warm Water and 30 % Vinegar. This softens the decals and give it a very good adhesion.
Washing and weathering
For the washing, oil colour of Umbra Brown was used. Before application it lightened it a bit using white to decrease the contrast with the creamy paint scheme. However, the wash colour still came out a little bit to dark, especially as the entire model was later sealed with the semi-gloss varnish. So, for the next plane with pale colours I will definitely go for a more subtle washing in lighter tones.
For the weathering, very little of it was applied using dry pastel chalks. It is wise to show restraint with the weathering on sports planes as they were normally very well maintained.
Final assembly was the installation of the windscreens with Humbrol’s Clear Fix.
The overall kit is really a nice and simple to built little representation of a little known aircraft.
This article was originally published in IPMS Stockholm Magazine in May 2003.


