Dressing up Eduard’s Profipack P-40N
by Szymon Grzywocz
English translation by Martin Waligorski

As it often happens, the inspiration for building this model came from a book. In this case, it was a Squadron/Signal Walkaround no. 8 on Curtiss P-40 that provided the necessary ”kick”. Similarly to other items in the Walkaround series, this book provides a lot of detail photographs being a good basis for a superdetailing project.
In my stash I already had the excellent resin CMK Allison V-1710 engine and Tally Ho decals containing an interesting scheme for this RAAF machine. The only thing that remained was obtaining the kit, and I promptly purchased a 1/48 Eduard P-40N Warhawk during a subsequent visit to a local hobby show in Zywiec (Poland – Ed.) ”My” kit was a so-called Profipack issue containing additional resin components – cockpit interior, weighted wheels, wheel wells and cooler interior. In the box there was also a tiny photoetched fret with a few additional parts. As I dwelled deeper into my references and on the internet, my enthusiasm reached the peak and I promptly commenced building.
Cutting the plastic
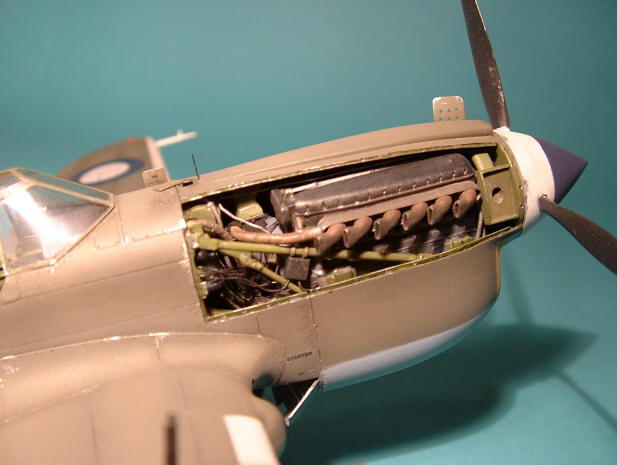
Initially I turned my attention to the engine. Assembling it this early in the project would make all the subsequent mating and trimming the forward fuselage easier. Dry-fitting showed that the resin set matches the dimensions of the cowling pretty nicely and that it would fit into the nose with just a little tweaking.
At first I intended to leave off engine covers on both sides of the nose, but I realized that doing it would deprive the model of that beautiful nose art painted on the port chin. After some consideration I opted for opening only the starboard side panel for displaying the engine. In the end it proved quite sufficient.
With the cowling panel and a few smaller hatches opened, I thinned down the edges of all openings to resemble the scale thickness of a light alloy construction.

In superdetailing, the end effect is usually proportional to the number of included detail. Adding detail is also the part of the project that I find the most enjoyable. In the engine compartment, I scratchbuilt a new firewall from plastic card and inserted it into the left fuselage half. Next came the scratchbuilt engine bearers, a difficult assembly made from lengths of stretched sprue. I also scratchbuilt oil and glycol tanks and the visible part of the carburettor air duct, and attached them to the firewall. I completed the area with quite a lot of cabling and plumbing as per reference photos, made from various lengths of copper wire.
The air intake grille forward of the exhaust stacks characteristic of the P-40N model were opened on both sides of the cowling. On the port side, I modelled the intake with the sand filter inside, while on the other side the filter is removed.

After the engine compartment my attention turned to the cockpit and the radio compartment. The resin cockpit provided in the kit was an excellent replica of the real thing, and I used it without hesitation. The instrument panel was provided as a photoetched ”sandwich” with film instruments, typical of Eduard, and looking quite convincing when assembled.
The major problem in the cockpit area proved to be the canopy, which I wanted to model in opened position. The Eduard’s transparency, although clear, was too thick to be mounted slid-back on top of the fuselage and looked miserably out of place in that position. For a while I considered thinning down the kit pat, but opted for a doing it the hard way and cut a new sliding hood from brass plate with glass provided by a piece of overhead transparency plastic glued to the back of the brass frame. The new hood fit in place very nicely and more importantly, it looks to scale.
I did not come across any good photos of the interior fittings in the radio compartment so I had to use some artistic license there. I consolate myself that it is quite hard to see anything in that opening on the finished model, just like on the real aircraft.

The wheel wells were provided as resin inserts. After trimming the excessive overflow of resin the assembly was problem-free.

A much more enjoyable task was scratchbuilding the gun compartment. The Brownings were provided in the Aires set. I used a few spare parts from other models for details in this area.

The fit of the main components was rather good. I had to pay special attention when glueing together fuselage halves, as with so many additional openings, their stiffness was largely gone and it would be easy to end up with a warped fuselage. The halves where therefore glued bit by bit using superglue. Dry-fitting the wing revealed a gap at the wing root, but it could be neatly eliminated by inserting a thin strip of styrene.
Painting
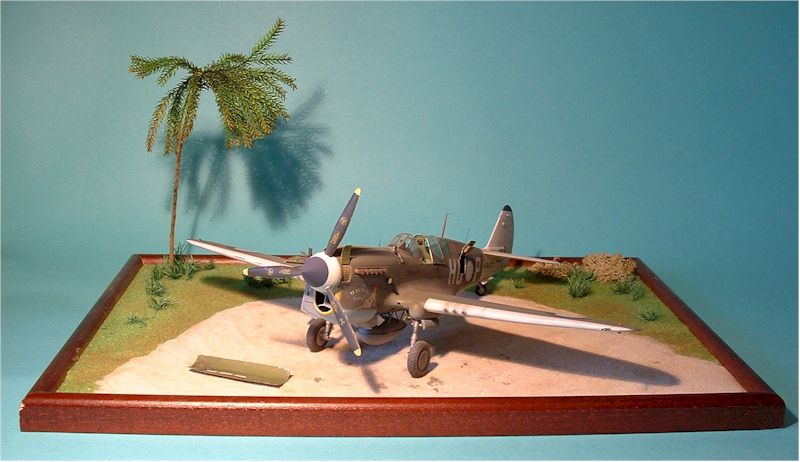
Now a few words about the camouflage scheme. Tally Ho claims that SGt. Smyth’s P-40N ”Watch My Form” was painted entirely in Foliage Green. Quite differently, the Australian website Antipodean Hawks interpreted the colour as a standard US Olive Drab over Neutral Grey. I chose the latter as it seemed more probable to me.

The painting started with pre-shading panel lines and other recesses of the model with black enamel, followed by light grey patches in the areas to be highlighted. The white recognition elements: the tail, wing leading edges and spinner, were then airbrushed, let dry and masked off.
Basic camouflage colours were applied using Model Master paints. I used more thinner than I do usually to let the pre-shaded undercoat show through and to reflect the sun-faded nature of the finish. Additionally, some panels received another coat of OD mixed with white.
The lower cowling, which was a replacement unit, was painted with a homemade mixture of Humbrol enamels resembling Sky Blue.
The yellow outline to the chin intake was painted last, by brush.
This is the first time I used floor polish (known in Poland under a brand name Sidolux) for a gloss clear finish in preparation for decals. I airbrushed it thinned slightly with water, and I am very pleased with the way it worked – the stuff must have been created for modellers!

The Tally Ho decals worked so-so; I have had better decals before. I have probably also made a small error in decal placement, those who know a lot about RAAF of the period would probably be able to spot it.
The final flat coating was a mixture of Sidolux and the new Pactra clear acrylic.

This article was originally published in IPMS Stockholm Magazine in August 2004.