Tamiya Messerschmitt Bf 109E-3 in 1/72 Scale
by Kuba Plewka
photos by Mirek Rawinski

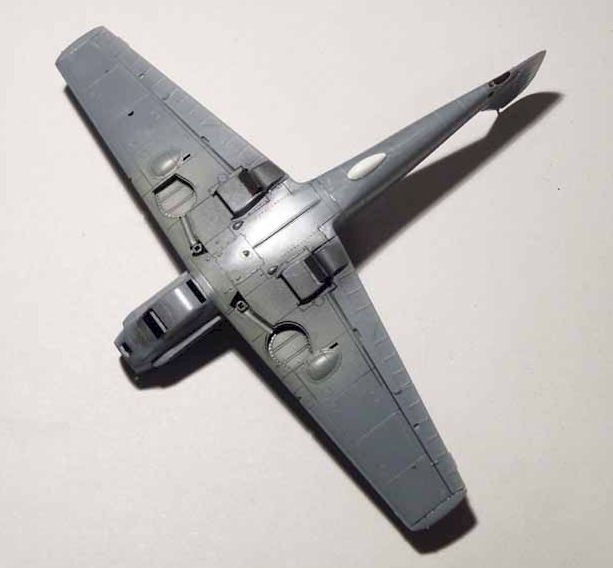
Among 1/72 modellers, the liited series of aircraft kits in this scale that Tamiya released during recent years posess an aura of excellence. Indeed, all of these kits are prefectly engineered and easy to assemble, but the Messerschmitt Bf 109E is in a class of its own. It is ingenious in its simplicity. Contained on but a single sprue of grey plastic, this kit has only a few parts, but makes a perfect replica of the aircraft. I have built a couple of them already and I plan to do many more. Emil is such a graceful subject with all this variety of colour schemes.
Construction
This kit simply falls together. However I describe it’s excellent fit it’s not enough. Believe me, I didn’t use any filler, only a little of Gunze Mr. Surfacer 1000.
The Tamiya cockpit is OK, but will benefit from some extra detailing especially on the sidewalls which are moulded in shallow relief on the inside of the fuselage halves. This time I decided not to use the Aires cockpit resin, but opted for scratchbuilding some interior details and use the excellent photoetched set by Part from Poland. The set is really exhaustive and contains almost everything what is necessary to build a little ”one’o’nine” replica.

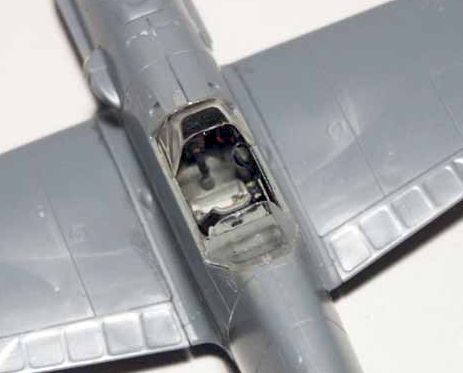
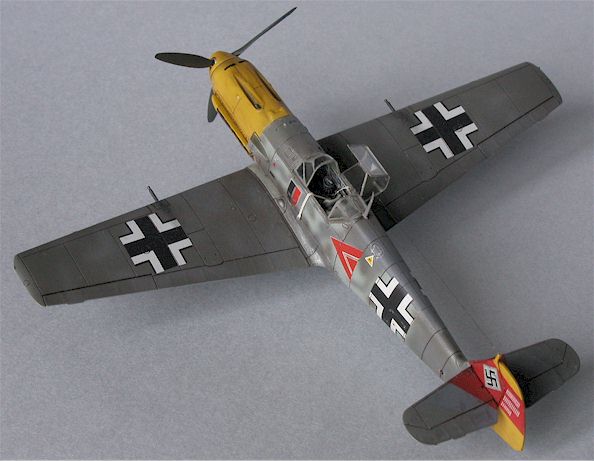
Construction photos showing cockpit interior, Peil IV antenna under the fuselage and Squadron canopy in place.
The project commenced with the cockpit. Its walls were detailed using photoetched items. For the seat I have retained the kit part, only modified it slightly. When completed and detailed I had painted the interior with RLM 02 gray colour using Testors Authentic. The instrument panel was painted RLM 66 black-grey. The next step was to paint all switches, levers and equipment inside the cockpit, for which I used red, yellow, blue and black acrylics.
The painted interior then received a wash of Vallejo patina glaze mixed with water and soap. Then followed some dry-brushing to highlight the protruding detail, followed by a final coat of clear matt varnish
Wheel wells and undercarriage struts received some extra details from the Part set. The wire was used to make a brake lines. Wheels were painted black, then I applied some brown wash onto the discs and some gray wash covered the tires.

Although Tamiya provides a three-part poseable canopy as good as the injection plastic can be, I opted for a vacuformed canopy made by Squadron. This comes in one piece and I had to cut the moveable part to open the cockpit.
As I wanted to model the aircraft of II/(J)LG2 flown by Herbert Ihlefeld, I added the Peil IV antenna blister under the fuselage. The blister was shaped of Milliput epoxy putty.
Painting
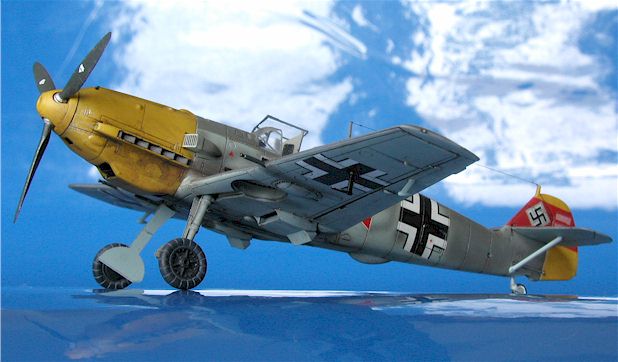
The inspiration was the Third Group Decals sheet, JG 77 / LG2. Ihlefeld’s aircraft was one of the most colorful Emils I have ever seen. The choice was right. First I had painted the nose and rudder with Aeromaster RLM 04 Yellow. A few thin layers layed one by one guaranteed the solid, smooth and delicate surface.
Then I masked off the yellow areas and started to apply camouflage colours. For this I decided to use Xtracolour enamels exclusively. These are the best enamels I had used with an airbrush, very sprayable and featuring extremely fine pigment. The undersurfaces and fuselage sides were painted RLM 65 blue. Then some masking was done and the uppersurface colours were applied. What is really amazing is that Third Group Decals states that hese should be in RLM 74/75 grays, colours usually associated with later aircraft. The fuselage spine was painted then the RLM 74 Greengray was applied on the wings.

The wings of this machine are claimed to have been painted in RLM74 with irregular squiggles of RLM 75. As you can see, the contrast between these two colours on the model is too low, sligtly spoiling this interesting paint scheme.
Ihlefed’s machine carried interesting camouflage on the wings. It looks like RLM 74 with some freehand RLM 75 overspray and mottles. My mistake was to paint them freehand too. The contrast between RLM 74 and 75 is too low and the sprayed squiggles are unfortunately hardly visible. I should have painted them using masks… The next step was to apply complicated fuselage mottled pattern. I had lowered the pressure in my compressor, thinned the paint more than usual and started to paint them carefully. At the end I had oversprayed the tail according to the decals references. The swastika on that plane was left on the patch of RLM 65 blue while the fin and the rudder was painted red. The same red triangles are visible on the stabilizers. I painted it with Aeromaster RLM 23 red.

When the paint job was completed I started to apply the decals over the smooth gloss surface. A coat of clear gloss is not necessary when you use Xtracolours. Third Group Decals were of excellent quality, nicely conforming to the model’s surface. And now it was time for…
Weathering
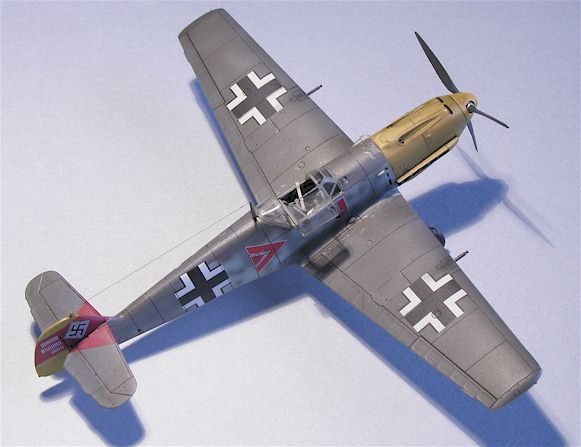
I really enjoy it! Weathering, making a model look like a real thing not a toy. I love heavy oil and exhaust stains, dust, dirt covering models. Some say my weathering is to strong. Maybe.. but I like it.
I covered the entire model with Aeromaster Clear Gloss and went about darkening the panel lines first. I had used black/dark gray artist oil. Some stains under the wings and behind the radiators were made with the same technique. Then the model was resprayed with clear matt and dry pastels were used to apply exhaust stains, tire dirt and so on. Some oil stains were done with a dry pastel then touched with wet fine brush.
At the end I covered the entire model with semigloss acrylic laquer. Few final details were placed and the Bf 109 was done.
I really love the kit, it is the excellent base for more detailing project as well as ”out of the box” simple model. I’m going to make a bigger ”Emil collection”. My next one will be E-1 ”Kanalkampf Jager”. Or maybe… well anyway it will be another Tamiya Bf 109.

This article was originally published in IPMS Stockholm Magazine in February 2004.