A review of the Fujimi Supermarine Spitfire Mark XIVc (and V-1 Flying Bomb)
by Jeff Warshaw
All those magic moments…
For me, as a scale modeler, there are two moments in the process which are almost magical. The first is opening the box and seeing the kit for the first time, looking over the parts trees, checking the quality of the clear parts and the accuracy of the decals, glancing over the instruction sheet. This ritual brings me back to the same joy I felt as a young boy opening a new kit, knowing that with a little glue, paint and patience, I’d have a Sopwith Camel, or a Focke Wulf 190, or perhaps a SPACE:1999 Eagle to be proudly displayed on my shelves. This is the moment of discovery, when I can tell myself either ”Wow! This looks like a great kit!” or ”I just wasted (insert monetary amount) on a piece of crap!”
The second magic moment for me is my first good look at the finished kit. The final judgment, as it were, when all the elements come together, and I realize that either I’ve done a good job, or that I made some mistakes, not to be repeated later. For instance, the first kit I built when I returned to modeling in 1989, after a twenty year hiatus, was a HobbyCraft Canada Messerschmitt Bf-109B. I decided to paint the kit in the colors of the infamous ”Legion Condor” of the Spanish Civil War period. But I used Polly-S acrylics for the Field Gray, and did not thin them sufficiently. I had never used acrylic paint before, and didn’t realize that in order to brush paint, it must be thinned about 25% for scale. I got a very gloppy looking kit, which still doesn’t look too bad, thanks to the excellent decals and the very nicely detailed cockpit. On the good side, there are my two Hasegawa 1/72nd scale B-17s, an F and a G, both of which look smashing because I took the time to get even the little details right. Patience pays off, but it helps to have a good, detailed kit at the beginning of the process.
Although I tend to build only airplanes, and more specifically, only WWII combat aircraft (sorry, I’m just not interested in civilian, recon, transport or cargo planes-there’s no such thing as a cargo ace!) , I tend to go through ”cycles.” A few months back, it was night fighters, both Allied and Axis. I even built some speculative planes, like a Dornier Do-335 B-6, which never got past the planning stages in real life. But lately, I’ve been rather RAF focused, and more specifically, I’ve been looking for a few good Spitfires.
I had built a Tamiya 1/48th scale Spitfire Mark V, and was very pleased with it (still am, excellent kit, which I highly recommend), but I hadn’t done any of the Griffon-engined Spits in 1/72nd, which is my preferred scale, mostly due to space limitations. I’d built an Airfix Mark IX, which was nice, but lacked any significant cockpit detail, and a very nice Hasagawa Mark VIII in SEAC colors, but hadn’t done a Mark XIV.
The Fujimi Spitfire

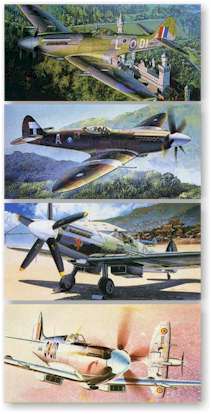
Fujimi released a whole family of Griffon Spitfire kits utilizing the same basic tool. From top: FR Mk XIV w/clipped wings; Mk. XIV E bubbletop; Mk XIV E ”Red Lion”; Mk. XIV E razorback w/clipped wings
I had built the excellent Fujimi Bf109 kit, both as a Bf109 G-14 and a G-2 Trop, so I knew the quality would be excellent. I was not disappointed. On initial inspection, this looked like a fairly detailed, competently molded kit, and I looked forward to the day she’d sit on my display case next to my Hasagawa Hawker Hurricane Mark IIc night fighter. Unlike the Revell-Monogram Mark V, which I’m sure you’ve heard enough about by now (see the review of this kit in September 1998 issue of The Magazine – Ed.), this kit gets the ”gull” center section just right.
The kit comes with a decal for the cockpit instrument panel, but the panel itself is fully detailed, including individual instrument faces, and I chose not to use the decal. Instead, I painted the panel flat black, then used a very sharp white artist’s pencil to pick out the instrument details. With the canopy in place it will probably be hard to see, but it’s still impressive for a small-scale kit. The kit comes with a decal for the seat belts, but I chose to use spares from an Airwaves set I bought for another kit. These fit well with the parts provided.
The rest of the cockpit is a bit sparse, consisting of a ”tub” assembly containing the pilot’s seat and control stick (remember to paint the ”safety” switch red-I used a red colored pencil-believe me, I saw a real Spitfire cockpit last summer in Southampton, England. The switch was a red button on the control column). There are no side panels or instruments, but for those so inclined, I’m sure you can use the Eduard’s metal etched kit made for the Academy Mark XIVc with this kit as well. Considering how small the kit is, and the fact that it comes with only a closed canopy option, this is not too regrettable. Of course, you can use bits and bobs of sprue to create instruments if you want, but I didn’t.
The reflector gun sight is nice, and it’s possible to leave part of it clear. Paint the lower parts flat black. The assembly of the propeller and nose went very smoothly. The blades are the thicker, slightly curved type (variable pitch) used on the Griffon-engine Spitfires, and fit nicely into the hub provided. Don’t worry about the seam between the hub and nose cone. On the real Mark XIV’s I saw in England, this gap was evident. If you can’t stand it, use a bit of Bare Metal Foil. The curved surfaces don’t take putty well.
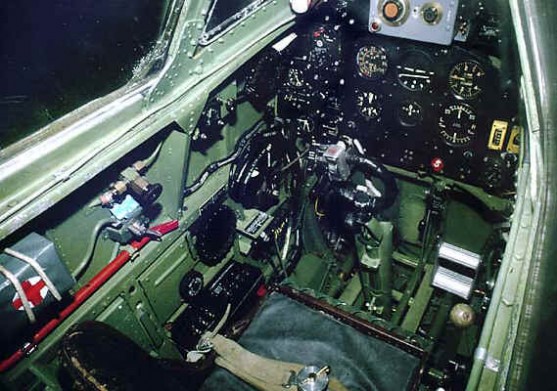
The cockpit of the preserved Spitfire PR Mk XIX looks much like that for Mk. XIV.
The obvious exceptions are: a camera control box instead of the gun sight, and the lack of gun trigger button on the control stick Photo: Joachim Smith
Main assembly
Remember to punch out the holes for the 20mm cannon and the gun fairings on the top wings. The wings went together well, but one area which I found problematic was the attachment of the rounded ”type C” wing tips. They do not fit flush, and the only real way to get them into place properly is to hold them while they are drying. I used clothes pins, and they came out a bit bent, so I had to redo them. Once dry, they look fine. This was done because Fujimi also offers several Mark E Spitfires, with ”clipped” wings typical of that aircraft. I’m building one of those next!
The fuselage and ailerons attach well, but there are gaps between the wing roots and the fuselage which must be filled. I used Dr. Microtools putty, then sanded with my Flexifile, and finally overlaid strips of Bare Metal Foil. Once painted, the seams will disappear. This is a trick I learned on the much larger B-17 kits, and it works like a charm. Just take your time, use several thin coats of paint, and the foil will vanish, leaving only a smooth surface.
The ”fishtail” exhaust pipes must be trimmed a bit for a proper fit. I painted the fuselage and wings before inserting them, so as not to overpaint them by mistake. They needed to be sanded a bit for a proper fit. I used a small file. Another trick I’ve learned for getting the proper ”rusted metal” look of the pipes is to mix about 25% Gunze Sangyo ”Rust” (# 344) with 75% ”Burnt lron” (#76). Thinned with a little water, this makes the perfect burnt exhaust pipes, and in my opinion, looks better than flat black washed over copper.
The holes in the lower wing for the radiators (parts A11 and A12) need to be drilled out a bit with a pin vise for proper fit. This must also be done with the 20mm cannon, parts C4 and C5 (x 2). I recommend using white glue to fill any gaps caused by drilling out the holes. Also, use your pin vise and the small, 1mm bit to make a tiny hole in part A17 for a brass wire (I used Elco 28 Gauge Brass Wire # 35528, which I bought at my local ACE Hardware store. A 75 foot roll is only about $2.00), then follow instructions for cutting a 10mm length (2mm goes into the hole – buying a mm ruler is a good investment, and again, you can get one for about $1.75 at any hardware store) to make the whip radio antenna typical of the later mark Spitfires. This was easy, fun, and it looks terrific!
Camouflage and decals
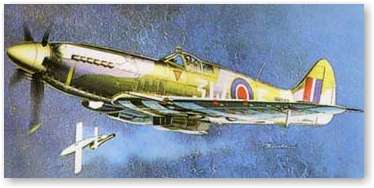
After gluing the radiators and the air cooler (assembly 9) onto the fuselage, I decided to paint the kit and apply the decals, saving the landing-gear assemblies for last. This makes locating the smaller stencils much easier. I opted to build the first of three options, the plane flown by V-1 ace Flying Officer R.F. Burgwal. Though not marked properly on the kit, this aircraft, NH649 was RAF Dark Green and Ocean Gray upper surfaces over Medium Sea Gray undercarriage. He flew with an all Dutch unit, No. 322 Dutch Squadron out of West Malling, during June of 1944 (the ”Diver Summer”). Although the painting instructions list him as having shot down 5 buzz bombs, his final score was actually much higher. His tally was 21 V-1s destroyed, making him the top V-1 ace among pilots flying Spitfires.
I used Model Master enamels, thinned with 25% flat white and a few drops of Testor’s enamel thinner for scale. Other decals are for major K. C. Kuhlmann, another 322 Squadron V-1 ace, and the famous DW-D of Major R. A. Newbury, No. 610 Squadron, Kent. Newbury downed seven V-1s in the Spitfire Mark XIV shown, RB159. The decals are excellent quality, and include all of the small stencils (all of which can be read using a magnifying glass!).
One more note here. Like many late Spitfires, Burgwal’s mount had part of its ”Normandy Invasion Stripes” painted out. Unless you have an airbrush, a steady eye, and a lot of patience, I do not suggest painting the stripes by hand, especially when Super Scale makes a full set of Spitfire Invasion Stripes, Decal No. 72-760. I used the under-fuselage stripes, and simply cut off the excess. The underwing stripes fit this kit very well, and unlike other sets, the white in these stripes is solid, and does not require under-painting. I also used decals from this set for the red tape squares over the .303 caliber machine guns. It took me a long time to realize that these thin strips of tape were used to test fire the machine guns. If the bullets burst the tape, the guns were working properly. If not, a jam was indicated.
Two of the individual aircraft marking decals (one for the Dutch Squadron, one for Burghwal himself, I presume) must be hand painted, a sky-blue square for decal # 17, and an orange triangle for one of the #18 decals. I again used Gunze Sangyo Aqueous paints as suggested on the instruction sheet. They are water-based, and easy to clean up, though consistency can vary from batch to batch. They are Sky Blue # 25, and Orange # 14, and were applied carefully using a 15/0 Pactra Dover Pure Red Sable B-30 brush. This and the 10/0 are my favorite brushes, and I highly recommend them for small detail work. If your hobby shop doesn’t carry them, you can find them at hardware stores or home furnishing stores. I allowed 24 hours for drying.
After giving the kit a coat of Future Floor Polish, which I allowed to cure for 72 hours, I applied the decals, stencils and unit insignia. All of the Fujimi decals are excellent, and went on without any trouble, setting well with Micro Sol and Micro Set, producing no bubbles or silvering. The upper wing roundels are particularly nice. I messed up a bit on the black ”walk here” strips on the left wing, and had to replace them from a Superscale Spitfire Mark XIV sheet. I allowed the decals to dry for 24 hours, then gave them a top coat of Future as protection, again giving the floor polish 72 hours before touching the plane.
Finals
I finished off by unmasking the canopy and cleaning it with eyeglass cleaner, then carefully glued in the rear view mirror with white glue. I then attached the completed forward and rear landing gear assemblies and allowed them 24 hours to dry, after testing to see that the plane ”sat” correctly. I applied the pitot tube to the hole in the left wing with white glue, and my kit was finished. I had some trouble aligning the ”lock/unlock” decals on the propeller hub, but that’s because I’m a klutz, not because of the kit or the quality of the decals. So they’re a bit off? It doesn’t really detract from the look of the kit.
This is definitely the nicest of my 1/72nd scale Spitfires, and now sits alongside my Hawker Hurricane, Hawker Tempest, Boulton-Paul Defiant and the Spitfire Mark VIII on my RAF shelf.
’Buzz’ bomb
Along with the Spitfire, this kit came with a model of it’s deadly adversary, the Fieseler Fi-103, more commonly called the V-1 Flying Bomb or ”Buzz Bomb.”

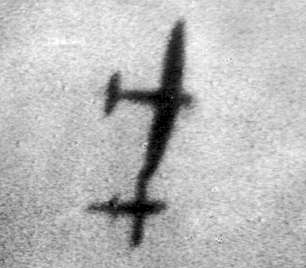
This well-known wartime photograph shows a Spitfire (the actual mark being hard to determine) tipping-off a V1 over England.
First launched on June 13, 1944, thousand of these deadly, unguided ballistic missiles hit London and Antwerp until American forces overran the launchers in the Pas De Calais in early September. Though it flew at speeds from 230 to 450 miles per hour, it was possible to intercept and destroy, and a defense cordon was quickly thrown up around London. Consisting of four rings of defense, Spitfires, Tempests, Mustangs, and at night, Mosquitos patrolled the Outer Fighter Patrol Area, from mid-Dover to 10 miles outside London. Next came a heavily armed Gun Belt, from Dover to Beachy Head, where fighters were forbidden, and AA gunners shot anything that moved. Third was another, Inner Fighter Patrol Area, where fighters knocked down V-1, from 10 miles inland, to 10 miles short of London. Finally, barrage balloons lined the outskirts of greater London.
The V-1 kit was easily assembled in two well-fitted fuselage halves, the Argus pulse jet sitting atop a pylon, a pitot tube, and a nose-mounted fuse. The pitot tube and fuse propeller are painted ”steel” or ”metal color” (I used Gunze Sangyo’s Burnt Iron # 76).
It should be noted that the painting instructions differ from actual, preserved V-1s I have seen personally. The instruction sheet lists the upper fuselage color as RLM 71 Dunkelgrun, which is correct for examples I saw in the Imperial War Museum and the RAF Museum in Hendon, but the incorrect underside color of RLM 65 Lichtblau. This was an early war color, and was not generally applied after 1943. The correct underside color should be RLM 76. I used Testor’s Model Master paints, thinned with 25% white and a few drops of thinner for scale. Also, it should be noted that the camouflage patterns on the examples I saw were not straight, but slightly wavering lines, so I painted my V-1 that way.
One of the V-1s I saw last summer was overall RLM 71, while another was RLM 71 upper/RLM 76 Lower, with an RLM 04 Gelb nose section. Patterns varied greatly, as with the V-2. Assembled, this is a very nice kit…I just wish it came with a launch rail to display it on!
The result
I give this kit very high marks on all counts, though I wish the cockpit area was more detailed. There are many variants available in different color schemes. For the price, (around $14.00 from Squadron Mail Order), this is a beautiful kit. Due to the small parts and the complexity of some of the fit and the decals, I do not recommend this kit for beginners, but for anyone with an intermediate modeler’s skills (around a ”3” on the Revell scale), this kit is a fairly easy build. Mine took approximately 20 hours, including the V-1 Flying Bomb.
This article was originally published in IPMS Stockholm Magazine in February 1999.

