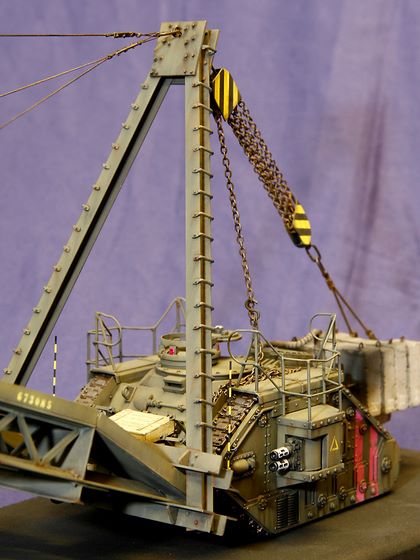
An Old-School Bridge Layer From the Future
by Stellan Englund
This time I’m back with another head-first dive into the possibilities of the Warhammer 40K series from Games Workshop. As before (see the Hunting Russ Mk II project in the October 2007 issue of the IPMS Stockholm Magazine), the original model was inspired by the Great War Mk 1 tank, the Leman-Russ Mk VII.
This time I would modify the kit with so many new parts as to go way beyond the basic box contents. Heavens know from where I got the idea to make a bridge layer, perhaps I had stored some image in my brain and kept it for inspiration.
The first idea was to make a really cool modern scissor-like folding bridge. However, the technical problems were not for me to solve at the moment and I resorted to the simpler Churchill AVRE-style bridge layer. In a way it is a brutally simple construction, almost medieval and thus fitted my intentions perfectly.
I started by sketching about a bit just getting a feeling for the object. What did I want to show, the purpose of the object, technical aspects, measurements etc. The final 1:1 draft was showing a bridge spanning a full four tank lengths, rather than the original WW2 AVRE bridge which amounted only twice the length of the tank. I didn’t hold back on this as I wanted it to be a bit absurd as well as majestic in its appearance. This bridge would span huge gaps, not tiny trenches. In order to make the building process a bit logical I broke down the building in four separate subassemblies; tank, bridge, A-frame and rigging.
The Tank
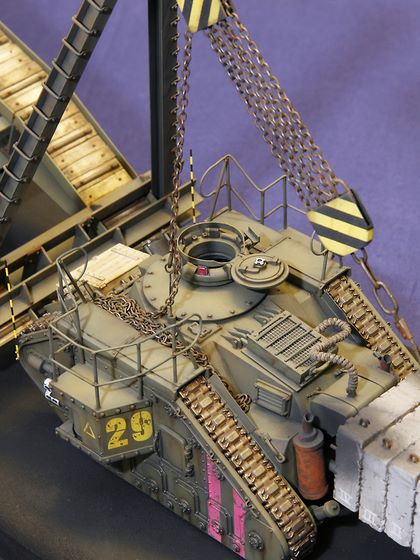
Off came the turret, on came plastic card bits altering the basic shape around the nose area in particular. This area had to be sufficiently rigid as it was to be the contact point between the tank and the bridge – more on this later. Inside, a few bits of plastic reinforced the hull so a couple of brass tubes had something to be glued to. The brass tubes were projecting out on the back, forming an anchor point for the wire arrangement supporting the bridge.
The sides, tracks and barbettes were glued to the hull as per instructions. A rail was glued onto the upper hull, a coolant tank connected to the radiator on top of the back. The commander’s cupola and the blanking plate covering the turret ring was a separate piece glued to the hull. Minor details as a driver’s periscope, extra track links and rollers and a few more bits and pieces finished the whole thing.
The Bridge
This is the reason and the focal point of the whole project and I tried not to hold back on the detailing. Two packets of Plastruct zigzag beams formed the backbone, literally. I made up two identical driveways of plastic card, sandwiching the beams in between. It was the length of the beams which dictated the size of the bridge. Adding the wedge like end bits made the bridge grand enough for my taste. A few reinforcements made the end bits rigid enough to take the weight of the bridge as it was connected to the A-frame later.
I used four meters of elm wood on top of the driveways to make it a bit more rustic looking and not just hard cold steel. Did I mention the 700 bolt heads all over the model? They add a lot of visual appeal to the model, so it was all worth it.
The A-frame
This was to be the weak link of the build and it gave me a bit of a headache. I had no idea how the real thing worked as all photos of a Churchill AVRE were either blurred or not showing the exact details, grrr! So what does one do? Come up with the second-best and create something that look convincing if not scrutinized too closely.
The A-frame was constructed around the bridge itself to make everything fit snugly. H- and L-shaped beams of Evergreen make and a few bits of sheet styrene formed the basic structure. A few (quite a few, actually) bolt heads of plastic rod were glued to make the whole thing look “industrial” and heavy. To make it a bit more detailed a set of grips to get up to the top were made of solder wire and put along the H-beams. A box was constructed and glued to the tank front to act as a pivot point between A-frame/bridge and tank. This box was made of H-beams, plastic card and a steel hinge. Everything looked great and was tested time and time again to ensure it all went together smartly in the end.
The Rigging
It doesn’t look much on the pictures but without these small strings and chains it just wouldn’t be a bridge layer, but a set of big parts not being able to work as a unit. I found a roll of thin wire-like non-stretch line in my hobby room. This coupled together with an ingenious system of chains and pulleys made of plastic card and small pieces of aluminium tubes, made the basics of the rigging. This system connects from four points on the bridge, to the A-frame. From the A-frame the pulley system connects back to the brass tubes protruding from the tank. Four counterweights made of gypsum was cast and cut to shape, just to add a tiny bit of visual logic to counter the immense weight of the bridge.
The Make-Up
This was actually the toughest part, to make up my mind of how to present the model. Would it be in a three-tone camouflage, what colours then? Or perhaps a monochrome scheme, what colour? I started on a complicated camouflage which didn’t come out well. Why complicate matters more than I have to, it did not need all that colour. I certainly did not need all the extra work. The model was complex enough in itself and would stand out well anyway, and a monochrome finish would just make it look more brutish. So there it went.
My first thought was a medium grey and weather it grossly. No, grey would just make it look like a crane in a dock. A bit too lame for my taste. Back to square one and the original Churchill war paint. I first primed it using a can of Games Workshops excellent, but smelly, Chaos Black all over. Then I worked my way all around painting one panel at a time, using Vallejo Model Colour US Dark Green. After a few hours I had covered it all. A set of markings was applied using brass stencils. The pink stripes were masked and sprayed. I finally weathered it all using artist oils. A bit of graphite powder was rubbed on the tracks to make them look worn. The final rigging was done and weathered. Finally finished, ha!
Conclusion
Immediately after I finished it I just felt empty, exhausted. Sigh, relief and total happiness to see it done are the feelings I have now. It took six months from start to finish and is the most complicated model I have made. Again? Did I hear the question “would you do it again”? Think NOT, but it have given me confidence to make something even crazier. See you again…
This article was originally published in IPMS Stockholms Magazine in June 2008


