Hasegawa Spit Mk. VB with improvements
by Rickard Malmborg
English translation by Anders Isaksson
This project started the way in which my projects usually begin; I sit there among all my unbuilt kits trying to decide which one to start with next. Someone with a sense of humour called this ”sniffing the plastic” – I look at the sprues, browse the instructions and try to figure out which areas of the model should be improved with extra details.
Plastic in all respects, at the same time I browse through my books to see how much information I have to assist me. While I have the books open I try to find any of the individual aircraft that are depicted with kit markings. I find a project more rewarding if I have a picture of the specific aircraft and some information to place it in its historical context. As you may understand this can be a lengthy process and it never stops! For me this is one of the benefits of our hobby.
Choosing the subject I often set on a specific aircraft that is representative for the period and combat area. On the other hand, I also like the aircraft with a splash of colour! It can be in the form of prominent insignia, kill markings or nose art decorations. Whatever attracts the viewers attention works for me.
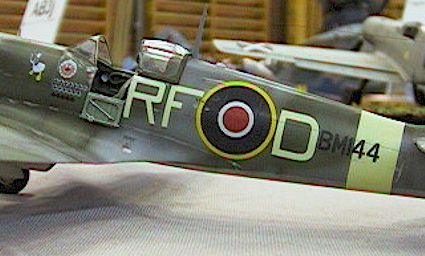
This particular time I was lucky enough to have a colour picture of a Spitfire Mk. Vb that was exactly what I was looking for. The aircraft had the code RF*D and belonged to No. 303 (Polish) Squadron RAF. Other markings were the Polish red and white checkerboard insignia on the nose, kill markings, the colorful squadron insignia and nose art in the form of a well-known cartoon duck armed with a baseball bat! (This aircraft, Spitfire Mk. VB ser.no BM144 is very well known and had been flown by Sqn Ldr Jan Zumbach in 1942. Known as Johann because of his Swiss parentage, he was also nicknamed ’Donald Duck’. Zumbach’s combat record started already in the September 1939 defence campaign in Poland, then continued in France and during the Battle of Britain. IN 1941 he became the leader of the famous 303 Sqn. By 1942 his scoreboard was 12 and 1/3 kills, 4 probables and 1 damaged aircraft. He survived the war and died in 1986 in France – Ed.)
I had a Hasegawa Spitfire Mk. Vb (kit no. JT18) at hand and the decal sheet in the kit featured the markings for another Spitfire of the same squadron, RF*M. All I needed model my chosen aircraft was the duck image, the kill markings and the letter ’D’.
Now that I had found a specific aircraft to model I decided to start my Spitfire project right away.
References
Further references for this project consisted of Rikiu Watanabe’s Great Book of WWII Aircraft, Bill Gunston’s British Fighters of World War II, Spitfire In Action by Squadron Signal and an old issue of Fine Scale Modeler. I also used Tamiya’s kit of the Spitfire Mk. Vb. I found the Hasegawa offering to be better in most aspects but I figured the Tamiya kit would come in handy when building the cockpit.
Cockpit
The construction of this kit is no different than other kits, you simply start with the cockpit. I would not describe the Hasegawa cockpit as bad but it was annoying to find that Tamiya provided some details that were missing in the Hasegawa kit.
I decided to detail the cockpit using the Tamiya kit and pictures from the books as reference. I started by drilling lightening holes in the seat bracket (A16), head armour protection (B4), bulkhead (B22) and instrument panel (C3).
The compass located beneath the instrument panel was also revised. The kit representation was removed and I used my punch and die set to make a styrene disc for the compass. The disc received a suitable decal and it was attached to the instrument panel with a bracket bent from sheet metal. These simple steps gave me the detail that already was provided in the Tamiya cockpit.
Now it was time to open the book by Rikiu Watanabe and start detailing the cockpit walls. I used copper wire, guitar string, Evergreen strip styrene, lead foil and epoxy glue for the details. Levers and electric boxes in the kit were removed and new ones were added along with missing details. Seat bets were made from lead foil and copper wire (yes, I know there are ready-made sets commercially available but I could not find a suitable one at the time). The sight was also slightly upgraded with a new piece of glass.
Naturally, with all the work done to the cockpit I wanted to display the hood in the open position. Also, I could just as well display the cockpit door on the left hand side open as is typical of the Spitfire. This is where the issue of Fine Scale Modeler was used as it had an article on building a Spitfire Mk. IX. The modeller used a photoetched set to make a new cockpit door. I did not want to use any photoetched part but opted to make the door myself. Working from the pictures in the magazine I used thin sheet aluminium to make the door itself and used Evergreen strip styrene and thin sheet metal for the frames and ribs. Thin sheet metal and piano wire was used to make the crow bar and locking mechanism along with copper wire for the hinge. This work was all a bit tedious but I was very satisfied with the door once finished.
General construction
The rest of the project followed the instructions with small improvements being made along the way. The small air inlet for the compressor (A9) was hollowed out. The edges of the oil and water radiators were thinned down for a thinner appearance. To suit my specific aircraft I used the pointed spinner together with the wide propeller blades included as an alternative with the kit. The tires were flattened by pressing them against an iron set at low heat. Hoses for the hydraulics for the wheel brakes were added and the cannon substituted for sections of hypodermic needle.
I never paint my models with landing gear, propeller, exhaust pipes and other fragile parts attached to the model, these are always added last. However, I usually glue the clear parts in place prior to painting and often use superglue for this task. Many modellers avoid this since the superglue may cause the clear parts to turn foggy. I found that if you coat the clear part with Future floor polish and let it dry thoroughly before gluing the part it will not be affected by the glue fumes. It actually works, even if I was a bit nervous the first few times I tried this method.
Painting
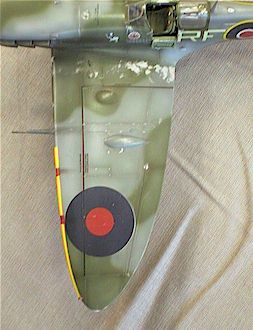
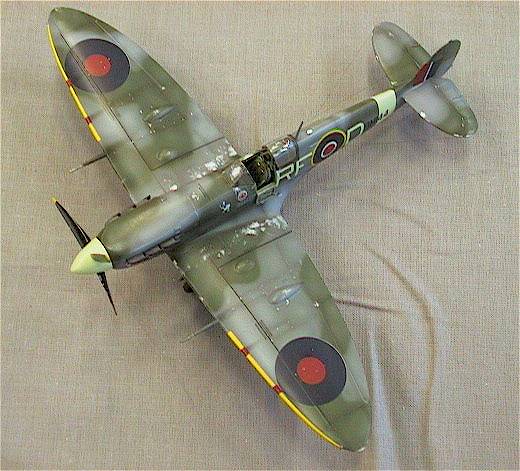
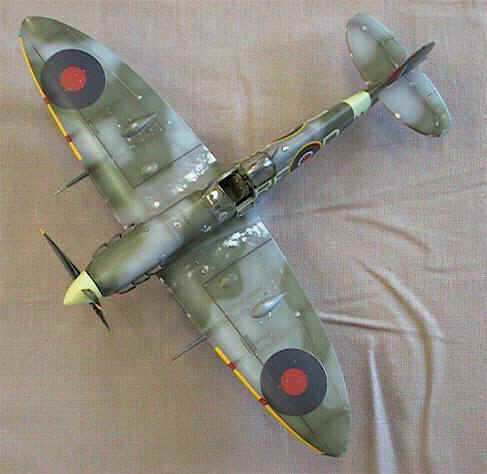
When painting their aircraft the British factories and  RAF maintenance units used pre-cut rubber mats to mask the camouflage scheme. Consequently the edges between the camouflage colours should be sharp, but having just completed the masking and painting of another Spitfire in this style I did not feel like doing another one. I therefore choose to paint the camouflage free hand to get soft edges.
To add life to the surface I rarely start with the colours that the model will eventually have but use many different shades of the basic colour in order to emphasise panel lines, highlight large panels, add shadows and simulate different materials such as metal and fabric. However, I do stick to the proper camouflage pattern.
When satisfied with the patchwork of different shades I moved on to the correct colours. Each colour had been heavily thinned resulting in only partial coverage. Since I initially painted the model in the correct pattern it was now rather easy to paint the final pattern. As I made progressive passes with the airbrush, the colour covered gradually better. I let the patchwork randomly show through which gave an interesting lifelike appearance to the surface where the different shades blend together resulting in an attractively looking model.
As for the soft edges of the camouflage, these may not be entirely correct but I feel that it’s within the scope of artistic license or whatever you want to call it. I am happy with the results!
Markings
I am often sceptic to trying to match colours to the decals in the kit, does it ever look good? Well, Hasegawa does a really good job here! The tail band and the letters are supposed to be duck egg green and are included as decals. The spinner needs to be painted in the very same colour and all you have to do is follow the colour reference in the kit instructions. When comparing the painted parts to the decals you can not tell the difference! Quite amazing and perhaps only a coincidence.
 The kit includes two tail bands and I used the second one to carefully cut out the two ’D’s required for the squadron codes. I also had the luck to find a separate decal sheet with just the one aircraft I was modelling. The decals were not of a high standard but the duck and kill markings were usable.
With the decals in place I applied a few coats of flat varnish. The more coats you apply the more flat will the surface become and I seldom stop after just one coat. To get a slightly shiny surface I use a piece of specialized equipment in form of a pair of nylon stockings. These are moistened (with water, nothing else) and used to buff the surface. The more I buff the more shiny will the surface get and I am careful not to polish as much everywhere but try to vary the amount of polishing to add life to the surface.
Small details and weathering
Finally all the small details were attached to the model. Using my airbrush and pastels the model received stains from gunpowder on the wings and exhaust stains on the sides of the fuselage. I simulated chipped paint with flat aluminium and applied a dark wash on the wheel hubs. The wire for the antenna was made from thin fishing line painted black with the aid of a felt tip pen.
A final word
I was very satisfied with my Spitfire and there will surely be more of them. I also decided to place this model on a display base. I ordered a base made from marble but did not receive it in time for these photos. Actually I ordered the base more than a year ago and I still have not received it… but I’m not losing hope.
This article was originally published in IPMS Stockholm Magazine in April 2002.


A beautiful model of Jan Zumbach’s aircraft. Nice work!