by Nils Mathisrud
English translation by Martin Waligorski
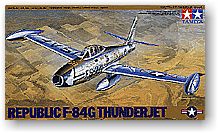
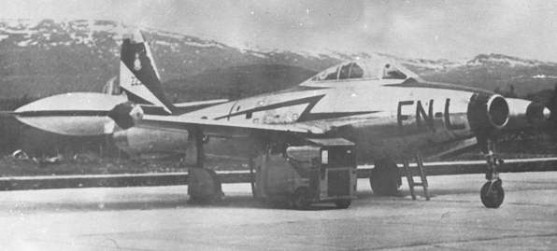
Republic Thunderjet was the first fighter that Norway received as defence aid from USA and the type that was operated in biggest numbers by the Royal Norwegian Air Force (Luftforsvaret). It also happened to be one of the most colorful aircraft flown by the RNoAF. American tradition of colourful squadron markings was promptly adopted by the Norwegians.
A good quarter-scale kit of the Thunderjet had been standing on my wish-list for many years. The only available ancient offering from Testors/Hawk was painfully spartan. It even had an integrally-moulded pilot figure that was split in halves together with the fuselage! Years later, a cottage manufacturer named Battle Axe released a multi-media kit, and even if it was a big leap forward in accuracy, the kit required a lot of skill to complete.
Recently, things began to change. Monogram has announced that they will release a F-84E/G. But, not for a first time, Monogram was pre-emptied by Tamiya. F-84G from the Japanese manufacturer appeared already during last summer. We still have to wait until early 1999 for the Monogram offering to arrive.
I had a pleasure to build Tamiya’s Thunderjet, and these are my notes  from the project. I also used Eduard’s photo-etched detail set. Eduard is always surprisingly quick in releasing detail sets for new f84_01.jpg (13773 bytes)mainstream kits, however, my set has not arrived until the construction was well advanced, so I couldn’t use all the parts from it.
Fuselage
Extra air intakes in front of the wing roots on both fuselage sides did not appear very realistic. The openings were good, but too shallow. I hollowed them out and added new bulkheads further inside. There are also some openings in the fuselage behind the cockpit. The air intake in the back should be blanked off on the inside, otherwise it would be possible to see right through the fuselage.
An extra bonus in the kit is an option to leave the nose gun bay open. I chose to close the access panel on my model because I did not liked to spoil the flowing curved lines of the aircraft.
Another nice touch from Tamiya is that metal weights (to prevent tail-sitting of the finished model) are conveniently included in the box. These come in form of metal shot, which should be glued below the cockpit floor.
The inner surface of the air brake on the underside has some moulded-in detail, but it is quite simplified. The real thing was built of a perforated with large openings, and the holes on the model need to be drilled by you. Behind them there was a good amount of wiring and plumbing. Correct this if you think kit detail is too plain.
The airbrake itself is also a candidate for improvement. On real Thunderjets two different types of this item appeared, one with six elongated perforations, and one with a multitude of small circular holes. Inner surface of each type was built of a second pressed metal sheet, with correspondingly larger perforations. The kit’s part represents the latter type, but the perforations are only engraved and not hollow. You can drill the holes out for a better effect, or use Eduard’s photo-etched part, which by the way represents the former type of brake.
Honestly, the airbrake detail is not very noticeable on the finished model, so many modellers will surely consider the kit parts to be good enough.
Cockpit
The kit’s cockpit is very well done. I’ve only added some minor details on my model. The cockpit has then been painted with Interior Green and black. The seat can be used as is or detailed with parts from Eduard’s fret. Even the seat was painted Interior Green with dark green cushioning. Tamiya provides seat belts as decals, but these do not look very well for the scale, so I replaced mine with Eduard’s items.
Wheel wells
The nose wheel well is marred by the long mould seam inside it, which appeared almost impossible to fill or file. I covered it with a pre-cut piece of thin plastic sheet. Your alternative is a resin wheel bay from Tekniks, if you want to spend that extra money.
Main wheel wells were moderately detailed with a few pipes and wires, after that I painted them Zinc Chromate.
Wings
The wings have integrally-moulded pylons, one on each wing’s lower surface, which could present a slight difficulty if you decide to model an aircraft without them. This, however, shouldn’t be a problem for the majority of modellers, as the pylons were carried by most Thunderjets in service. You choose between bombs and drop tanks; Tamiya provides both.
Alternative parts are provided for the wing tips, one set with wing-tip tanks and the other without. As Thunderjets as a rule flew with the wing-tip tanks on, I chose this configuration for my model. Regardless of which wing tips you choose, the navigation lights on them are moulded integrally in grey plastic. These should have been provided as clear parts. I cut them out and replaced with new ones made from clear acetate.
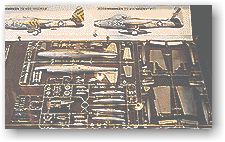
Tamiya also equipped wings with separate flaps, which can be mounted open or closed. The model looks pleasantly busy with the flaps deployed. The majority of my reference photos f84_02.jpg (12933 bytes)show parked F-84s with their flaps closed, but I’ve also come across one or two pictures of aircraft on the ground with dropped flaps, so – choose your option.
Fit of parts
The fit of all major components is perfect, Tamiya really saves us those major putty jobs… Two small exceptions are: the nose ring which is slightly too big and wing tip tanks. These tanks also have a seam line along which needs to be sanded down and polished for a model in bare-metal finish. That is if your unit markings do not happen to cover it…
Decals
Tamiya provides a total of three decal sheets. One large sheet with national and squadron markings for three colorful USAF machines, one small with a multitude of stencils, and yet smaller one with still more stencils!
These stencil decals hide some funnies. Apparently Tamiya’s designers did not have access to all stencil texts of the real thing. Therefore, in some places, they picked a random text and formatted it so that it would look good from a distance of few inches. If you study some of the stencils with a magnifying glass, you’ll find that:
”It was the first fighter designed to carry and deliver nuclear weapons. It was also the first fighter aircraft designed to include an in-flight refuelling system.
Or on another stencil:
”The F-84G differed from the other variants by using the 5400 L.B. thrust Allison J25A-29 engine. This increased the top speed to 622 MPH and unrefuelled range jumped to 2000 miles.”
Quite a useful piece of background information for those contest judges with sharp eyes!
If you’re really serious about accuracy, you can pick a sheet of F-84 stencils from Cutting Edge. These are based on the original drawings from Republic, and very accurate.
Painting and finishing
In the moment of writing this, I haven’t yet started to apply the bare metal finish to my model. My intention is to try SnJ, first time for me, and test if it’s as good as people say… A detail to remember is that even natural-metal Thunderjets were most often painted aluminium silver on the rear lower quarter of the fuselage. A drawing accompanying Cutting Edge’s decals shows this area.
Decals for Norwegian (my favourite subjects) F-84s are not easy to come by. Roundels can be collected from various sheets, but those squadron markings need to be painted on or combined from various pieces of colored decal film. But, hope is still there: Cutting Edge announced that they will release a sheet including a Norwegian ”MU-5”, an aircraft currently on display at the museum in Gardenmoen.
So, a conclusion? I have for sale: almost new and complete multimedia kit of Thunderjet from Battle Axe. Cheap!
Other extras
I assembled a following list of 3rd party sets for the F-84 from the current Hannants catalogue. Personally, I purchased the Eduard set and Cutting Edge decals and was most pleased with both. I haven’t seen the resin parts, as with their high prices they did not appear worth my money. After all, the corresponding Tamiya parts do not leave much to be desired…
- Cutting Edge
CEC48123 1:48 F-84G resin cockpit set for TAMIYA kit £16.95
CED48109 F-84E/G Maintenance Stencils & National Insignia decals for one aircraft £6.99
- Eduard
ED48257 F-84G Thunderjet (photo-etched detail set) £4.95
- Tekniks
TK48069 1:48 F-84E/F superdetailed undercarriage legs and resin nose wheel bay for the new TAMIYA kit £18.95
(Note from the author:) Useful detail pictures of F-84 can be found at IPMS Norway’s website.
This article was originally published in IPMS Stockholm Magazine in February 1999.

