by Martin Waligorski
I’m sure that many fellow model builders out there will agree that masking and painting wheel hubs of vehicles, road wheels of AFVs or aircraft is an ungrateful task.
If you are lucky enough to model large-scale modern kit it may contain wheel hubs and tires as separate parts. For the rest of us, there has been a choice between masking or hand-painting. I have tried several less-then perfect methods, my personal favourite being covering the wheel in Parafilm M and cutting out the rim shape. Cutting out a perfect circle had been a tedious and error-prone process.
Another favourite of mine is using a circle template from a drafting supply store. Paint the wheels rubber color first, then use circle template to paint the centers. The only problem is to find a template with a hole matching the size of the rim…
Latest trend are pre-cut round vinyl masks, like the ones provided by Eduard or Cutting Edge. Even though these are effective, they need to be ordered separately and add to the cost of the model. In practice, I’ve found that pre-cut masks repeat the problem of drafting templates: the right diameter mask never seem to be at hand when needed.
During my last project I arrived at the method which has all the advantages of the vinyl mask or circle template, is just as easy, but allows you to retain full control over the size and number of masks used. Here’s how to do.
You will need the following:
- Thin sheet styrene or acetate
- A drafting compass
- Parafilm M or modelling clay
A compass you use should have needles at both ends. It should also have wheel adjustment or built-in stop to prevent over-extending the legs.
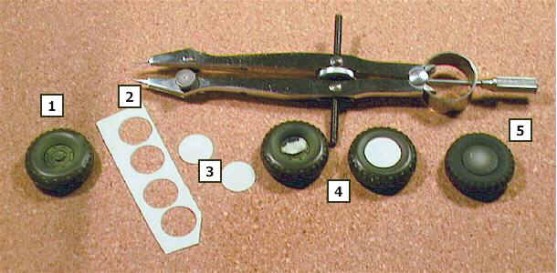
In step 1, paint the wheel hub area with the appropriate color and leave if off to dry. No masking necessary here as this is the first paint coat. Step 2 is cutting out the masks. Set the compass for the exact diameter of the rim. Place a thin sheet of styrene on the hard surface and score a circle with the compass. If you don’t have thin sheet styrene at hand, a piece of plastic lid from a food product like yoghurt or cottage cheese will do. Continue to score until the sheet is cut through and you get a separate circle. It usually comes out in perfect shape, but if you are a purist, you may smooth its edges with a very fine sandpaper. – step 3. Now you have a prefect circular mask exactly matching the size needed. To attach it to the wheel (step 4), I stick it to a small blob of Parafilm M placed inside the wheel. I believe that a tiny bit of modelling clay (play-Doh style) may also be used for this. Voilá – masking ready. The remaining step 5 is a pleasure – just spray everything with rubber color. Ready!
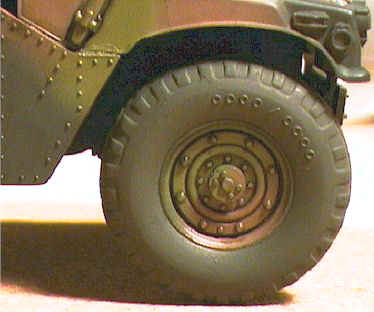
The final result – which can be seen on the adjacent photo – is as good as it gets. The method is quick, easy, and should be manageable by everyone. The entire painting process for the four wheels of the Tamiya Humvee shown here took less than 15 minutes!
Recommended.
This article was originally published in IPMS Stockholm Magazine in February 2001.


Actually, I think one is supposed to measure the radius rather than the diameter of the wheel with the compass, and I have to admit that usually takes a couple of attempts to get exactly right, so some amount of skill is still necessary.