Douglas DC-3 Behind the Iron Curtain
by Jerzy Ciupek

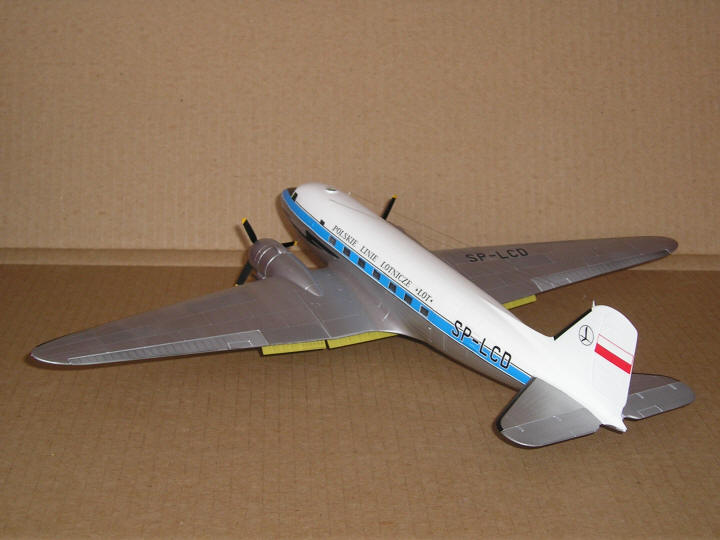
Among the Douglas DC-3 operators in Europe, LOT Polish Airlines counts as perhaps more exotic one, considering that it operated behind the Iron Curtain. In 1946, LOT purchased 9 DC-3s to operate domestic airlines as well as connections to Berlin, Paris, Stockholm and Prague. The aircraft served alongside 10 Lisunov Li-2s, being Soviet copies of the same Douglas design, apparently of much lower comfort and quality.
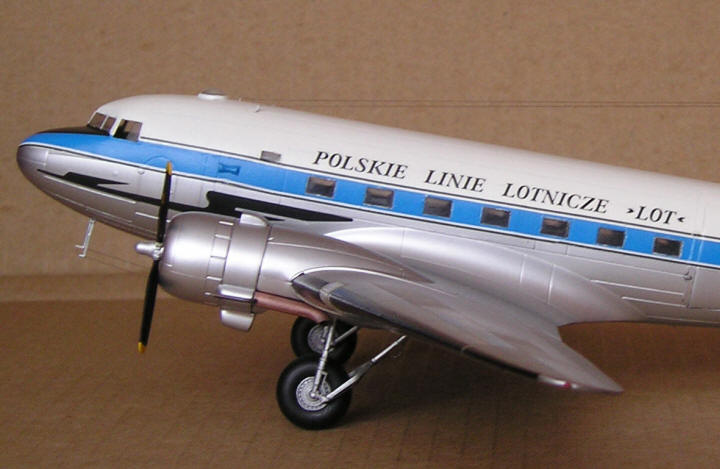
To build a model of a DC-3 I picked a venerable but still good Italeri kit. This was then enhanced with Eduard’s photoetched set for this aircraft and a decal sheet from SP-Decal. The latter contained full markings for my personal favourite, SP-LCD in the most colourful of all LOT Dakota liveries.
Construction begun with all the internal bits. Here a word of wisdom for all fans of superdetailed cabin interiors – nothing of it can be seen on the finished model, not even through the open side windows of the canopy!
The crew cabin was painted Interior Green, while the passengers’ compartment received a finish of grey.
Assembling the fuselage halves was straightforward, the only detail that had to be taken care of was cutting off an additional rectangular window of the radio compartment, which has not been rendered in the kit.
Now my attention turned to the engines. Those included in the kit were of decent quality, containing both rows of cylinders. I have only added photoetched ignition wires from the Eduard set. The engines were then painted using Model Master Steel Blue metalizer and washed using black enamel. The reduction gear housing was painted Engine Gray. Cowling interiors were painted aluminium.
More challenging was the undercarriage assembly, which is another area addressed in the Eduard’s set. To use the metal parts, the original wheel wells had to be altogether removed and the new wells folded from photoetched elements. The wheel wells were painted Zinc Chromate Yellow.

Before assembling the wings, flaps were removed from their lower halves. A strip of plastic was glued instead to retain the proper distance between the upper and lower wing surfaces.
The next step was attaching the lower wing centre section to the fuselage. The new flap interiors were installed then. At this stage the fit problems also began to manifest themselves. First, there was an ugly step between the lower wing and the fuselage. Secondly, attaching the wing revealed a rather loose fit of the latter, resulting in visible gaps along the seams. Fortunately these could be filled quite easily with 1 x 0,75 mm Evergreen plastic rod.
With wings ready, horizontal tail surfaces were attached and the model was ready for painting. First, the fabric-covered control surfaces were airbrushed with Humbrol Metal Cote Matt Aluminium and then masked off in preparation for the main paint job.
To prime the model I used Tamiya’s white acrylics. This is where disaster nearly struck. For whatever reason, after a few hours dying time the paint coat began to crack along panel lines. I touched-up here and there, resprayed with Pactra acrylics and… the effect was the same! Utterly frustrated, I was considering abandoning the entire project, but in the end decided to give it another try. The next attempt was only undertaken a week later, this time with success.

With these problems out of the way, I continued carefully with natural metal finish on the lower fuselage and wings, and for a change it went without surprises. The metal surfaces were sealed with appropriate Model Master varnish.
Another, albeit more easily rectified surprise came when taking a close look at the decal sheet. SP-Decal has left the white stripes in the blue-white-black cheatline were transparent rather than white. because of this I had to extend the white further down, meaning a bit below the windows.
Decal application followed. A word of comment there: I learned that long cheatline decals are best divided into shorter more manageable pieces, for example nose to first passenger window — passenger cabin — rear fuselage. The de-icing boots were also decals, touched up along the leading edge using Pactra acrylics. The decals then received a coat of gloss varnish.
With the airframe ready and painted, the engines were fit in place followed by the main undercarriage and flaps.
Whenever displayed at modelling shows, SP-LCD invariably draws a lot of spectators’ attention among the grey mass of all military aircraft. It has also received a prize for Best Civilian Aircraft at the 2005 Modelling Festival in Zywiec, Poland.

This article was originally published in IPMS Stockholms Magazine in June 2005.