A Review of the Accurate Miniatures 1/48 Yakovlev Yak-1
by Jeff Warshaw
Not for the beginner
For several years I have been reading professional magazine reviews of Accurate Miniatures highly-detailed kits. From the articles, it seemed like the modeler had to be a top-notch, A-1 competitor (the kind who airbrush details so small you need a microscope to see them and spend hours worrying over exact wing dihedrals) to even consider approaching one of these formidable kits.
As someone who considers himself an intermediate modeler, and who doesn’t even own an airbrush (I don’t think my landlord or my neighbors would appreciate the noise of a compressor, let alone my cat!), I put off purchasing their P-51 Mustang series, even though they offered kits of early Mustangs, including an A-36 Apache Allison-engine dive bomber, which, to my knowledge, had never been previously produced in 1/48th scale. I eschewed the early Dauntless kit because a reviewer in my local IPMS newsletter made it sound as if you needed a degree in Naval Aviation History to even open the box! I heard rumors that the Ilyushin Il-2 Stormovik kits were very easy to mess up if you didn’t take excruciating pain not to break certain brittle parts. So I took heed, and stayed away.
My fears were both confirmed and negated by building the inexpensive, excellent-looking Yakovlev Yak-1 kit, which won Squadron Signal’s ”Kit of the Year” award last year. These kits are definitely not for beginners or children. There is a profusion of tiny parts which must be carefully positioned, and knowledge of some advanced modeling skills is required. It helps to have a pin vise and small bits, several different sizes of Xacto or other hobby blades, at least two types of adhesives (white glue for clear parts, and a strong bond for plastic parts), a Flexifile with several grits, some fine grit wet-dry sand paper, Bare Metal Foil (Aluminum), flat wooden toothpicks, and a lot of patience. If you have these tools, and stick closely to the excellent instructions, you will produce a wonderful Yak-1 kit, a fine tribute to a brave young Soviet woman fighter pilot, Lilya Litvyak, known as ”The White Rose of Stalingrad.” More on this exceptional young woman later.
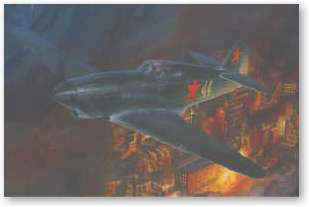
The boxart of Accurate Miniatures’ Yak-1 kit.
The kit
The kit is molded in dark gray and clear polystyrene, with the decals and clear parts in a separate bag underneath the main box. A nice feature is a painting chart printed on the top of this ”inner box lid,” and also a color photo of a completed kit on the bottom of the box. The historical section is interesting, and includes a few pictures of Ms. Litvyak provided by her family, although it does not give a detailed description of her service in the Red Air Force (VVS – Voyenno Vosdushnye Sily-literally meaning ”Military Air Force” in Russian) or the nature of her victories. These can be found on the Internet at a site called Modeling the Aircraft of the VVS which gives wonderful descriptions, tips on paint colors and markings, as well as in depth pilot histories and kit reviews. The fold-out instruction sheet is sturdy, and has little empty check boxes which I found very convenient for following precise instruction steps. Take their advice-follow their instructions. Don’t be a maverick and start building like mad. The process DOES make logical sense once you start building the sub-assemblies.
Step 1, the Cockpit Assembly, went off without a hitch. I painted the interior parts with Testor’s Model Master RLM 02, thinned with 25% white (hint-use a hollow straw and a bottle cap for mixing) and a few drops of enamel thinner. Then I dry brushed the raised details with Flat Black to give some contrast. I used the seat belt decals provided, but looking back, I think the kit would benefit from after market Sutton Harnesses. The overall detail is very nice, and includes a very unique instrument panel. The glass instrument faces are simulated by a clear panel deeply recessed, which gives a wonderful illusion of depth once the decal is applied. I don’t know why other companies haven’t thought of this idea. It looks fantastic! The gun charging handles, Shvak Cannon charger and detailed joystick give the cockpit a very realistic feel.
The first ”problem” I ran across was that the seat back pins on part C-55 didn’t fit into the recesses in the folding seat back, D-21. I had to cut the upper pin off and cement the seat back to the frame using white glue. The seat may look like it’s tilted back too far, but this is an illusion, as you will find out when you install the Cockpit in step # 3. In fact, it fits perfectly inside the fuselage halves.
Another early difficulty was encountered during Step 2, concerning Part B 51, the oil cooler outlet door, which may be positioned open or closed. The pins on the side of the door simply would not stay put, no matter what I did. I tried drilling the holes out with a very small pin vise bit, but this didn’t help. I must have dropped the piece inside the fuselage about a hundred times. I took to holding the box on my lap so I wouldn’t lose the part when it inevitably fell out. For those so inclined, you may wish to glue this part inside the left fuselage before gluing the fuselage halves together, or drilling out the holes prior to assembly. I gave up in frustration, cut off the pins with my Xacto blade, sanded the sides, and glued the part in place with white glue. It looks fine.
Problems…
A few minor things upset me in the next few assembly steps. Step Four, the Wing Assembly is one of the most complicated, and presented several challenges worth mentioning. The spar which will lock the fuselage assembly into place, part no. D20, is very difficult to glue in place due to the curvature of the lower surface. I tried MicroWeld first, but this would not hold the large piece, so I opted to use white glue. I waited until the glue was partially dry (it should be starting to turn clear), then carefully wedged the spar into the partially set glue. I gave this 24 hours to dry before gluing the spar/wing assembly into the fuselage. I used white glue for that also, but I suppose you could use super glue. I don’t trust the stuff, because I’m a klutz, and would probably end up with a finger glued to my face!
One major disappointment was clear part F36, the clear landing light cover. The part in my kit had two large, vertical scratches on the inside of the lens. I tried sanding these off with a fine nail file, my # 6000 Flexipad, and even the reverse of my Xacto # 11 blade, but nothing would take the scratches out, and filing only made the plastic opaque. I tried to restore the clear quality using Future floor polish, but it didn’t work. I ended up losing the part, which was even more frustrating. I decided to replace the cover by filling the hole with Micro Crystal Clear and sanding it to shape once dried. I hope you have patience if you’re going to do this—it has been a week, and it’s still not 100% clear yet, but it will be. Clear part # F-35, the pilot’s canopy also had a long scratch, but I buffed this out by rubbing it against the leg of my jeans, a trick I learned from Chuck Davenport’s excellent video ”How To Build World War Two Airplane Models”!
Construction goes on
Most of Step Four went off smoothly, but the port wing, A2, did not fit well. I had to trim part of the landing gear well (molded into the underside of the wing), and cut off some of the alignment pins. The wing eventually fit, but required some puttying to make it flush with the lower wing, A1. Although the kit reports that the joint between the wing and the rudder was rough, I found that I had a large, unsightly gap of about 2/16ths of an inch, and I filled this with Dr. Microtools putty mixed with Testor’s Liquid Cement (caution-this mixture is potentially lethal. Use a breather mask and make sure the room is well ventilated before applying this mixture with a small paint brush. Give it 24 hours to dry, then wet sand it until it is glass-smooth. Apply Bare Metal Aluminum foil over this and burnish it flat, then paint over the foil. Wing roots were handled similarly). Once the wing was assembled, I found that part # C49, the carburetor air intake didn’t attach well. I had to fill in gaps with white glue and paint over them, but it looks fine once the kit is painted.
Step 5 went as described, with no difficulties, but I was disappointed with parts D18, the landing gear scissors (more properly called oleo scissors, or oleo struts). They were not detailed, and also are too short (i.e., they are ”closed” too far) to fit onto the landing gear. Ideally, the should stretch across the rubber gaiters, but they do not. I lost one of these small parts, and after trying to fashion one out of Evergreen Styrene Strips, found that a much solution was to use the end of a flat wooden toothpick! I painted it and glued it in place, and it looks better than the kit part! Should Verlinden or one of the other after market ”update” makers read this report, some more detailed oleo scissors would be nice. I don’t know why these were not molded onto the landing gear, as they were on the tail gear.
Painting
It should be noted that Accurate Miniatures does not mention the important fact that you should paint the wings and fuselage of your kit immediately after Step 4. Do not install the landing gear, rockets, exhaust nozzles, landing lights, tail wheel or drop tanks (Step 6-Final Details) until after you have painted the camouflage scheme on the wings, fuselage and undercarriage of the plane. I followed the scheme marked on the back page of the folding instruction sheet, using Testor’s Model Master enamels. I used Flat Black FS 37038 for the black surfaces, and Russian Topside Green for the green areas, and Russian Underside Blue, again thinned with 25% Flat White for scale, for the undercarriage. It should also be noted that in Step 6, if you are going to build the kit with the cockpit open, as I did, glue part # E70 (use white glue or Crystal Clear) into place, and paint it before attaching the pilot’s canopy, # F35. If you don’t do this, you won’t be able to do it later, unless you remove the canopy.
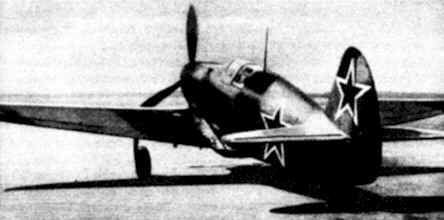
This, regrettably heavily-retouched, period photo of Yak-1 (alternatively Yak-7) gives some idea about the two-tone camouflage pattern similar to one used on Litvyak’s machine.
I chose not to drill out the exhaust stacks, because I don’t have a small enough pin-vise bit, but I did glue them into place. Using white glue will allow you to position the stacks carefully as the glue dries, making sure they’re properly aligned. This is a part I’d also like to see replaced in an ”update” kit if one becomes available. They were hard to position. I spend about 30 minutes on each side.
To simulate the wing tip landing light bulbs, I used a drop of Gunze Sangyo 90, Clear Red on the left lens (E67) and a drop of Clear Green (94) on the right lens. This looks very nice on the finished kit. In order to paint the rocket warheads ”dark red” I mixed Testors Model Master Insignia Red with about 20% Flat Black. This made a nice, dull, brownish-red. I painted the rockets and launch rails Testors Model Master ”Steel.”
The drop tanks were painted Model Master ”Chrome Silver”, then coated with Clear Flat to give a slightly weathered look. I carefully assembled the propeller and spinner, test-fitting the parts before using a thin application of white glue to cement the pre-painted parts. The heavy Shvak cannon fired through the propeller hub, which is why the hub should be painted silver. According to pilots, planes hit by this deadly cannon simply ”flew apart.” The rockets, it should be noted, were used for ground attack and anti-tank purposes, and were not air-to-air weapons.
Final assembly
The trickiest part of Step 6 involves the placement of the upper and lower landing gear covers. The instructions warn that the locating pins on parts D57 and D10 may have to be sanded or filed in order for the parts to fit flush with the upper parts D98 and D11,and this was true. I had to significantly trim D10, and cut the pins off of part D57 altogether to achieve a proper fit, and they still don’t look quite right. I would suggest that the modeler glue these parts together prior to installation in the wing (A1). This is another area where after market parts might help (it would be nice if the entire landing gear assembly were molded as one piece, though some detail might have to be sacrificed).
The rest of the assembly went off without a hitch.
Decals
Prior to applying decals, I applied a thin coat of Future floor polish and allowed it 72 hours to ”cure.” This acts as a setting agent for the decals and also protects the paint from skin oils when handling the painted model. The application of the decals is a bit tricky. A print out of the color markings of Lilya Litvyak’s plane, ”Yellow 44” shows the red stars a bit closer to the numerals than indicated by the kit, but this could be due to image compression, so I positioned them as the kit shows.
I have learned never to handle decals with my bare hands. This only leads to tearing and accidents. Instead, I wear the same latex ”medical” gloves I always use, and use a cotton swab to position and move the decals. They all went on with very little trouble, but it would be nice to have had a translation of the small stencils. Some are obviously ”Don’t Walk Here” or ”Jack Point” markings, but what do the ones near the landing gear mean? Fuel filler points?
The print out from the VVS Modeling web site also indicated that ”Yellow 44” had black under wing stars, outlined in white, not the red stars trimmed in black provided. I do not know enough about Red Air Force markings to know if black under wing stars were ever used. I would think that a minimum of black markings would have been used, to avoid confusion with the black and white Balkan crosses on Luftwaffe aircraft, but I could be wrong. It might be necessary for advanced modelers to research this information. I used the stars provided.
Once the decals were fairly dry, I white-glued the drop tanks into place. I gave the decals 24 hours to dry before applying a final sealer coat of Future Floor Polish. Finally, I positioned the antenna, pitot tube and pilot’s canopy, and attached the previously assembled propeller/spinner assembly to the fuselage. My kit was now ready for display.
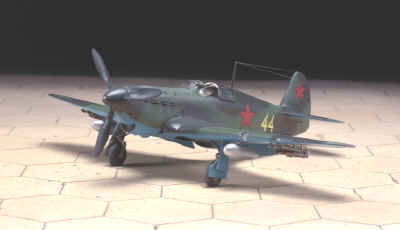
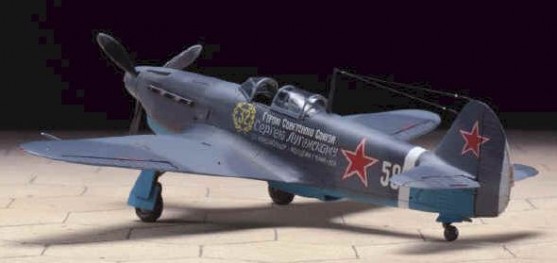
The completed model representing the aircraft of 286 IAP flown by Lidya Litvyak.
This is not Jeff’s model, but the prototype model produced by Accurate Miniatures.
Photo: Accurate Miniatures.
I must say that this is one of the nicest 1/48th scale kits I have built. Now all that remains is to find a space for it on my display shelves.
White Rose of Stalingrad
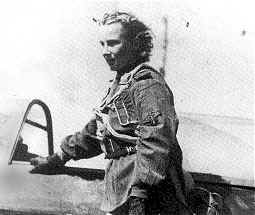
I would be remiss if I were not to include some background information on the pilot of this Yak-1, Lilya Litvyak. While it would be nice to imagine that the reason American, British, French and even Japanese air forces refused to allow women into combat was out of love and respect. The truth, however, is probably closer to prejudice than pride. Women’s Army Air Corps members were trained to ferry planes to both the European and Pacific Theaters of Operation, but not allowed to pilot those planes into battle because it was thought they couldn’t handle the stress of combat situations.
The ”nacht hexen” of the VVS proved these chauvinist policies inaccurate, as the women of 286 IAP (Fighter Division) and others racked up impressive scores against superior German aircraft. Lilya Litvyak was a ”strikingly beautiful” young woman, known as the ”White Rose of Stalingrad,” for the white lily she painted on her cockpit (why wasn’t a decal of this marking provided?), often mistaken for a rose. She enjoyed flowers so much that she had postcard of yellow roses taped to her instrument panel, and picked wildflowers to carry into combat with her. She began her service in the all-female 586th IAP flying mostly defensive missions from January to August of 1942. Because of her skill, she was transferred to ”male” squadrons in August, starting with the 286th IAD, then the 437th IAP, equipped with the Lavochkin La-5. She scored her first two victories while flying with this unit. She was then sent to the all-female 287th IAD, and briefly to the 9th Guards IAP.
German pilots soon came to recognize the skills of the young woman pilot, and knew better than to dogfight her Yak-1 marked with white lilies on either side of the cockpit. She was wounded three times in the summer of 1943, a period of intense aerial combat. The first time, on March 15th, she shot down a Junkers Ju-88 bomber, then got jumped by escorting Bf109s, yet still managed to down another Ju-88. She managed to land at her base, then passed out and was hospitalized.
Returning to combat with newly renamed 73 Guards IAP, she was wounded again on July 16, and July 18th. On both occasions, she landed in German-occupied territory, but managed to escape capture. On July 16th she made it back on foot, and on the 18th, was rescued by another fighter pilot who landed after her.
Though she was a skilled ”ace,” Lilya Litvyak was finally killed in combat on August 1, 1943, while escorting a flight of Ilyushin Il-2 Stormovik fighter-bombers. It is reported that it took eight Messershmitt Me-109s to down her nimble Yak-1b fighter. Considered lost in battle, her body was not recovered until 1979, where it was found buried under the wing of her downed aircraft, ”White 23” of 73 Guards IAP. She had flown a total of 168 missions, and racked up a score of twelve kills and three shared kills. She died at the age of 22. In 1990, her body was recovered for official burial, and she was awarded a posthumous Gold Star Hero of the Soviet Union, a medal comparable to the Congessional Medal of Honor by then Premier Mikhail Gorbachov. She is the only woman fighter pilot to have received this much deserved honor.
Conclusion
In the final analysis, the Accurate Miniatures Yak-1 kit is one of the finest I have built. It is as detailed as the Tamiya Spitfire kits, and looks terrific finished. It took a lot of patience and some improvisation, but I was rewarded with a great model. I’d be surprised if someone doesn’t win a National with one of these kits (not me-I don’t build for competition, only fun).
My recommendation for those intimidated by the ”hype” on AM kits is simply ”don’t believe it.” You do not have to be a professional model maker to handle one of these excellent kits. The instructions are remarkably lucid and helpful, and even provide templates for those who wish to ”drop the flaps” on the plane. Painting instructions are provided for each assembly, along with many helpful ”tips” on construction, gluing and detailing.
I found this kit relatively pain-free and easy to assemble by following the steps and ticking off each box as I finished each small task. Be careful with the small parts. I lost or broke several, including that landing gear scissors I had to replace with a bent, painted toothpick and the clear landing gear light, which I replicated with Microscale Kristal Kleer.
I recommend this kit to anyone interested in modeling a Yak-1, and look forward to the upcoming B-25 Mitchell series.
Also available from Accurate Miniatures is this kit of Yak-1b,
an improved version with all-round-vision canopy.
Photo: Accurate Miniatures
This article was originally published in IPMS Stockholm Magazine in February 1999.
