Tech Tips
by Michael Gleffe
English translation by Martin Waligorski
Without a doubt, the least interesting and sometimes bothersome aspect of airbrushing is cleaning the equipment. Neglecting to clean a brush properly is the most certain way of assuring yourself of never-ending frustration while painting. Often, thorough cleaning alone may solve a problem.
Most manufacturers would advise you to end your airbrushing session by running pure thinner through your brush, disassembling it and soaking or rinsing the parts in appropriate thinners. While these procedures usually provide adequate cleaning when changing colours, I found them less than satisfactory after a full day of airbrushing.
How do you keep your airbrush as clean as new?
Here is my way of thorough cleaning of an airbrush. It applies to all-metal, double-action types. I use this method once every few days, or when I know that I won’t be using an airbrush for a while. I usually spray acrylics in my brush and therefore can use isopropyl alcohol as cleaning medium; for oils or resin-based acrylics use other appropriate thinners.
The key to proper cleaning is removing all paint residue from the internal parts of the equipment, including particularly hard-to-get areas such as the bodywork, connecting threads, paint caps and delicate items such as nozzle and needle. Some brushes may be easier to keep clean than others, but not attended to they will invariably start to collect paint in confined places, typically in the nozzle, all threaded connectors and needle aperture in the body.
The procedure is as follows:
Run some pure isopropyl alcohol (or other acrylic thinner) through the brush
- Disassemble the brush and wipe the needle and nozzle gently with paper or rag soaked in ethyl acetate
- Now take some household silver polishing compound (Häxan in Sweden) and use it to clean the parts externally and internally. Silver polish is most likely to dissolve any residue that remained unaffected by alcohol or ethyl acetate. All cleaning and polishing must be done gently and carefully. Suitable cleaning tools are:
- Cotton swabs
- Go-between dental brushes
- Cotton makeup pads
- The general principle is to rub and polish the parts externally and internally until no more black oxidized residue remains an a clean cotton swab or pad.
- The last step is rinsing the parts thoroughly with lukewarm water and letting them dry.
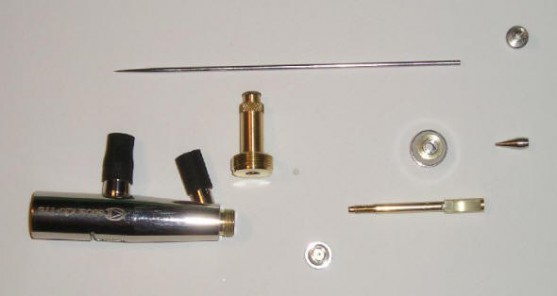
The result is shown on the picture.
The advantage of using silver polishing compound is not only restoring the factory-new shine to the parts, but also that the parts will move more smoothly after assembly and that there is less tendency for paint to stick, for example on the needle.
Perhaps a word of caution is also in place, remember that polishing compound contains an abrasive, so applying lot of pressure during polishing could (just maybe) lead to parts wearing off over time. However, I have had my Badgers 175 and 200 for over two years now and didn’t notice any negative effects of my cleaning technique. Anyway, always remember to be very gentle with the nozzle!
This article was originally published in IPMS Stockholms Magazine in January-February 2005
