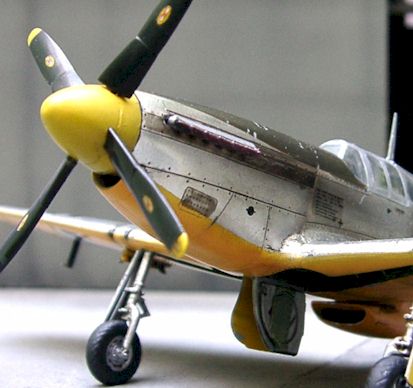
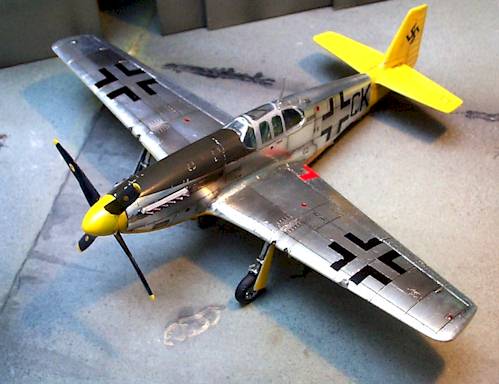
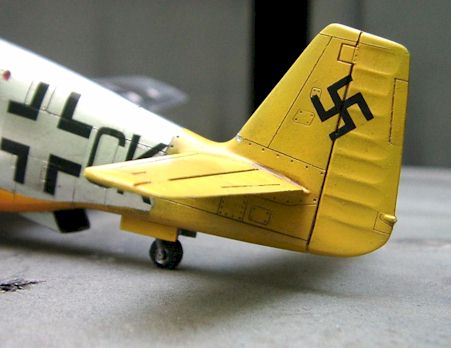
Captured P-51B in Luftwaffe markings
by Ricardo Dacoba
With the advent of the North American P-51B, the USAAF finally received an aircraft which could compete on equal terms with the Focke-Wulf Fw 190 and later models of the Messerschmitt Bf 109. Previously reluctant to ”not conceived here” Mustang fighter, the USAAF was finally fully sold on the type, issuing a production contract for over two thousand P-51Bs. Providing a long-range escort to daytime bombers, the Mustang carried the air war to the heart of Germany.
As is widely known, the key to its success was the installation of a two-stage Rolls-Royce Merlin engine. By early 1943, massive production of Merlin engines was undertaken by Packard and Continental factories. The huge North American plant at Inglewood, California was dedicated solely to Mustang production, and a second plant in Dallas, Texas was set up to expand production even further.
Inglewood-built Mustangs were designated P-51B, Dallas-built Mustangs were designated P-51C, the two aircraft being almost identical.
(If you don’t known the development history of the P-51 by heart, you can read the previously published Modeller’s Guide to P-51 Mustang Variants – Ed.)
P-51s in German hands
Due to the sheer size of the Allied air offensive upon Germany, it was inevitable that a certain number of combat aircraft would fall into the hands of the Luftwaffe. In fact, both sides of the conflict conducted intense intelligence on all crashed and damaged enemy aircraft that happen to come down on their own territory. In Germany, the Luftwaffe put the recovery of crashed aircraft into a widespread system. Repairable aircraft were put back into the air, other were used as a source of spare parts or recycle fuel and lubrication oils or ammunition. Everything was collected, sorted and directed to special units operating the captured aircraft or gathering technical intelligence.
A variety of British and American types found their way to the famous KG 200 where they were used for a variety of ”black” operations, or in a much less mysterious fashion as specialized transports. Other aircraft, especially fighters, were used for pilot education, being demonstrated by special Staffel to the frontline fighter units.
I thought the German paint scheme for the P-51 offered something a bit out of the ordinary. The object of my model, T9+CK, had a log career in German hands. It was initially tested at Rechlin in the original Olive Drab paint scheme but with German markings and undersides repainted in yellow. The plane was later moved to Hannover-Wunstorf during the summer of 1944 where it was assigned to 2.Staffel of the Versuchtverband Oberbefehlshaber der Luftwaffe for demonstration purposes. It circulated between various fighter units as a practical aid in teaching how to use the Fw-190s to the best advantage in combat against P-51s. At that time the original paint finish was also stripped off, presumably to match the improved performance of bare-metal USAAF machines which appeared towards the end of the conflict.
The kit
Revell of Germany offers an excellent 1/72 scale model of the ”B” model Mustang, which is perhaps one of the most accurate Mustang kits in this scale today. The model consists of 40 parts with a very well engraved surface detail, good quality plastic, clear instructions and a sheet of well executed decals. The only criticism on my part concerns the poor quality of the one-piece transparent canopy. A shame for such a fine kit.
I opted for the other sources of decals for the Luftwaffe scheme, although I used few of kit items for smaller markings like stencils.
Construction
The model is really a pleasure to build, it doesn’t present any big difficulties provided that you take care not to remove the fine detail when sanding the major joint lines. Because of the good quality of the kit, I decided to built it directly off-the-box and instead concentrate on the natural metal finish.
The finish
Now comes the fun part, painting the model! Or rather applying the finish. I started with polishing the assembled airframe with Polishing Compound. This is the very important step; care should be taken to obtain high-quality finish on all surfaces, fuselage, wings and tail planes. The more glossy the model will be, the better!
Then I used Micro Metal Foil Adhesive and aluminium foil. The technique of foil application is really pretty straightforward – just follow the instructions provided with the adhesive.
Having finished with the foil, I continued painting the yellow undersides with airbrushed acrylic model paint. Contrary to what others say, I didn’t have any problem with applying masking tape over the metal foil. A coat of gloss varnish was then lightly applied prior to the application of decals. I used Testors Visions clear varnish throughout.
I used the numerals and crosses from the spare box of unused kit decals. The decals were applied to the surface using Tamiya Acrylic Solvent. Once done, a thicker coat of satin varnish was applied over the decals, allowed to dry thoroughly and then sanded and varnished all over again until the clear decal backing film disappeared.
Then the entire airplane was weathered with an airbrush application of a very thinned dark brown shade. A final coat of varnish rounded off the paint stage.
Once the painting phase has been completed the only thing left to do was the usual assembly of the small parts, and my P-51 was ready!
This article was originally published in IPMS Stockholm Magazine in December 2001.


