Tamiya Chieftain Mk. 5 in Cold War Livery
by Marco Antonio Vaiano Jr

The Chieftain
The mainstay of the British Army of the 1960s and 1970s, the Chieftain Main Battle Tank succeeded the Centurion and was in turn replaced by the Challenger. Designed by the Fighting Vehicles Research and Development Establishment, the first prototype was completed in 1959. The type was accepted for army use in 1963 and entered service with the British army only in 1967. Total production for the British Army amounted to some 900 tanks. The Mk. 5 was the final production version, the subsequent Mk 6-11 being upgrades to earlier models.
The Berlin Brigade Scheme
Among former frontiers of the Cold War, Berlin holds a place of its own. If governments in Washington and Moscow felt threatened by the missiles that could cover the distance between continents in minutes – it is difficult to imagine how Berliners must have felt on the cold front. The constant tension put extraordinary requirements on men and equipment stationed within the city for its defense. For the military planners, the confined area of West Berlin presented a totally unique set of challenges. Some of them were perhaps never solved, but others lead to some innovative military thinking.
In 1982, the 4/7 Royal Dragoon Guards tank squadron in Berlin initiated a series of experiments with replacing a normal Deep Bronze Green paint scheme of the British Army with something giving a more effective camouflage in the urban environment.
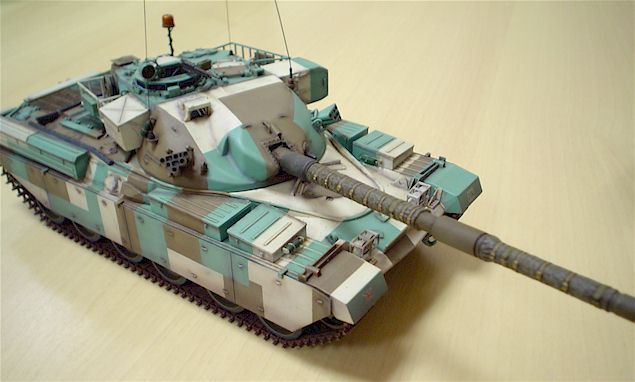
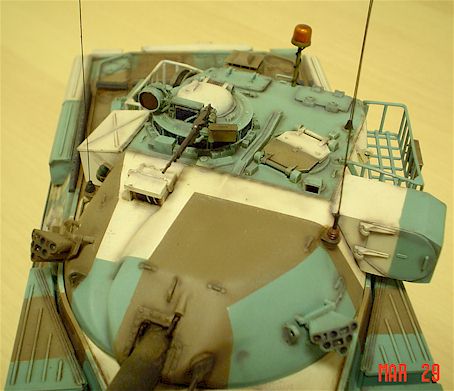
The resulting Chieftain paint scheme must still rank as one of the most unusual and visually appealing tank camouflages ever devised. Influenced by the “dazzle” scheme of Royal Navy in WWII, the striking rectangular pattern was intended not only to conceal, but also to mislead, and was reportedly extremely effective.
The scheme was subsequently adopted by all British forces in Berlin. All vehicles were painted exactly to the same pattern, thereby denying the Soviets a possibility to determine the strength of the British Forces by recognizing individual tanks.
My model
I used the classic Tamiya´s Chieftain Mk. 5. This kit is not entirely correct; some modellers say that it bears a closer resemblance to a Mk. 3. However, it is a good, buildable kit and as the most important thing with this project was the paint scheme, I decided to go with it out-of-the-box.
The small aditional items were the antennae and the rotating orange light on the turret which was picked from some old Italeri kit.

Painting the beast (a real nightmare)
If you want to paint a tank in a complex paint scheme such as this, planning is essential. All of the small parts such as hooks, toolboxes, headlights, smoke grenade launchers, turret baskets, hatches etc. are best painted separately and glued only after the basic paint job is done. All the masking of the hull and turret would be virtually impossible without damaging these fragile parts.
Based on available colour photos of the Berlin Brigade vehicles, a friend of mine (Marcelo Guerra – one of the best plastic modelers I know) mixed the camouflage colour shades using automotive paints.
Oh God, time to start painting! Having washed all the assemblies in water and detergent, I started with a good gray primer to prepare the surface. Then I painted the interior parts and wheels in dark green: the Berlin scheme was field-applied and certain difficult-to-paint items such as wheels or exhaust stacks were left in the original Bronze Green finish.

When this has dried completely, I masked off the green parts and painted the hull and the turret white overall. I let the white dry for 24 hours and started the masking job.
Using Tamiya’s masking tape and constantly checking with the photos, I masked the contours of grey-green patches. The remaining areas of the model were covered using additional paper and tape.
I airbrushed the paint and let it dry for 5 minutes (don’t forget I use automotive paints), then removed all the masks. Removing the masks while the paint is still fresh is important. If you let the paint dry too much there is a risk of pulling off the entire patch with the tape. Unmasked, the grey-green patches were left for additional 24 hours drying time.
Using the same process and reference photos, I masked and painted the brown patches and again left the model aside for 24 hours. Having removed the masks, I could appreciate the camouflage in its entirety for the first time. It looked even better than I expected…!
With the main paint job completed, I glued the small parts, applied the decals and covered everything with two coats of Testors flat varnish.
The gun with its canvas boot was hand-painted.

As the Berlin Chieftains were used in the city on paved surfaces, they did not accumulate as much dirt and grime as tanks usually do. I opted for not applying the normal wash for weathering, as I was afraid that the effect in the white areas would be too harsh. Instead, I applied a subtle pattern of streaks and rain stains using a reddish gray tone and the airbrush.
Highlighting was done in the traditional way by dry-brushing.


References
More information about the development of the Berlin camouflage can be found in the december 1999 newsletter of The Ex-Military Land Rover Association:
http://www.emlra.org/newsletter/newsletter.htm
This article was originally published in IPMS Stockholm Magazine in May 2004.