Searching for perfection with Revell’s Focke-Wulf Fw 190 A-8
text by Martin Waligorski
model photos by Peter Alsterberg
”An exceptionally accurate kit; (…) so accurate as to be almost unbelievable”. So enthusiastic was a review of Revell/ProModeler’s new 1/72 kit of Focke-Wulf’s famous fighter in Scale Aviation Modeller International vol. 5 no. 3. An ultimate kit of Fw 190? Maybe. In this article, I will try to share my experiences building it.
The aircraft itself is probably the most publicised modelling subject nowadays, I wonder if its popularity has exceeded that of Messerschmitt Bf 109? Having a lot of references at hand, I intend to tell as full story as possible in this article, and follow all the steps and techniques involved in the construction of the model. Strap your seatbelts, this will be a long story.
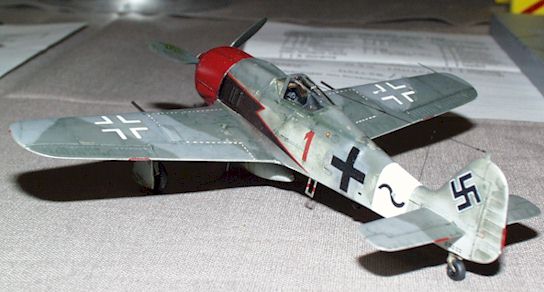
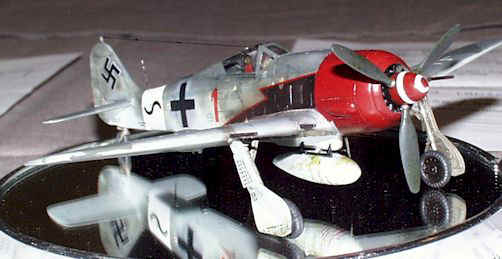
My model represents a well-worn ”Rammjäger” aircraft of IV./JG 3. Recent research added a controversy whether the red ”1” and red cowling of this particular aircraft weren’t in fact yellow.
Reverse engineering
I built the model in reverse order than it should have been done. Here is how.
The original purpose of this project was a quick-build during a dark February weekend. I picked the kit because the crisp moulding carried a promise of perfect fit, and a single-color paint scheme featured in the instructions allowed for an easy paint job.
Had Revell’s decals been of acceptable quality, my model would have stayed that way. But let me tell you, these decals were just terrible! They effectively ruined the almost-completed model. Somehow I found it hard to let it be, and I attempted the recovery.
I sanded off the decals, the camouflage and started again aiming at using a third-party decal sheet.
Already having a file in hand, I attempted to improve the external shape of the model. No, it wasn’t quite as perfect as the reviews said – see details below. Then, I gradually added more external detail leaving off the original out-of-the-box approach entirely.
Finally, you wouldn’t like to leave a nicely finished kit without some cockpit improvements, would you? I finished off adding some interior details from the outside through the cockpit opening.
This approach: first painting the entire model, than detailing, and then the cockpit interior may sound weird, but on the second thought I think it has its advantages. Next time I might do the same thing in purpose. I will get back to it at the end.
The kit
The kit is currently available in two versions, and Revell has options to do more in the future. In the U.S., the same basic kit has been issued with different boxes and paint schemes in the ProModeler line.
The original release, and the one in my possession, was a Fw 190 A-8/R-11. It first came in 1997. This kit allows a modeller to build either a night fighter version R-11 equipped with radar antennae on the wings, or a standard fighter A-8.
The second kit (recently released) is marketed as Fw 190 F-8/A-8 and features an esoteric Bv 246 gliding bomb. This kit allows also to build a standard F-8/A-8 in with either a ”flat” or ”blown” canopy configuration.
In the box
The first impression is very favourable. There are three sprues of light grey plastic with very nicely moulded parts, recessed panel lines and very crisp detail. The level of detail is excellent. It is in fact much better than on the Hasegawa kit, up until recently considered to be the best kit of the Fw 190 available in this small scale. Revell’s kit excels especially in the areas of cockpit and undercarriage. Both are executed with great deal of accuracy and precision.
There were traces of flash mainly on the propeller fan and clear canopy parts but nothing really serious.
Both main undercarriage wheels were distorted by sink marks. Correcting them would be impossible without destroying the beautiful detail. I decided to keep mine – the black wheel discs and careful positioning on the wheel legs made the fault less visible on the finished model.
Ailerons and elevators featured a wealth of recessed detail. However nice, it is definitely exaggerated for the scale! Purists might want to remove it. I decided to leave it mostly because it added interest to the wing’s surface. An impression of correct detail is not necessarily the correct detail… I believe this to be especially true for smaller scales like 1/72.
Wheel wells are commenably deep and have internal detail. However, being moulded integrally with the lower wing, they lack a see-through look characteristic for the full-scale aircraft. To my knowledge, so far only Dragon got this area right in their Ta 152 models, but there it was a multi-part assembly.
A number of nicely-moulded small parts for external details are provided. Of these, the radar antennae are too thick for the scale, but I don’t think Revell could have done them much thinner. Separate cannon barrels and pitot tubes will, as always, benefit from replacement by fine tubing. A nice touch is the provision of extended access step behind the port wing.
There were also a few less fortunate areas. Canopy parts are clearly moulded but very thick. There is also a row of funky overscale rivets surrounding the rear part of the canopy. These remind of the old Airfix kits of the 50’s. I shaved them off with a tip of a scalpel blade.
Even the decal sheet appeared from the outset to be of dubious quality, being noticeably out of register and having all red parts printed in rather pinkish color. These bad qualities have only been confirmed later.
The potential
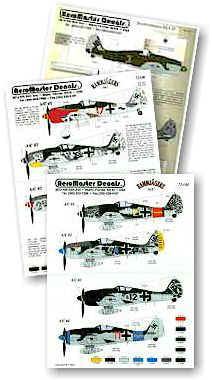
Aeromaster has been particularly productive in making decals for Fw 190. Here are only three sheets of their extensive range.
The Fw 109 A-8 subtype was produced in large numbers over a relatively long period of time. Despite common designation, individual aircraft came in many variantions. For Fw 190 aficionados, here’s the list of model’s features and options:
One early type ”flat” canopy is included. The newer ”F” kit includes a choice of ”blown” or ”flat”one.
Both kits feature only an early type of head armour supported by a single bar at the rear
Fairings for wing-mounted outer guns are separate parts, and can be left off if desired. The fairings included were of later production model designed for MK108, but used also with MG151.
Parts are included for R-11 night fighter Rustsatz, including all radar antennae and exhaust glare shields
Parts are included for R-1, an extra armament pack consisting of two underwing gondolas each containing two MG 151 cannon.
A centerline fairing and rack for external fuel tank are moulded as separate parts and can be left off if desired. The fairing is of later ”long” type.
Drop tank is included.
With these attributes, the kit forms a good basis for many late fighter and fighter-bomber variants of the Butcher Bird, and can easily be made to represent anything from A-7 to A-9, and F-8 to F-9. With the kit’s low price and tons of Fw 190 decal sheets coming recently from Aeromaster, it’s not difficult to put it to a good use!
Instructions
These were typical of new Revell kits, regrettably on several loose sheets of paper rather than in a booklet form.
The assembly part was self-explanatory and left nothing to be desired.
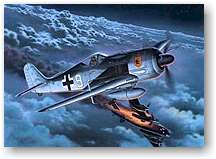
I found the painting instructions unclear. The first aircraft on offer, and one featured in the box art, is a Wilde Sau night fighter coded white ”9”. The parts for R-11 are appropriate for this one. Except for night equipment, the aircraft carried a usual scheme of RLM 74/75/76. The mystifying fact is that the coat of arms depicted in yellow on the box art is white on the decal sheet. I’m not sure which of them is right.
The other scheme was an anonymous scheme of RLM 76 overall. It nevertheless attracted me by the simple application. The aircraft featured is a yellow ”10” of unknown unit, also carrying a factory radio call signs of VS+BX.
Later I found out more about this particular aircraft. Yellow ”10” was found by the allies abandoned at Bad Abling by the end of hostilities. The overall RLM 76 camouflage was only roughly oversprayed on top of what was probably a standard RLM 74/75 scheme. The swastika markings and upper wing crosses where almost entirely oversprayed by RLM 76, in contrast with the fuselage crosses and markings which apparently have been re-applied later. Taking this into consideration, accurately reproducing this single-color scheme would have been more complicated that I thought at the beginning. Maybe it’s just as well that the project evolved into something different…
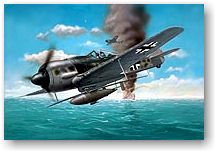
One of the color schemes presented by Revell leaves unanswered questions. This overall RLM 76 machine of unknown unit was found in Bad Abling, April 1945.
The instructions fail to tell whether the yellow ”10” carried R-1 cannon pods. It is suggested in the assembly sequence that they should be mounted, but the paint plan doesn’t show them in place, and the designation Fw 190 A-8/R-1 is not used. Also, I strongly mistake that a 1945 production machine would have a blown-type canopy and a late type ”solid” head armor, as illustrated on the above profile, but I found no confirmation of that.
First attempt
Prior to construction, don’t forget to open up the locator holes for the extra equipment to be carried by your chosen subject. Of course I did forgot to do it on my model.
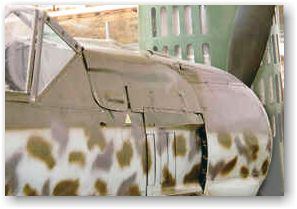
Fw 190 A-8 featured f uselage-mounted MG 131 guns hidden under this bulged cover. Note the loose fit of parts .
The construction was a true pleasure. After painting and assembling the cockpit interior, it took only a couple of hours to arrive at an almost complete model, minus undercarriage, canopy and other detail parts. The fit was perfect all over, no filler being required. Well, almost. The fuselage machine gun cover (part 13) was slightly too narrow for the fuselage. This panel on the real aircraft was a rather loose fit anyway, so you can do as I did: leave it as is.
The entire model was then airbrushed in RLM 76 using a 50-50 mix of Humbrol enamel no. 76 and white. Once dry the matt paint was gently polished to a smooth finish.
It was on my attempt to apply kit decals that everything went wrong. Revell decals turned out to be very thick, brittle, and unpleasant to work with. They simply wouldn’t conform to the surface of the kit no matter how much I attempted to soften them with Microset/Microsol. On curved surfaces, like around the spinner, they had a clear tendency to break into pieces on slightest attempt to align them.
It got worse than that. Curiously, the red stencil decals turned out to be half-transparent, which caused them to disappear on dark backgrounds and come out in ridiculous pink color on RLM 76 background.
Last but not least, the yellow ”10” and black cross markings turned out to be off-register against their white backings.
The model was ruined! Why couldn’t Revell include decent decals a brand-new kit of this quality? Or did it just happen to me? Several kit reviews indicated that the decals were good; mine must have been the worst I have seen in years.
Well, perhaps one just shouldn’t expect everything to be perfect in a five-dollar kit. After the application of fuselage markings I made the decision to abandon the kit decals and re-make the model using an entirely different paint scheme.
Here comes the interesting part…
When sanding off the first paint layer, I also took my time to look over the kit’s accuracy. Before starting construction, I already checked the main kit components against a set of classic – and still outstanding – drawings by Arthur Bentley (Classic Aircraft of WW2 published by Argus Books in the Aircraft Archive series). These checks confirmed that the wings, stabilisers, and rear fuselage have been executed very accurately. Furthermore, all panel lines appeared to be in the right places.
Having now the assembled model in hand, I could also check if it looked accurately in three dimensions. Kurt Tank’s creation was an unusually purposeful design, but as with other aircraft of the era, some of the shapes and curvatures were complex and difficult to represent on a flat drawing. A comparison of kit parts with reputable plans can help in finding major dimensional flaws, but only a study of the three-dimensional shape can reveal the accuracy of the form. I firmly believe in precedence of the looks of the model before the dimensional accuracy, exact placement of the panels etc.
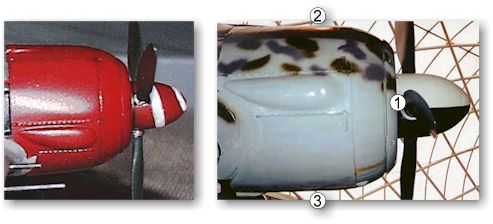
Having previously seen photos of some completed models, I had a vague expectation of spotting some problems in the forward fuselage area. Indeed, after looking at the kit from different angles – comparing its outline with the photographs (See also Focke-Wulf Fw 190 A in Detail from January 1997 issue of this webzine -Ed.) I concluded that the model’s engine cowling looked unlike the Focke-Wulf’s. The reason for this became apparent after a second check against Bentley’s drawings. Revell moulded the front opening of the cowling too small. The error is quite large for the scale, being if I remember correctly around 2 mm. As a consequence, the front part of the cowling and the cowling ring tapers too much to meet the small opening. The negative effect is even more exaggerated by the model having its cowling slightly rounded in profile. All this gives the front part of the fuselage an unnaturally heavy ”bulbous” look. The accompanying picture of the preserved A-8 illustrates the error.
The kit’s erroneous nose profile is illustrated here by the comparison with the photo of the real A-8. The front oil ring and the cowling opening of the kit is much too small (1). I also did some heavy sanding to ’straighten up’ the top (2) and bottom (3) llnes of the cowling, which were curved in the kit. As you can see, only a partial improvement was possible without complete re-make of the nose.
The error would not be easy to correct. A purist modeller might have wanted to replace the front ring entirely, and reshape the cowling by sanding off all of its detail.
After some consideration I decided that enlarging the front engine opening would require too much work. As an intermediate measure, I opted to sand down the cowling to give it a straighter, uniformly tapered profile. The sanding job was a bit awkward – the cheek blisters on the cowling’s surface stood in the way. Nevertheless, after some two hours of work I arrived at the cowling profile that, however not entirely accurate, greatly improved the model’s appearance. The appropriate panel lines were then restored.
I also wondered for a while if the bulged fairings over the fuselage guns were not too pronounced, but I decided not to do anything about it. By the way, these fairings are moulded differently in about every Fw 190 A and D kit I have seen. Accurate or not, Revell’s offering is no worse than any other contemporary kit of the Butcher Bird.
All things considered, I was still impressed with the kit’s accuracy. The distorted nose shape is the only thing that Revell really missed, and regrettably it’s noticeable. In other areas the kit is great.
Being ready with the shape corrections I went over to re-applying the paint scheme.
Painting and ageing
The aircraft chosen by me was Red ”1”, a Reich’s Defence fighter flown by an unidentified pilot of IV./JG3. The chosen time was the beginning of 1944, when the unit’s unorthodox rear-firing rocket launchers were removed and replaced by standard extra fuel tank racks.
The colors of this machine’s markings are speculative. My choice conforms to Almark Decals’ sheet Reich’s Defence – Weapon Carriers, researched some years ago by Les Whitehouse. More recently other researchers interpreted the dark red cowling and number as yellow, some other would have the yellow-on-red or yellow-on-black nose spiral. I’m also not sure if the Red (Yellow?) ”1” lasted long enough to be converted back to the standard configuration without the rocket unit. Somehow it doesn’t surprise, does it? I wonder if we will ever be 100% sure about those Luftwaffe paint schemes…
I stayed with the red color because of it’s attractive appeal – a purely unscientific choice, although in my eyes a probable one. Also, I assumed that the aircraft being in combat service until 1944 would show some heavy signs of use (many Rammjaegers did).
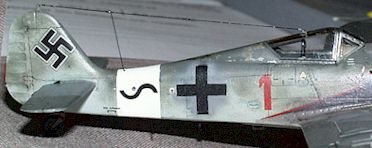
The soft mottle effect was applied freehand using the fine nozzle of my Aztek airbrush. Non-standard fuselage crosses were produced emulating the order of events on the original machine. First an ordinary cross decal was applied, then the white outline has been oversprayed with light application of RLM 75.
Note also the ”metalized” rear part of the cockpit hood. See adjacent text for details.
Planning to weather my model, I prepared for it. The basis of weathering had been my own technique which gives a neat simulation of metal skin of the real aircraft. It’s essence is to ”prime” the model’s surface with real metal before painting. I first select some panels on the airframe in strategic areas. The choice usually falls on some access hatches, a few panels on the upper wing surface, cowling panels, fuel filler caps. These panels are then covered with pieces of Matt Silver Bare-Metal Foil. After burnishing, each piece of the foil is trimmed along the surrounding panel line. For the technique to work, it is not neccessary to attempt to cover the entire airframe with foil. Just a few flat panels where the foil application is easy will do.
Priming the model with metal foil serves several purposes. First, nothing looks like metal than the metal – oversprayed with only light coats of paint these panels will look just like painted metal, reducing the ”plastic” feeling to the model. Secondly, the paint can be gently chipped off from the primed panels, thus creating a most realistic impression of worn paintwork. Lastly, although the Bare Metal Foil is very thin, the diference in level between covered and uncovered panels will be noticeable to the eye after painting (which must be done in thin layers). This will add more life and variation to the surface of the model.
This time I airbrushed the model with a Aeromaster Acrylics. A coat of RLM 76 went underneath and RLM 74/75 on top. I used rolled Parafilm M for masking which helped me to obtain slightly feathered edges to the camouflage pattern.
A freehand mottle was then applied to the fuselage using very well thinned paint and the finest airbrush nozzle.
I was not too happy with the Aeromaster acrylics. They constantly clogged the airbrush nozzle. Perhaps I was trying with worng thinning agents, but I’ve heard that other modellers had the same problem with Aeromaster paints. I also had my doubts about the shade of RLM 74, which was rendered as grey-green, whereas my other references suggested it would be more neutral in shade. For the similar reason Likewise, Aeromaster’s equivalent of RLM 76 looked too dull and lifeless for my taste. Of course, these judgements are only a matter of personal preference.
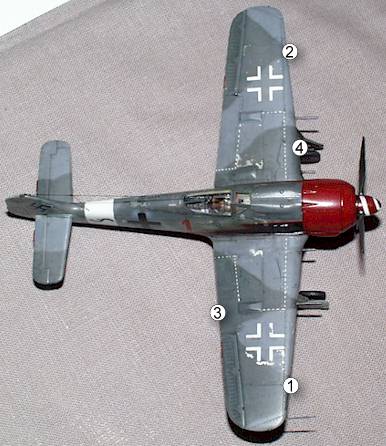
Painting techniques described in the text are illustrated here. The areas of worn paint and slight variations in skin’s surface produced with Bare-Metal Foil are visible on the wings (1). Parafilm M was used for masking to obtain feathered edges of the camouflage pattern (2). The effect of wear was further enhanced by applying a neutral-grey wash (3), also explained on a separate photo below. Wing walk markings (4) were produced from Xtradecals finest continuous white strip, overpainted with dots of camouflage paint.
After finished painting, I polished my model using the technique similar to the one recently described on these pages by Mark Wlodarczyk. I used Bare Metal Plastic Polish for this, and a small piece of soft cotton cloth. Gentle polishing of the painted surface has a number of benefits. Firstly, any overspray which occured during freehand airbrushing can be trimmed away. Secondly, the paint will chip off easily from metal-covered panels underneath, producing a lifelike worn-off areas (caution should be applied there as the effect can easily be overdone). Last but not least, polishing brings life to the painted surface, giving it a degree of sheen appropriate for viewig the real aircraft from some distance.
After initial polishing I applied the decals. These were collected from a variety of sources. The individual aircraft markings originate from the aforementioned Almark Decals sheet. Crosses and the many stencils were taken from a variety of other sheets, mostly Aeromaster. Almark also provided a decal for the black ”chevron” panel on the fuselage sides, but I chose to mask and airbrush mine, adding only an outline from Xtradecal’s thin red stripe decal .
The partially oversprayed fuselage cross was first applied as decal. Then the black parts were masked off using strips of very low-tack masking tape, and the white outline lightly oversprayed with RLM 75 grey color.
Usual application of Micro Set was given to all decals, followed by Micro Sol. After that the entire model was given a coat of Micro Flat, and then lightly polished again.
The weathering effect was completed by applying varying degrees of transluscent wash of neutral grey color to the entire external surface of the aircraft. Special attention was given to areas that are especially prone to degradation on the real aircraft. These are the wing’s upper walk areas; area around the cockpit; areas around fuel and oil filler caps; wing’s lower centerline behind the engine; wheel wells; the external fuel tank; propeller blades.
For washes, I have also developed my own technique which is is more fool-proof than using oil paint. I use water-based textile marker pens, of the type which features a soft but pointed brush-like tip. They have a benefit of being very controllable tools for achieving subtle effects: you simply draw on your weathering! At the same time, any mistakes can be easily wiped off using plain water, or in hopeless cases a drop of isopropyl alcohol.
These qualities make the textile markers ideal tools for applying sublte wash effects without risk of unwanted exaggeration. The effect can be judged from pictures.
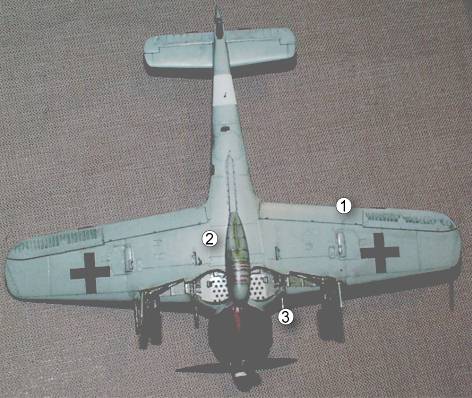
The effect of my weathering techniques can be seen here on the aircraft’s lower surfaces.
The only tool used for emphasizing panel lines (1) was a medium grey water-based textile marker pen. It works like watercolor – the more you apply, the darker the shade. It can be further diluted by dipping the tip of the pen in water, and removed from the model by wiping off with the wet Q-tip. These qualities make it an ideal tool for applying sublte wash effects without the risk of exaggeration.
The heavy spill marks on the extra fuel tank (2) originally came from volumes of hot oil dripping from the engine. They were produced the same way using the olive-green pen. Heavier dark wash inside the wheel wells was applied the traditional way (3).
Small things matter
For many years I tended to put all my detailing effort into cockpits and wheel wells of the aircraft. Not so in my recent projects. In time, I learned that the real trick is not to maximize the cockpit detail – it is to detail the entire model evenly. External detail, at first glance sparse and unsignificant, can do miracles to the scale appearance of your creation.
The detailing job started prior to painting with adapting the model to represent the praticular specimen I wanted to build. The armament of Red ”1” was field-modified. It carried four 20 mm MG 151 cannon in the wings, but at the same time had it’s cowling guns removed. I applied the appropriate wing fairings, and carefully removed cowling gun barrels with the moto tool. The empty gun ports in the cowling were then hollowed out.
I also added external armour plates below the cockpit, so typical of the Rammjaeger aircraft. They produced from pieces of self-adhesive metal tape fixed in place and trimmed to correct shape directly on the model. Slightly raised appearance is all that was needed to simulate these armoured panels.
The propeller was enhanced by adding a metal fitting at the root of each blade. I turned a length of fine soldering wire twice around each blade and fixed it with tiny drops of superglue.
Inside the canopy, new seat belts were aded using spare photoetched parts from Airwaves. The solid reflector sight was improved by adding reflector glass made from tiny pieces of clear acetate. The head armour was thinned down and an overscale support bar replaced by a thin strip of plastic. A drop of white glue aded some shape to the head padding.
With the various panels, gagues and controls inside the cockpit previously painted with colors appropriate for the real aircraft (many levers of Luftwaffe aircraft were color-coded in red and yellow), the finished cockpit looked more than adequate for a model with closed canopy.
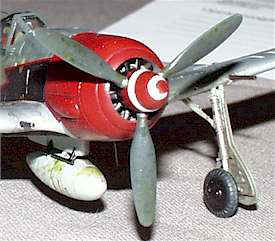
It pays off to spend time on propellers. On my model, each prop blade resides in a realistic metal fitting.
The propellers stained and wore off easily. Modellers often forget to weather this area.
Note also the replaced cannon barrel at the wing root.
On the wing’s upper surface, the moulded undercarriage lock indicators were replaced with very fine wire, painted red.
The excellently moulded undercariage didn’t really need any improvement except for the hydraulic brake lines. I used fine soldering wire, which had an advantage of bending very easily.
The direction finder loop was fashioned from a tiny strip of plastic sheet. Even the morane antenna below the wing was thinned down to a scale appearance and received a new tip from very fine stretched sprue.
A lso refined the crew access step by taking the kit part and thinning it to about 1/4 of the original diameter.
A length of very fine monofiliament served as a material for the radio antenna. Holes were drilled in the canopy and fuselage to accept it, and the antenna was fixed with superglue. I added tiny blobs of white glue to simulate the isolators at the fin’s end of the wire. Finally the antenna was brush-painted in glossy dark grey color.
I finished off replacing all cannon barrels with pieces of fine metal tubing. The pitot tube was a two part assembly. A piece of thin streched-sprue rod was put inside the heat-stretched plastic tube. I always use this this method to produce small probes of more sophisticated shape.
Summarizing, I replaced or refined all the small parts supplied with the kit, and added some more. The effort added significantly to the appearance of the model.
And the canopy was bad, bad
The last part remaining was the canopy hood.
Although there are no problems with it’s accuracy, Revell didn’t engineer it very well. The first and most obvious problem is its thickness. Secondly, even if the canopy is moulded in two parts, it still cannon be modelled in an open position. The reason for this is that the rearward sliding portion of the hood is moulded integrally with the fuselage halves. Revell could have done much smarter following Hasegawa’s example and moulding the entire sliding portion of the canopy as a single transparent part.
The transparent qualities of the canopy were substantially improved by dipping the hood parts in Future Floor Wax, and leaving them aside to dry. I found that applying Future by dipping parts in it gives a more solid and smoother coat of wax than can be achieved by brushing or spraying. The only thing to remember is to avoid air bubbles when lifting the canopy parts off the bath.
The third and most serious problem became apparent only after the canopy was glued in place. The lower frame of the hood is moulded together with both fuselage halves, the clear part being supposed to remain unpainted at its lower and rear edges. Because of the canopy’s thickness this would result in an ugly visible seam.
Another sad deficiency of the Revell kit is the canopy. Again, it becomes clear once you compare with the photo of the real thing. The kit’s clear part is only as large as the transparent part of the original hood. This leaves no option to the modeller but to apply much heavier canopy framing than would be otherwise desirable. It is apparent at the lower (1) and rear (2) part of the hood.
Note also that even if i thinned the head armour (3) on my model considerably, it is still not near the scale thickness! A photoetched part would have filled the purpose much better.
As I didn’t have a replacement canopy at hand, I opted to resolve this by painting the lower canopy frame to a higher extent, but I’m not satisfied with the result. Next time I will replace the kit hood with the spare one taken from Hasegawa kit, or a homemade one.
Lessons learned
This project was relatively easy to complete. Although not out-of-the-box as initially intended, completing it was not one of those once-in-a-lifetime efforts. In fact it took only about as much time as writing this article… Most of the time was spent on the paintwork.
Being an average modeller, I was very pleased with the finished model. It even managed to fetch a Highly Commended award at IPMS Open 1999.
As a comment to kit’s shape problems. ”So accurate as to be almost unbelievable” was an overstatement from SAMIs reviewer, although this kit has missed the mark by a very narrow margin. Whether you like it more than Hasegawa’s is up to you. I know how I would build the ultimate 1/72 model of the Fw 190. Revell would be my kit to go with, but not without a new nose. I’d borrow it from another Fw 190 kit, only haven’t decided yet which would best fill the purpose. I would also rebuild the centerplane section of wheel wells and add a new cockpit hood (that’s an easy part). Throwing in a photetched set from Part or Eduard might just create a real contest winner.
The unusual order of activities on this project was eye-opening to me. Arriving at a ready-to-paint airframe after the first few hours of work, I could focus entirely on achieving a good paint job and visible details. This has certainly made the project more entertaining and time-effective. I will try a similar approach again on some future projects. Otherwise I’d only be improving my cockpit detailing skills…
Despite my criticism it still looks like a Focke-Wulf, doesn’t it?
This article was originally published in IPMS Stockholm Magazine in July 1999.
