Tech Tips
by Fredrik Lundbeck
It was peculiar to the Eastern Front of the World War II that most military equipment had to be re-camouflaged for winter conditions. This is because prolonged periods with all-covering deep snow made any objects other than white clearly visible against the landscape.
Both Russians and Germans used the same method of applying temporary white camouflages. In the winter of 1941/42, all German vehicles on the Eastern Front were provided and applied with washable white winter camouflage paint that was used to cover all the visible areas. The distemper finish was applied right on top of the original finish. In the spring, the paint was to be washed off revealing original dark grey. Often, it was applied hastily and with crude means. But the most interesting property of it – well, at least from the modeller’s point of view – was that being water-soluble, it eroded very heavily due to atmospheric conditions and the usual wear.
General approach
There are several possible approaches to replicating a realistically worn winter camouflage on a scale model. One of them has been presented on these pages before by Anders Isaksson on his M4 Sherman.
I have adopted another method which to my knowledge has been first presented on the Missing Links forum by Alberto Elizondo from Mexico. Therefore I would like to refer to this method as the Alberto Elizondo Method. Without this posting on Missing Links I would not had tried to make this kind of winter camo at all. I tried different others but with no great success.
So far this is the best method for this kind of weathering. I also rush to tell you that the technique can be useful for most kinds of worn paint schemes. I have seen pictures from Alberto with desert camouflages produced in the same way and they look great!
Nowadays, most of the methods used for winter camouflages recommend to apply the basic camouflage scheme first, and then overcoat with white, thereby emulating the factual order of paint application on the real thing. However, if you simply airbrush one paint on top of another, you may end up with something like this:

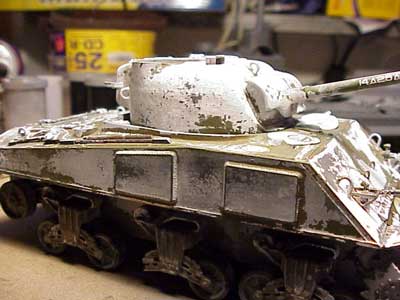
I think that you will agree that while airbrushing can produce a variety of fine finishes, this does not look like the vehicle has gone outdoors for the entire winter! In other words, I was rather looking for something shown on the following photo (it’s the same model, yes I did remove the airbrushed finish between these two photos were taken!)

Quite a difference, won’t you agree? Now bear with me as I describe how to do it.
The Elizondo Method described
The essence of this method is to dissolve, damage and wash away a top paint coat on a model using a laundry detergent.
The steps are as follows:
- Paint the entire model with a base camouflage coat
 using enamel paints. It is important that the paint is enamel rather than acrylic because this coat needs to be resistant to the detergent. Humbrol enamels are great for the purpose.
 - Leave the base coat to dry thoroughly
- Apply a white overcoat camouflage using acrylics. In my case I have used Tamiya XF-2 White. Let the acrylic coat dry to the touch, about 30 minutes.
- Rinse the model in lukewarm water. Unless you have some fragile detail parts attached, this may be done directly under the tap.
- Take an ordinary powder laundry detergent. A note here. Many of the modern laundry powders come in highly concentrated ”compact” form (small boxes). In my opinion – and I have tried – they are very strong and cause too rapid reaction once applied on the model. I prefer to use an ordinary old-fashion detergent in a large box. Brand of the detergent should be less important, I used a cheap Coop type (Blåvitt).
- Using a stiff brush, pick a little powder at a time and apply on the model by tapping the brush against the surface. Rather than covering the entire surface, try to apply the powder with varying density, focusing on areas that should receive heavier weathering.
- After detergent application, the detergent will react and dissolve the underlying acrylic paint. It takes from 10 to 30 seconds depending on the degree of erosion you would like to achieve.
- You can help to remove the dissolved white paint by gently rubbing it with a tip of your finger, or scratching with a nail.
- Rinse the detergent away using lukewarm (tap) water.

If the colour does not dissolve as expected, just add more detergent and/or allow it to work for more time. You can also help by scrubbing with an old toothbrush.
Timing is the essential aspect of this method. Both the active time of the detergent and the preceding drying time of the acrylics are important. As with all ”wet” techniques, It is recommended that you try it first on a scrap model before washing away your latest wonderwork.
Should all paint vanish in the process, just re-paint the model and repeat the procedure. Otherwise, white acrylic coat can be removed altogether using isopropyl alcohol, and the entire process started over from scratch.
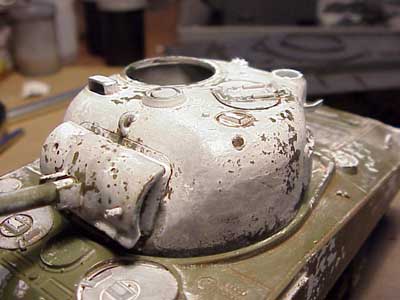
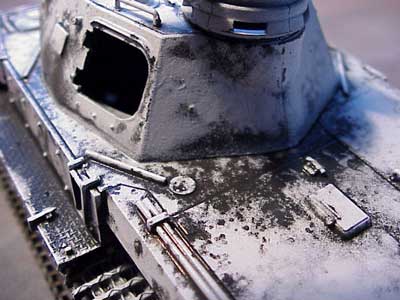
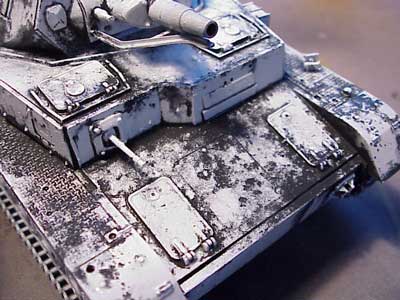
I hope that the photos of my KV-II and some other ”trial” models below will speak for the kind and diversity of the results that can be achieved using Elizondo’s method. Thanks, Alberto!


This article was originally published in IPMS Stockholm Magazine in February 2003.