by Dennis Glas
This material has been first published on the home page of IPMS London, Canada. Used by kind permission of the copyright owner (Ed.)
My latest modelling project is an M4A3E8 Sherman in 1/35 scale. Many of the cast parts found on Sherman tanks were adorned with numbers for identification purposes. As an example, the commander’s cupola had as many as seven sets of numbers dispersed on the external faces of the various components. To date, none of the major kit manufacturers have captured this detail in their offerings so I sought some way to correct these omissions.
I had considered all of the usual remedies (shaving off tree part  numbers or using injection/photo-etched numbers), but I could not find anything that was small enough for the job (approx. .020″ high). I thought that it was time to try an idea that I had been kicking around for a while – make my own etched parts using a technique that is used for making printed circuit boards.
About etching
Essentially, the process involves applying a ”barrier” to a thin piece of copper or brass sheet and immersing it in an etchant. The etchant gradually erodes any metal that isn’t protected. Depending on the desired results, a partial or full etch can be achieved – it’s merely a matter of time. Unlike photo-etching, this process does not require the preparation of any artwork (used for masking a piece of photo-sensitised metal).
The etchant, which is basically a concentrated acid, can be purchased at most electronic supply houses. I purchased a 16 oz. bottle at Radio Shack (product #276-1535) for around $6.00 (purchased in 2000). The numbers were etched from .005″ copper shim stock. The ”barrier” that I used to create the numbers are HO scale model railroading dry transfers produced by C-D-S. Dry transfers are wax and as such, they are impervious to acid.
The technique
My first step was to clean both sides of the shim stock with super fine steel wool (0000). This removes anything from the surface that may impede the etching process and provides for better adhesion of the dry transfers. Then I covered one side of the shim stock with electrical tape and applied the dry transfer letters and numbers to the other side in the desired sequences and patterns. Don’t apply the transfers along the edge of the stock, but rather lay them out so that there is at least a 1/16″ margin of material around each individual pattern. Light pencil lines can be drawn onto the metal to serve as guides for aligning the transfers. When each pattern was set down, the transfers were burnished down onto the metal. This was done by placing the backing sheet that comes with the transfer sheet over each pattern and rubbing the transfers down with a toothpick. Cut out each pattern leaving an even margin around each one. I’ll refer to these pieces as pattern ”blanks.”
To create the bath I poured the etchant into a 500 ml plastic cottage cheese/yoghurt container to a depth of approximately one inch. When the etching session is completed, the lid can be placed over the container for storage. In most cases, the bath will work for several etching sessions. Don’t pour used etchant back into the original bottle as this will dilute the unused etchant. While I’m on the subject of containers, make sure that you use something that is resistant to acid. Metal is obviously out of the question!
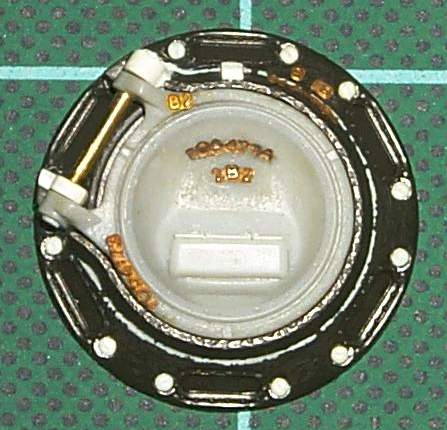
The cupola that I referred to adorned with all those casting numbers. Notice how the very thin web between the numbers serves to keep them positioned relative to each other.
I secured the electrical tape side of each blank to a suitable length of 14 gauge insulated copper wire (the type that is commonly used for wiring houses – leftovers from another of my projects) bent into an ”L” shape with a piece of rolled electrical tape (yes – sticky side out). I poked slits through another container lid and slid the long end of each hanger through the slits so that the blanks would be completely immersed in the etchant when the lid was on the container. As the etching process works more efficiently if the bath is gently agitated, the lid prevents the etchant from splashing out (this stuff is pretty nasty), and keeps the blanks from contacting each other while they are in the bath.
Depending on all kinds of variables, such as stock thickness, amount of agitation, strength of the acid, etc., the etching time will vary. Therefore, the blanks will have to be periodically removed from the etchant and checked. By the way, that’s another good reason for using the perforated lid, as all the blanks can be removed from the bath simultaneously for these inspections. My numbers took approximately 40 minutes to etch.
As I stated previously, the etchant attacks any metal that is not suitably protected. Therefore, as the etchant is working its way down through the metal, it is also working inward under the mask that has been used. This helped to enhance the look of the numbers that I was after as this effect served to round them off.
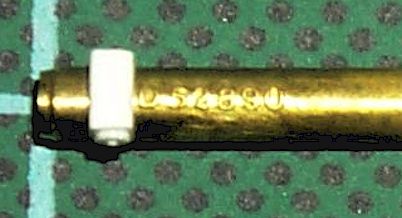
This item is a pintle mount for the Sherman’s M2 HMG (it still needs to be cut to length). This shows how the process can be used on tubing, rod, etc. The pintle started out as a .125″ diameter rod. I etched casting numbers (to the right of the white styrene block) and a step at the left end.
Once a suitable etch has been achieved, the process can be stopped by rinsing the parts in water. I took this a step further by dissolving some baking soda in water and terminating the etching process by dipping the parts in this solution first (remember basic chemistry – acids and bases). By removing the parts from the bath at the appropriate time, partial etches can also be obtained. In my case, I stopped the process when there was just a trace of a web left between the individual numbers and letters. This maintained their spacing, which greatly simplified their application to the model.
If any of the dry transfers remain on the parts, use a piece of masking or scotch tape to remove them. This is accomplished by touching the sticky side of the tape to the transfer and pulling it off. To remove the parts from their electrical tape backing, just soak the lot in some lacquer thinner. The thinner dissolves the tape’s adhesive and frees the parts. The etched parts can then be dried and applied to the model. As my numbers were pretty small, I adhered them with some thinned varnish.
Some variations of the same technique:
- Pattern masks (like the dry transfers used in the previous explanation) can be created from electrical tape or painted onto the metal surface with lacquer or enamel paints
- This process can be used for etching anything that is brass or copper – tubing, rod, wire, etc.
I hope that you’ll find this technique of some use, and remember that the etchant is very corrosive, so please exercise extreme care when using and storing the stuff.
This article was originally published in IPMS Stockholm Magazine in April 2002.

