A Way to Stronger Models
by Frank Spahr
Styrene is a good material for modeling, but on certain occasions, it´s not strong enough. My main trouble areas are masts for sailing ships, especially the upper and thinner parts of the construction, and certain kinds of landing gears, the long and spindly variant, for instance with the F-105. The upper spars of the masts will inevitably tend to bend under the stress of rigging, and it´s hard to achieve a balance between the various rigging threads and the respective pull they produce. Certain landing gears, especially if they are ”to scale”, are not particularly sturdy. Some kits need plenty of weight to keep them from tailsitting, adding ever more stress on the gear struts. Over the years, with the styrene becoming more brittle, the problem tends to increase, so a sturdier replacement might come handy.
With resin kits, you frequently get cast metal parts for the gear struts to support the much higher weight of the material, but with ordinary kits, it´s rare apart from the huge Tamiya jets, for instance. So these potentially weak parts may need strengthening in some cases. If no aftermarket replacement is available, there are only the following ways to pursue:
A good way is scratchbuilding the part from metal, if you´re skilled in the necessary techniques. Several master modelers do so and achieve great results. Various diameters of metal rods and tubings may be used to construct the desired parts, using glueing and soldering techniques.
I present you a different approach, surely not for everyday use and possibly mainly to show ”what can be done”. It originates from my time at dental school when we did some private projects in what spare time we had. I for instance sculpted a figurehead for a wooden sailing ship model I was building at the time from wax. I cast it in brass which looked really nice. We also took leaves and flowers, even HO scale car models and cast them in metal, sometimes in brass, even in silver. They made really nice shelf sitters!
This is possible in dental casting technique because here you make a mold from any material that will burn without a trace, be it wax or plastic or a plant. You embed this model in an investing mass and heat the cured mass in an oven, thereby burning the embedded model out and leaving a hollow shaped like your model. You then pour liquid metal into this empty space and let it cool down. You then destroy the mold and release the cast, clean it up and polish it. It´s the same method as used in casting bells, yet on a minute scale.
So it´s perfectly possible to take mostly any  conveniently sized styrene part and make a metal replica of it using dental casting techniques, resulting in a very strong and very delicately rendered part, probably better than some of the white metal casts you get.
The material of preference will be a cobalt-chromium-molybdene alloy which is used for dentures, crowns and bridges. It´s light, strong and comparatively inexpensive. You now only need to find a friendly dental technician to cast your part for a reasonable reward …
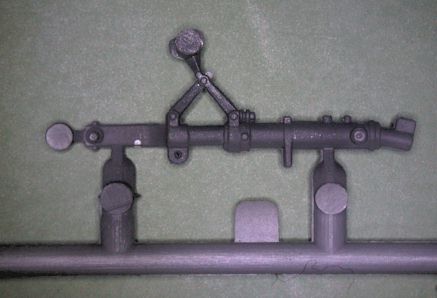
I have used a leftover nosegear of my Revell 1:48 Me 262 for this demonstration (see picture). This former Dragon and even former Trimaster kit pushed injection molding technique as far as was possible, resulting in very fine and thin and often flimsy parts – just think of all those parts prone to breakage in other modern kits when you´re looking for a reason to give this technique a try.
I asked the owner of the dental lab I partner with if he could help me in this project and he did. My heartfelt thanks therefore go to Mr. Uwe Eckhardt from Kaufungen, Germany. So here he is cutting the part with its immediate sprue from the main sprue.
It is advisable to clean up the plastic part as good as possible before casting as it is much easier working with styrene.
The sprue attachments need to be enlarged for the metal casting, making cleanup harder yet being necessary for the casting process. It is important to keep the channels for the metal as smooth as possible to avoid the liquid metal breaking off grains of the investing mass during the cast. The casting channel also needs to be so large as to allow the liquid metal to fill the mold entirely before solidifying.
We left the little plastic lumps on the gear scissor and the lower end of the strut as they fulfill the important purpose of forming a reservoir for molten metal:
If you cast metal into a hollow mold, the metal will start cooling down and then shrink while solidifying – much like plastic does – which leaves the sink marks that annoy us so much. In making a dental cast, you place the strongest part of the structure into the centre of the casting block where heat is retained for the longest time, enabling liquid metal to flow into the part during cooldown from the strong parts. Thus, the ”sink marks” (in fact they are little hollows in the metal, like air bubbles) should be confined to the casting channels and the sprue, leaving the part itself cast without hollows and imperfections. In dentistry this is really important as these hollows may produce corrosion of the alloy when placed in an electrolyte = saliva.
The plastic part is waxed to a V-shaped channel and the entire construction is waxed to the bottom of a casting mold. The part should be placed above the centre and about 8 mm from the upper end to retain a strong enough layer of investing mass above it. It is advisable to collect parts and to cast as much as possible in one go, thus reducing costs.
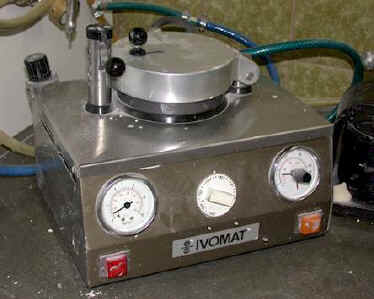
The investing mass is mixed per specs in a vacuum mixer. This device removes air bubbles from the mass while mixing.
Then the casting mold is placed on a dental (!) vibrator and is gently filled with the investing mass, attempting not to trap air bubbles around the part.
Then the entire mold is placed in a high-pressure pot. The  pressure will release remaining airbubbles and further improve the reproduction of the part – they can be seen on the upper surface of the cured mass.
After curing, the casting ring is removed from the investing mass and it is placed in an oven. The oven´s programming will heat the mass so that the plastic and wax will be burned out and the investing mass then warmed to its specs. This implies a certain time/heat curve unique to the materials used. To achieve a snug fit of a cast dental object, it is important that the shrinkage of the metal when solidifying is accurately compensated by the expansion iof the investing mass – say: If shrinkage is 4%, the investing mass has to expand likewise before casting.
After the proper heating procedure, the metal is molten by induction and the investment mass placed in the casting machine, where the liquid metal is injected into the mold by a combination of centrifugal force and vacuum.
After cooling down, the coat of investing mass is removed and the cast object cleaned by sandblasting. Next the casting channels are removed with rotating carbide discs and the attachment areas cleaned up.

Next follows further cleaning and polishing with appropriate instruments – with such a strong alloy, your Dremel won´t easily do but might, patience and consideration provided. We used carbide burs of varying size and shape, followed by rubber polishing devices of varying grain.
You´re in for some slight burns of your fingers anyway as the metal gets really hot …
Now you have a part that can be easily painted and CA – glued to your model. I´ll use this method on my forthcoming Monogram F-105 and report on it.
This article was originally published in IPMS Stockholm Magazine in March 2004.


