text by Martin Waligorski
photos by Peter Alsterberg
For a change
I must admit I have never built a car model before. My modelling interests have always been connected to flying machines, and then mostly to 1/72nd scale. However, from time to time these tedious detail and paint jobs on tiny aircraft make me want something else for a change.
This time I was looking for a quick-build. A larger scale model, preferably single-colour paint job, and (please) no puttying or sanding required. What could that be? I paid a visit to my local hobby shop to investigate, expecting to pick some armour kit, but then again… all those wheels to mask…
When my eyes fell on some of the new Tamiya car kits, I knew it was just what I needed. Most of these kits feature one-piece body with beautiful surface finish (no sanding or puttying!). The car body can most often be painted in single color without masking. Number of decals to apply is limited, chrome parts and tyres come ready-made; and if you don’t like to spend your precious time on adding detail, you can always model the bonnet closed.
This consideration resulted in picking a recent Tamiya offering of Jaguar Mk II Racing, and another Porsche 911 for my wife (a promising beginner). As it turned out both kits fulfilled the expectations. It took us only two evenings to arrive at two finished, and impressive, models. Beginners, build model cars!
The Kit
Jaguar Mk II represents the finest in British car design. 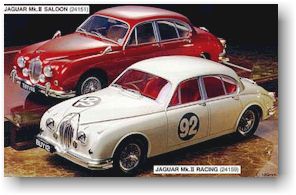 First presented in 1959, the Jaguar Mk. II became an instant hit. With Mk. II, Jaguar followed it’s tradition of making cars with elegant styling, high performance but comparatively affordable price (affordable price does not apply today, if you’d like to purchase a real Mk.II). From 1960, these cars took part in many rallies, endurance races etc. Among the drivers were legends like Stirling Moss, Graham Hill and Bruce McLaren. The pinnacle of Mk. II’s racing career was a 10,000 mile speed record at the Monza circuit, where an average speed of 105 mph was attained during a four-day event. After 1964 the Mk. II’ successes in racing gradually faded.
This kit is one of two Jaguars produced from the same basic tool. My kit represents the racing version, which featured a bigger and more powerful 3.8 litre engine producing 280 bhp. Tamiya makes also a stock version called ”Jaguar Mk. II Saloon”, from which most of the parts were taken.
Tamiya’s packaging is exemplary. All sprues are delivered in separate plastic bags. The one-piece body is moulded in cream white plastic. Other sprues are multi-color: chrome-plated for wheels, grille, bumpers and so on; cream white for interior parts; black for the chassis, suspension and engine.
There are also four rubber tyres and a set of poly-caps to mount the wheels without gluing.
All detail parts are crisply moulded without a trace of flash. There are one or two sink marks on the underside of the chassis, but none of them is noticeable on the finished model.
Tamiya provides two sorts of decals for this model. The first one is a  comprehensive decal sheet, featuring number plates, instrument dial faces, racing numbers (white 92 in black circle), and protective black rims for headlights, bonnet and rear lights. I’m not sure how the latter looked in reality – was some kind of tape used?
Finally, burled walnut panels of the interior are also provided as decals! An experienced car modeller at the hobby shop commented ”you could probably paint them better yourself”, but I can’t see how this could be easily achieved. The wood pattern on the decal is very well done, and the colors appear right.
Another sheet is referred to in the instruction sheet as ”dry decals”. This is a set of self-adhesive chrome trims and emblems for the bonnet, body sides and trunk cover. I believe these to be photo-etched metal parts with adhesive backing, but I might be wrong.
The 10-page instruction sheet is equally well executed and generally the diagrams are easy to follow. As a beginner, I had some problem with the assembly steps which combine construction, detail painting and decals, and such diagrams where in majority! I would prefer to have assembly, painting and decaling clearly separated in the instruction sheet.
…and the construction begins
The construction of the kit starts with an engine. This multi-part assembly is moulded in black plastic. Two top block covers and six carburettor intakes come in chrome-plated plastic. These parts appeared too shiny for my taste, so I airbrushed (washed) them with some very thinned black paint. Except for this small remark, the chromed parts greatly enhanced the look of the assembled engine.
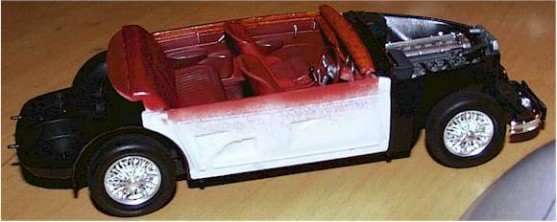
The engine was then mounted onto the chassis. As the 3.8 litre beast was wider than the stock engine, the engine room had to be widened by cutting off an opening on the right side of it and then blanking it off with a provided part. This little surgery was easy to do.
The engine room was completed by a radiator fan, radiator and battery. 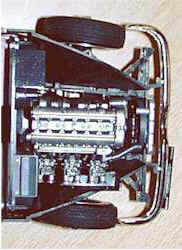 There is also a well-defined decal for a manufacturer’s plate which goes behind the engine on the rear wall of the engine room.
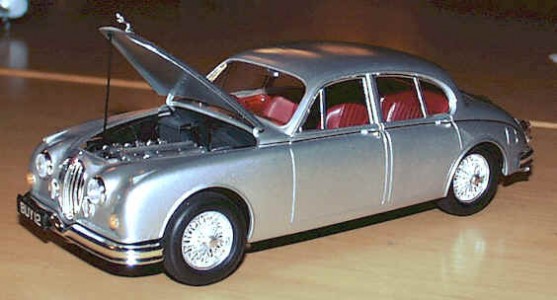
I painted the engine very sparingly, giving it a coat of very thin gloss black paint, and then picking up details in various shades of grey, using both matt and gloss enamels. The finished engine looked impressive and prompted me to leave the bonnet open on the finished model, although this admittedly spoils the flowing curved lines of the car.
The suspension assembly went on without problems. A nice touch is that Tamiya provides a set of polyethylene caps to hold the wheels in place without glue. You must not forget to insert them into the brake disc parts before assembling the suspension. I did, but fortunately was able to recover smoothly from my mistake: the glue hasn’t set yet.
Also, I have a remark about the kit’s steerable wheels. The front suspension is engineered in the way which allows the front wheels to turn. The right and left wheel is connected by means of a moveable bar (part C5). Unfortunately it was very fragile and easily popped out of it’s attachment points. Furthermore, even the wheels in straight position on my sample were not parallel to each other. I believe the steerable-wheel feature is something similar to once-popular moving flaps, ailerons etc. on aircraft models: it’s better to fix them permanently in one position.
Interior
The kit interior consisted of a dashboard, steering wheel, middle panel,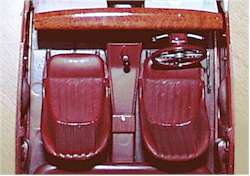 gear lever, seats and side panels representing inside detail of the four doors.
I painted the interior dark red to simulate the red leather upholstery. I experimented with different shades of red, then picked one base tone and another just a trace darker for shades, and applied both with a brush. I used Humbrol enamels for this. The whole process was a useful exercise in subtle ”weathering”.
Various details where then painted in different colors: steering wheel, stereo, pedals etc.
I left off the decals until the assembly was finished. It did make decal application more difficult, but nothing that couldn’t be coped with.
The body
I was advised by the salesman in the hobby shop to use a new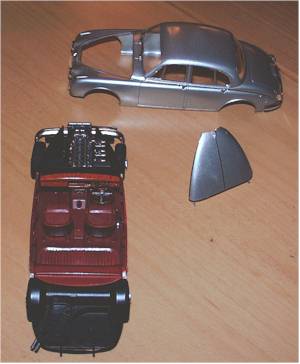 brand of quick-drying acrylic paint. I picked a silver colour, a choice which perhaps wasn’t used on real racing Jaguars, but I thought it would enhance the looks of the car (Hey, I’m a beginner). The paint came in a spray-can and was easy to apply.
First I applied a base coat. The paint appeared to be completely dry in 30 minutes. I then sprayed a richer coat of paint and let the body dry in another hour. The resulting finish was somewhat flaky and could probably be polished to a good result. Instead, I applied two coats of Future floor wax using my regular airbrush. Future is in humble opinions one of the great discoveries of the modelling community. The shiny coat covered all surface imperfections to my content.
I used Bare-Metal Foil for the chrome trim around windows. The body-trim provided as dry decals was then applied along the length of the car. These parts were delicate. The backing adhesive was not very sticky – applying the decal I got only one shot, otherwise it wouldn’t stick again, especially on the curved surface. For this reason I chose to secure some of the ”loose ends” with small drops of superglue, and leave off the smallest chrome trim pieces. They were simply too small for the adhesive to hold them in place.
The final effect makes the trouble justified: the chrome trim on the model looks very convincing.
Finals
Spoked wheels in this kit are small masterpieces of injection moulding. They look great. Quick check against the photo of real Jaguar revealed that despite their finesse, the spokes are still out of scale. However, I have hard to believe how Tamiya could have made these parts better: I promptly used them on my model.
Tyres were provided as soft rubber parts.
The model was finished by attaching the chromed grille, bumpers, head-and rear lights, windscreen wipers, rear view mirror and other small details. There was also a tiny jaguar figure to place on the bonnet.
All lamps were made of clear plastic, so I painted the blinkers and brake lights from the inside, using red and yellow enamel.
I chose to apply only some of the decals, end leave off the racing scheme. Exterior decals consist of number plates and Jaguar logotype on the grille. These responded very well to decal setting solutions.
As I mentioned, decals are also provided for the burled walnut panels. 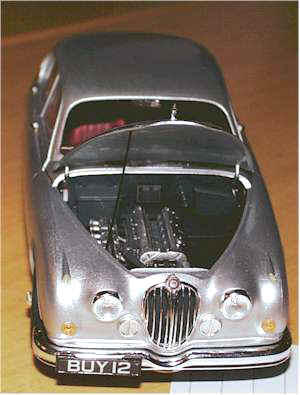 These were more tricky to apply, as all excess film had to be trimmed, and decals often positioned over curved surfaces. I used copious amounts of MicroSol to make the decals fit. When finished, the wooden panels looked just right, and even had the nice ”polished” sheen to them. You can’t tell they’re decals unless you come so close that you can see the printing pattern on them. Full marks, Tamiya!
After mounting the body and chassis together, I fixed the bonnet in an open position using a bit of stretched sprue as a support bar. This piece was also my only alteration to the model.
Conclusion
This project felt really refreshing. The Tamiya Jaguar kit is truly very well engineered. There was nothing to sand, trim or mask. The fit was perfect all over – truly an enjoyable experience. The final result looks to my (untrained) eye like the real Mark II.
Also, Tamiya’s attempt to reproduce spoked wheels as injection-moulded parts and providing chrome trim as rub-on decals as are novelties worth noting.
Now on to that Tamiya Morgan…
This article was originally published in IPMS Stockholm Magazine in March 1999.
