by Sven-Åke Grufstedt
Introduction
Many years ago I was very into modelling but for many reasons I put the hobby on hold and now, 20 years after my last kit was built I started again. And I can tell you that it was truly an eye-opener to realise how much the hobby has evolved during those years I’ve been away.
First of all the mouldings are so much better and all these options you can get for just about any kit out there is simply amazing. The painting techniques are also quite different to what I’m used to so it has basically been to start on square one again and re-learn the whole thing.
The first few kits I built since I began has been 1/35 kits with lots and lots of detail and accessories that made my bankaccount suffer. Projects like these takes a while to complete and over the years I have grown more and more unpatient, must be an age thing I guess but I want quick results and instead of fiddling with a 1/35 kit for two months I decided to try a different approach to my born again modelling enthusiasm. Why not try to build something in 1/72 straight out of the box without all the bells and whistles and see how far I can get with just painting the thing. No extra resin parts, no photo-etch, no nothing – just the contents of the box and what comes out of my airbrush.
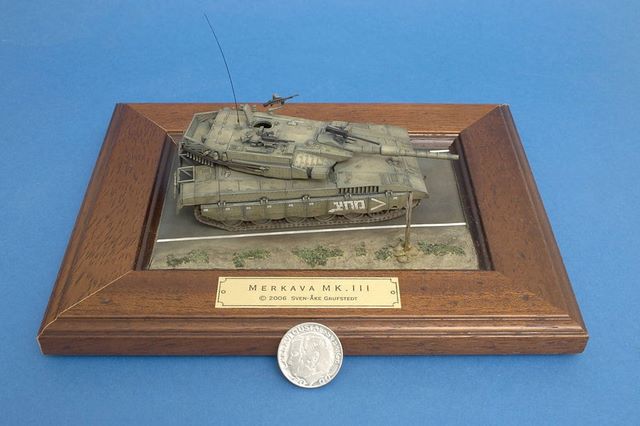
I visited my local hobby shop and went through the shelves and found this cute little kit from Revell. A Merkava Mk. III. A quick look in the box made me realise that my plan just might work. The mouldings were crisp and all the important details were there. So I brought it home and started to build it. To my joy I found that it went together like a dream, no filler was needed and the flash on the parts were almost non-existant. A quick shave with my scalpel took care of the little flash there was. Another good thing for a quick build was the fact that the links were moulded in big chunks with only those around the sprockets moulded one by one.
Putting the kit together took a little bit more than an hour and a half and I encountered no problems at all with the fit of the parts.
How it was done
First the whole kit was put together according to the manual. I also built the tracks which I fixed into position before the paint came on. Now I had the turret and the hull as two separate parts waiting for the paint.
The painting procedure for this model is diveded into several steps which are all quite easy to do with a little patience and and a steady hand. The different paints and techniques used will be described in each step of the painting procedure.
- Step One
The entire model was covered with Vellejo Air Matt Black. - Step Two
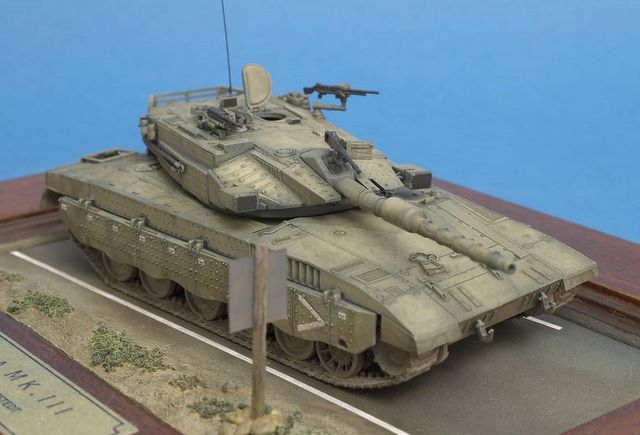
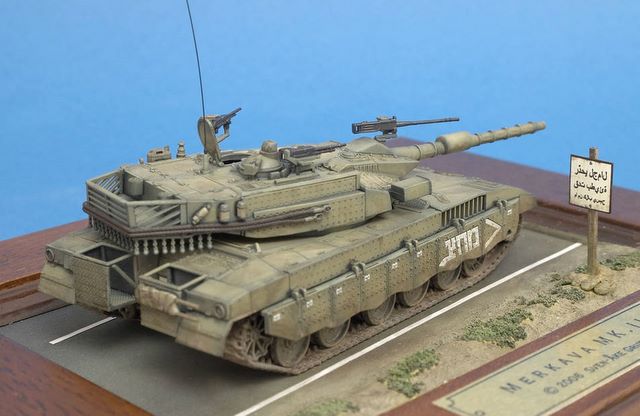
The main colour, in this case a light brown Vallejo Air was sprayed on the vehicle using a “cloud pattern” technique which roughly means that paint is sprayed on even surfaces like hatches and armorplates making the center stronger in shade and fading the color out towards the edges of the hatch or plate. This method creates instant shading and could be described as a form of pre/post shading in one step. - Step Three
All the details like tracks, wheels, tools and other details was painted with a paintbrush in their correct colours. The tracks were painted with a mix of Vallejo Matt Black and Hull Red to give them a good start for further weathering that will come later. - Step Four
A thin layer of a protective Vallejo Air dull cote was sprayed over the entire vehicle and the decals were fixed into position using Micro Sol and Micro Set decal softener. When the decals had dried another layer of dull cote was sprayed on. - Step Five
Now the fun begins. First I mixed artist oils, in this case 60% black and 40% raw umber with turpentine to get a wash. You should end up with a mix that looks a bit like milk (not in color though). This mix was applied to the entire model with a large brush covering everything. If done right you should end up with enhanced panel-lines, tools and other details since the wash will draw itself down into these recesses and follow the raised details to enrich the depth of the model. Another bonus with this wash is that it makes the surface of the model slightly darker and gives you the impression of a worn and dirty vehicle. Once the wash was dry a second run with a smaller brush was done in more local places both to further enhance detail and to make certain areas more dirty and worn. - Step Six
A mix of water and pigment powders was used to further weather the tracks. In this case a mix of MIG’s European Dust and Light Dust. The same mix was also drybrushed (no water) on the lower parts of the hull creating the effect of a vehicle driving in a very dusty environment. The last bit of weathering was done by using a regular pen which I used to highlight the tracks and machineguns. For the tracks as I used the pen as it was and for the machineguns I ground the pen into a powder and applied it with a stiff paintbrush.
Well, that’s about it… Not as hard as it looks in the pictures. The trick is on these small scale vehicles to overdo some of the effects since the details are so much smaller than on 1/35 scale vehicles.
If I was to recommend a kit for someone new to this hobby, it would be without a doubt a kit like this, it has all the detail you could ever wish for at an affordable price and it does not require that much skill to put together. And the best part (at least I think so) is that they do not take up so much space on the bookshelf as the 1/35 kits do.
So to conclude this little adventure into small-scale–land I can tell you that on my desk there are seven boxes of unbuilt Revell 1/72 scale armor kits just waiting to be built.
This article was originally published in IPMS Stockholm Magazine in December 2006