by Michael Scalingi
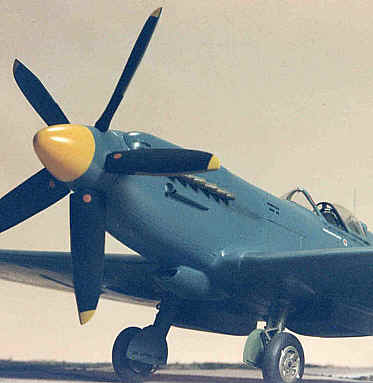
11 o’clock view of Mike’s S31In conjunction with the kit survey for Spitfire PR Mk XIX (in August issue of The Magazine – Ed.) I want to point out that there is one other avenue a modeller could take to model a 1/32 scale PR Mk XIX. This article describes how.
A few years ago, an American cottage company named PPM produced a pair of resin and white metal kits to convert the 1/32nd scale Spitfire Mk V by Hasegawa into either a Mk XIV or PR Mk XIX Spitfire. The Mk XIX has always been one of my favorite marks of Spitfire, especially since the Swedish Air Force flew it post war, with a Swedish designator S 31, and my principle scale is 1/32, so my destiny was clear: I would model an S 31!
Just what you need
The PPM conversion kit for the Mk XIX provides the kit basher the following resin components:
- Griffon engine nose
- Spinner
- Carburetor air scoop
- Radiator housings
- Main wheels (not flattened)
- Fin and rudder
…and in white metal:
- Propeller blades
- Exhaust stubs
- Compressor intake (the small air scoop below the left side exhaust)
- Tail wheel with strut (one piece)
There is also one small clear vacuum formed sheet providing a new windscreen and aft glazing. The modeller is expected to use the Hasegawa canopy.
Quality of the parts was excellent. The resin in my kit was well formed, with only slight pin holes (a common resin malady) in the very tip of the spinner. Shape and detail of the parts seem accurate with my references, but I do feel the propeller blades to be a little too wide. However, they do look convincing built up! I really liked the white metal exhaust stubs, which already had their ends drilled out. I just gave the bare metal a wash of dirty brown and black, painted the ends flat black, and the whole looked very convincing as burnt metal.
Planning
I wanted to make this model a little more detailed and accurate than would have resulted from just building it out of the box. As a result, I used only the major components of the Hasegawa kit, i.e., the fuselage halves, or rather what’s left of them after chopping them up, the wings, tail planes, gear covers, and pilots seat. Everything else I made from scratch! I also discarded the one piece tail wheel of the PPM kit, opting to make one with a true fork. I also had to make new clear pieces after the PPM sheet fell to the floor and I stepped on it! I have a home brew vacuum form machine and made new ones.
Working on the wings
This epic started with the wings. The Hasegawa kit has wheel wells that are too shallow, so I cut them out. Lining the openings with sheet plastic, the underside of the top wing halves now become the new ”roof” of the wells, giving them a more realistic depth. Strip plastic was used to make stringers and ribbing.
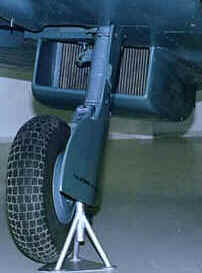
The radiator housings of the PPM kit are designed to just sit level on the surface of the lower wing half. This is not entirely accurate, as Spitfire radiators occupy the entire depth of the wing and housing, and have very deep ducting. In 1/32 scale this would be very noticeable, so before installing the resin housings, I built up their interiors with sheet plastic to simulate the ducting, cutting holes in the wings large Detail of landing gear and underwing radiator on real aircraftenough to accept this extra depth. To simulate the radiator faces, I took a piece of 20 thou plastic and scribed a series of lines very close together. From this I cut the faces to shape (lines vertical), painted them a steel color, then a black wash to bring out the lines. The modeller is required to make the radiator flaps, and this was fashioned from sheet plastic. Remember, Spitfire radiators are not ”handed”, i.e., there is no right or left, so if you open the coolant flaps and have the little actuator exposed, it occupys the right side of the flap on both radiators.
Landing gear
I decided to scratch build the landing gear struts as I felt the Hasegawa ones were a little spindly. This was accomplished using plastic rod and tube, with a metal tube down the center for strength. One trick I like to do for more realistic landing gear is to use a aluminum metal tube – or rod for smaller scales – for the oleo portion of the strut. This I polish until it looks like chrome. You can use whatever you use to polish clear parts. I use Blue Magic. I then coat it lightly with Future floor polish to keep from tarnishing later on. The rest of the strut I paint dull steel (or whatever the color should be, more on that later). If using the kit’s strut parts, I have had good results by wrapping the oleo portion with Bare Metal Foil, and then polishing and coating as above.
My one lapse in accuracy (actually there where more, but don’t ask) involved the wheels. The ones supplied by PPM are of the three spoke variety found on most British planes, but the Mk XIX’s supplied to the SAF had four spokes. The PPM resin wheels were so nice, I decided to use them as is, but I did flattened and bulged them using built up super glue. Incidentally, I used super glue for most of the construction of this model, as it really is the only glue you can use for the resin/plastic joints (especially as a filler). For all the little bumps and bulges on the wings of the Mk XIX, I made wooden molds for one of each type that was needed, then vacuum formed two pieces each. This ensured uniformity between right and left.
On to the fuselage
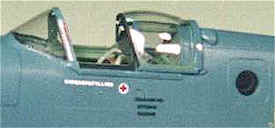
Cockpit surroundings on a completed modelI built up the  cockpit using Waldron model products British Instruments and their Spitfire placard set (mostly for the photo etched throttle quadrant, a real gem when built up). As mentioned, I used the kit’s seat, but modified it by adding the leather back piece found on the real thing. Waldron buckles with lead foil made up the seat belts. Also added was the double armor plate behind the seat, and the silicate dehumidifier attached to the back of the armor. Before I joined the fuselage and attached the new resin nose, I fashioned the camera ports on the side and bottom usin clear plastic. I also made a little camera that can be seen in the port. This was made from aluminum tubing of the appropriate size attached over a piece of plastic rod with its end rounded slightly. The aluminum was painted flat black, and the rod gloss black to simulate the lense. If modelling an S 31, don’t forget the oval reinforcement patch around the lower camera ports, which was unique to Swedish Spitfires.
The resin nose is solid (as is all the other parts in the PPM kit), and as such, is pretty heavy (the finished model has a pretty good heft to it). I drilled holes in it and added plastic rods to act as a reinforcement with the plastic fuselage. I used epoxy resin to attach the nose to the fuselage, and super glue to fill the seam. By this point it now becomes a matter of attaching all the sub-assemblies together.
The Hasegawa kit is a bit dated, with raised panel lines and surface details, so this was sanded off and rescribed.
When it came to the propeller assembly, I made a little jig to ensure each blade would be equally spaced from the next. This jig consisted of a post for the spinner to rotate on, and stops made of plastic sheet mounted at the requsite 72 degrees apart from one another.
Camouflage and markings
For coloring, I used Xtracolor No. 8, British PRU Blue. Don’t do as I did and buy only one tin. When I ran out, and bought another tin, it was from another batch and was slightly off color to the first tin. Buy at least two together to ensure they come from the same batch (there a little number printed on the side of each tin, which is the batch number).
Humbrol Interior Green, No. 78, was used in the cockpit. I also painted the wheel wells and inside of the gear doors with this color, but later found out that it was more customary to paint these areas, as well as the struts and wheel hubs, the same as the exterior color, in this case PRU blue. Oh well, too late!
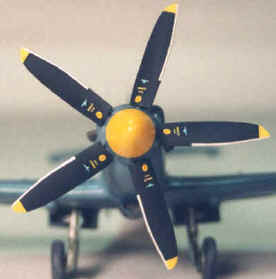
Propeller blades were painted flat black with yellow tips, then the leading edge of each blade was painted steel to represent the exposed reinforcement strip seen on most Swedish machines. As a final touch, dry transfers of the Rotol emblem and stencils, from Archers Fine Transfers, were added to each blade.
Swedish insignias came from the Flying Colors 48th scale sheet, as did the yellow unit numbers. Only one unit operated the Spitfire, F11 operating out of Nyköping. I tried to make as many accurate Swedish language stencils as I could, based on photos of S 31’s and the Flying Colors decal sheet of the J 26 (P-51D) in 1/24th scale, which has many stencils on it. Most were just educated guesses as to location. To make the stencils I wrote them on my word processor (font size 2 point in 1/32 scale), printed it out, then photo copied that to clear decal paper.
A coat of Humbrol Clear Satin finished off the project. Swedish Spit’s seem to have a more glossy finish, and clear flat just didn’t seem right.
My major reference for this project was a book by MPM. It is printed in the same size and format as the Squadron ”In Action” books, and is filled with photos and drawings of Mk XIX’s. It’s cover uses the same picture as does the box art for their forgettable model of the Mk XIX, as the two were meant to compliment each other (see below). I’m not sure of it’s availability, but shouldn’t be too hard to find
This project was my re-entry into plastic modelling, after a decade or so hiatus, and was a good introduction into multi-media modelling so prevalent today (they didn’t have resin when I was a kid!). Also it is a chance for me to start modelling my favorite subject, Swedish aviation! As for the availability of the PPM resin kits, sadly, both seem out of production. They weren’t cheap, being around $30 U.S. (about SEK 250), but definitely worth having if you can find one at a modeler’s flea market or such.
Oh, I guess I should also mention that this model won a third place trophy in its catagory at the 1996 IPMS/USA National Convention. Go figure!
This article was originally published in IPMS Stockholm Magazine in September 1998.


