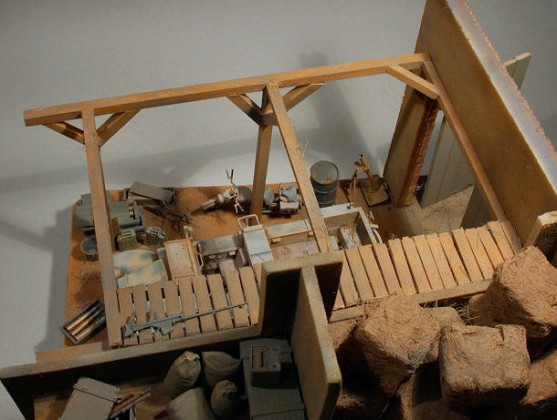
Diorama in 1/35th Scale
by Frank Spahr
Imagine a farm in rural Germany these days. Agriculture doesn’t pay off as it used to be, you either get big or get out of business. Much former farmland is developed for housing, the farm buildings fall into neglect and disuse. Imagine a guy buying a farm and then taking stock of what is there. Maybe he’s a farmer, too, the son of the former owner, or maybe a teacher or another guy who feels drawn into the ”simple life” and is planning to convert the structure to a posh condo.
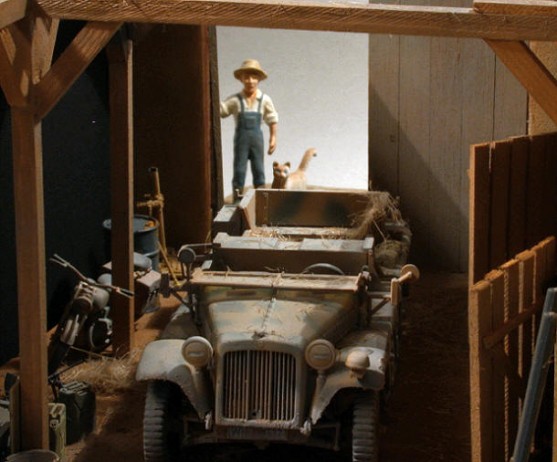
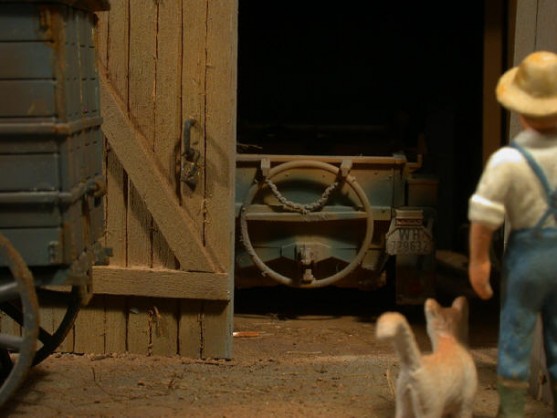
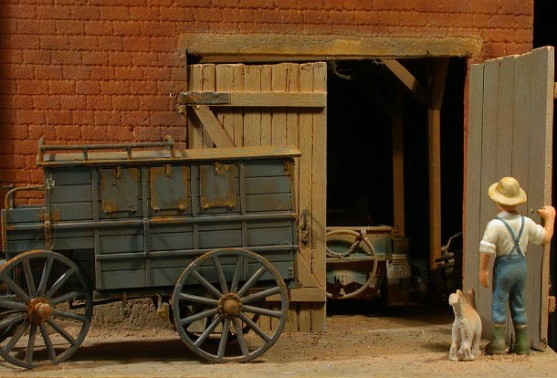
Anyway one fine day he opens an old barn door that has been blocked as long as anyone remembers. He pulls the decrepit old rusty waggon that blocked the door aside, pries open the rusty chain and opens the creaky door. Dust particles dance in the slanting sunlight, and then he sees something big and heavy filling nearly all of the space inside, obviously sitting there for a very long time. He grips the door and tries to find out what the heck is in there.
Mysterious ways of inspiration
I’m more and more becoming what one might call an eclectic modeller. I’ve built quite a number of planes, plus some ships, and now I’ve even tried my hands on some AFV in a diorama. Seems I’m mostly intrigued by modelling in itself, by creating replicas of appealing items, vehicles and scenes. It was like that since my childhood and hasn’t worn off yet. Maybe a steady diet of Godzilla movies sparked my interest in miniatures, too. Ever since I’ve admired those very talented and creative people who create worlds, from the early Godzilla movies to Lord of the Rings which had a a hefty dose of good old-fashioned modelling in it – beside all the CGI. All in all I’m not into specializing and knowing ever more about an ever smaller field. So I’d rather not become an expert yet joyfully muddle around wherever I get the most fun out of it – that’s my approach in general.
And fun I did get out of this project. Openly speaking, I was as happy as a pig in a particularly revolting puddle of mud during most of its construction.
I haven’t done any AFV modelling since my childhood save two Leopard tanks, one in 1987, the other in 1996. I don’t think that really counts. I got sucked into making airplanes, yet of late have started to venture into other fields again.
Oftentimes, it just takes a little to kick something off. In this case, it was last summer when I had a good look into the wire basket with kits at bargain prices in front of a hobby shop near my home. You know how it is, you mean to buy a tin of paint and end out with a bunch of kits. In this case, it was the Academy 1/50 Mirage, the old Matchbox HMS Kelly, the old Airfix Auster Antarctic, and Revell’s 1/35 SdKfz. 10 Halftrack vehicle. I’m a faithful reader of the German modelling magazine ModellFan; it has sections on all aspects of our hobby from planes over figures, cars, ships, even die-casts and last but not least AFVs. Gives you a good overview and is inspiring all around. Having seen so many fine AFVs I wanted to try my hand on one yet wanted to avoid too much figure work. Now that is really demanding, especially on your artistic talent – and I chickened out of that.
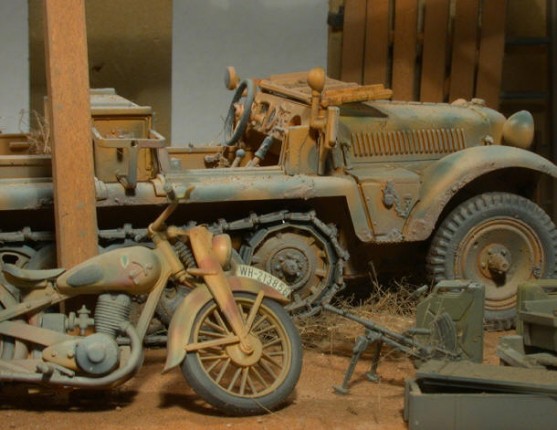
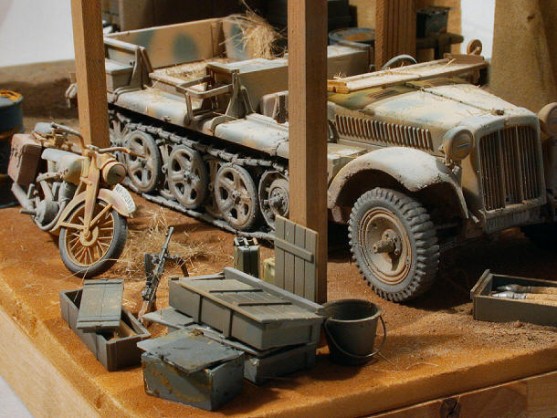
So I started that halftrack kit pretty soon and it was a hassle-free build. Little or no putty was needed, and most of it could be constructed before painting. The wheels of course had to be pre-painted on account of their rubber coating, same was true for parts of the interior and the tracks. The tracks are supplied as subassemblies ranging from single to six or eight track links. I sprayed the wheels black first and then applied the camouflage on the front using a mask cut out of a Post-It note. Painting was done with enamels, both Revell and Xtracolor. I skipped using the cover as I would have had to either do with the plastic one (which I didn’t like) or scratchbuild one (which I didn’t feel really up to).
Weathering was done with various approaches: I used a mild wash made from watercolour in water with a bit detergent added which I keep in an old deodorizer pump-spray bottle. Moreover I played around with my airbrush using some post-shading techniques. The tracks were painted somewhat similar to airplane exhausts, yet lighter and less rusty. I used Testor’s Metalizer and oil paint. Adding the tracks to the model was the only hair-raising moments I remember about the build, but it was done with less fuss than I remember from adding gun turrets to my H8K2 Emily flying boat, just to name an annoying experience that stuck. Now that was still fun, but the real kick was dirtying the vehicle with real dirt. I used finely ground garden soil mixed with water and white glue to make my own mud which I applied on the vehicle where it seemed to make sense. After drying and more airbrushing I was quite satisfied.
Conceiving the diorama
Now that the halftrack stood before me, weathered and ready to be used in a vignette or diorama, my subconscious self popped to the surface and I suddenly knew what had to be built (and for what diorama I had bought it in the first place).
I did no research whatsoever so nothing of what you see is historically correct. My approach was rather from personal aspects:
I remembered a former landlord of mine during dental school; he used to boast he had hidden a stash of weapons and ammo somewhere around his farm or in the forest – ”just in case”. He claimed there was one or more machine guns and even a grenade launcher in his stash. And I am living in an area with many old farms, many of which are let up or sold and converted with the change in agriculture.
Just imagine some farmer tidying up his premises. The farm buildings are too large for him to use them all, and maybe his dad has died and he gives a good look at all the buildings and what’s inside them. Now here’s that one barn door that was locked all the years and he never looked into it. It was partly obscured and so he removes the obstruction and opens the gate – right into the past. Because inside is all the stuff daddy stashed away in early 1945, covered with dirt and dust, but untouched.
Maybe another info that kicked those thoughts off was the news on German airplane engines found in some cellar in Italy one of these years. And I also once knew a guy who actually tried excavating a King Tiger Panzer near here. He only found some oil drums, but it’s the imagination and determination that counts. (Wouldn’t that be a cool next dio?)
So maybe it’s the new proprietor of a farm or a heir, anyway, he’s going to make a big discovery in that barn. I might of course also have hidden a veritable MBT in the barn, but somehow the halftrack looked just right.
My next concern was how to convey this idea. I soon envisioned the very moment the guy opens the gate and beholds the interior. So he would stand there, hand on the gate, and just stare blank-eyed inside. How was the gate obscured was my next issue. I first thought about bushes and small trees and the farmer having cut them down with his chainsaw, yes, just like in a modern sleeping beauty fairytale. I could have scratchbuilt a chainsaw, no problem, but the bush and tree part sounded not that easy to me. In fact I actually started building and only then had the right idea.
Collecting the components
Building commenced by getting accessories. It was fairly obvious that I would need some assorted equipment to fill my barn, so I obtained two accessories sets, one by Academy and the other by Italeri. I also got a Tamiya kit of a German motorcycle, an DKW NZ 350. Now I had some items to play with.
Next thing was my main protagonist, the farmer. I scoured all the relevant shops and the net after a contemporary farmer in 1:32 or 1:35. Zilch. Preiser figures had once made one but it was OOP. And you can get loads of German soldiers, but only very few civilians. And they definitely look WW2 to me. That was my next concern. The diorama had to immediately make clear that its setting is now. I fantasized about taking photographs of billboards or ads with dates on them and shrink them down, maybe an invitation to a rural disco night. In the end I did without that but there’s still some space left if I find the right ad …
I found my farmer in a toyshop, in a plastic bag with loads of farm animals sold by a German company that makes die-cast cars, trucks and farm equipment for kids. Hence he was vinyl and rather crude, but he was my only chance as I saw it. So I paid 10 Euro just to get that miserable fig. Well, in the end I added a cat from the same bag. I had it sitting there and I’m a big fan of cats, although I’m dreadfully allergic towards them, and I thought it really helped the composition.
Composition
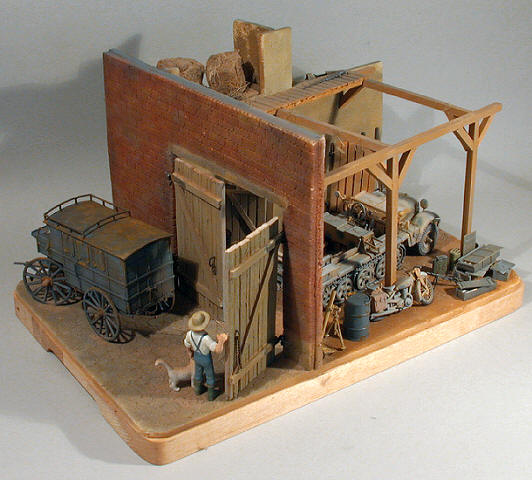
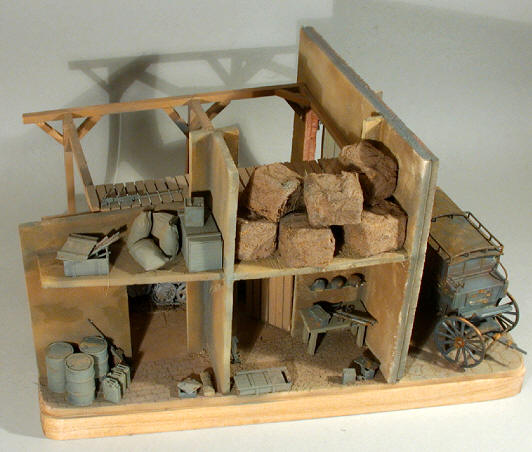
Next thing I had to do was that composition. I had assembled the motorcycle and painted it as new. It got a typical German late war camouflage in sand with brick red and green splotches. I really liked the way the saddlebags turned out when painted with oil paints. Now I had my two vehicles and decided to use a wooden serving board by IKEA as my base. I did a mock-up from black cardboard to get an idea of the dimensions. The barn wall had to be put at an angle to add some tension to the composition, and there had to be enough space before it for the opened gate (just one wing!) and enough behind it for the vehicle. I pretty soon wanted to have one or two extra rooms in which more gear could be stored, and their doors would offer good partial views of the halftrack. So I sketched my composition on the board and cut it to shape and size. After modifying the farmer figure I test-fitted the vehicles with the fig and the mock-up.
Next was building the walls. I had bought some foam core boards several years ago and now was the time to put them to use! In Germany the boards are called Epafit and are sold in architect’s supplies. They consist of a very fine grain styrofoam sandwiched between cardboard. The styrofoam can be carved and engraved and painted to look like bricks or plaster or paving – you name it.
So I cut my parts to size after my templates, removing all the cardboard. After fitting and scribing, they were glued with styrofoam glue. The main wall was engraved with the back of the tip of a #11 X-Acto and a steel ruler where appropriate. I wanted to show a foundation made from stone with a wall from bricks. So I did some measuring and carved things as I saw them fit. The other parts weren’t carved at all as they were supposed to be plastered. I used a doubled up piece for the main wall.
Now I had the basic framing, I thought about the floor. A bit late maybe, yet not too late. I decided not to try my luck with plaster or other goo but to make a base plate from foam. So I decided that the area in front of the barn was to be paved with larger slabs, whereas the main barn had a dirt floor and the two side rooms had floors made from bricks and small shingles respectively. Hey, my barn, my decision, my imagination. I engraved all that (which took about an hour and a half) and entered into painting.
Most of that was done by airbrush, in too many steps to remember or to relate. I used what came handy in my large stack of paint jars, and I obviously did a lot of shading hither and thither. Next came the woodwork. I fashioned some interior beams and frames from wooden profiles; they were also painted and weathered, all to convey the impression of sixty years of dirt and dust.
The barn doors and the small doors were made from balsa profiles glued with CA. The hinges were made from .3 mm tin foil from my dental practice, cut to size with an X-Acto and punched with an instrument I bought from a ship modelling site.
Rusting and dusting
Now the metal parts had to be weathered. I had received a tip from Vegard Henanger of Norway via Rick Brownlee of Kansas, both contributors to Modelling Madness, how to make your own rust. So I had taken steel wool and put it into a dish with water and watched it dissolve into pure rust. Mix that with Elmer’s glue and water and you’re in business. But I happened to come upon another alternative I wanted to test:
Now we in Kassel are happy to have two new model shops both run by dedicated modellers, so I can for the first time in years get stuff directly instead of mail order. I bought a two-component rust stuff in one of those shops just for this project. The first component is a paint with iron particles in it, the second a rather aggressive oxidant, possibly HCl or another acid. You paint the part with A, let it dry and then apply component B – ta-da – real rust. So I tried it and it worked just fine, but the other method seems to me equally feasible and cheaper.
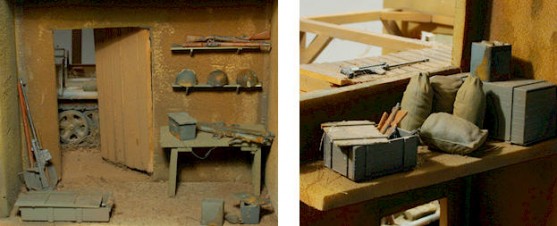
So with the walls and the floor and the doors ready as subassemblies, I had to tackle the dozens of bits and pieces. So you can imagine I had a nice time first cleaning up dozens of rifles, machine guns, ammo crates, tank grenades, tools and other stuff, then painting them in several colours and then applying rust. I’m sorry I didn’t take a picture of the box with all the stuff in it before adding it to the diorama, but it was jam-packed.
It was at that point that I remembered a decrepit old horse-waggon I had seen on a hike at some farm, and given the fact that I had chickened out of the sleeping beauty idea, I decided to get a horse-waggon and park it on front of the barn. Luckily Italeri offers a set of a German horse-drawn convoy. The moulds are venerable ESCI, but they make up fine models. I even could lay my hands on a kit in the shop around the corner. I assembled the covered waggon in less than an hour. After drying it was sprayed Panzergrau, or some grey anyway, shaded hither and thither until I was satisfied. Then came the rust treatment on all the metal parts until it looked really decrepit. A nice trait was the inclusion of some cargo, so I also got some fuel drums and crates plus some tools into the bargain.
It was then that I repainted the farmer to the best of my current abilities. The cat remained as it was. Next came the question of how to fill the upper level above the ceiling of the side chambers. I decided to use bales of hay. I made them from cubes of styrofoam which were painted somehow like hay and then coated with plumber’s hemp cut to size and glued with white glue. Six or eight of them sufficed to make the upper level look busy.
Finally there was the day when I glued it all together, applied the numerous fuel drums and oil drums and jerry cans and rusty steel helmets and bazookas and it all. The idea was that that guy collected just about all he could in his barn before and after the fighting ended, so I indiscriminately mixed allied and German stuff. When all was laid out, I glued all the individual parts with white glue and finished weathering with the application of a coat of some dust colour to it all. In the end I dusted garden soil and small clippings of hemp over the place to make it even dirtier. I had also used garden soil to blend in the junctions between the walls and the base, applying white glue into the corner and then dusting soil over it.
The vehicles had been dusted by airbrush before applying them to the scene.
When I had finished on that day, I let the diorama rest and sent some pics to my friend Rick Brownlee, who is a great artist and figure and diorama guy. I have to sincerely thank him for his help and support and inspiration on this project. After that I revisited the diorama and added some slight changes.
Photography
Then I got into more serious photo work. I used my trusty Nikon Coolpix 995 on a tripod with the aperture priority setting, individual white balance and slightly toned down exposure. First I tried to create the moody lighting for the title shots by closing the dio with black cardboard and experimenting a lot with the lighting, the focus and camera angles. Then I opened the dio up and took some detail shots from all sides plus some overall views.
Wat lernt uns dat?
Now what are my conclusions from that one, or to put it into the classic words from teacher Boemmel from the novel Die Feuerzangenbowle: Wat lernt uns dat?
I learned to try my hand on scratchbuilding stuff, I learned to give thought to composition, angles and views, to try to convey a situation, to try to reproduce textures and colours, a whole colour system to convey the specific air of that building. I learned to work with rust and hemp and foam core board and what else not. It was fun, and tons of that. I’ll sure some day make another diorama, possibly around a 1:72 ship or two – or a crew that excavates a veritable King Tiger tank …
Have fun.
List of kits used
- Revell of Germany DEMAG 1 t ZgKw D7 (Sd.Kfz.10) #03039
- Tamiya MM 241 German Motorcycle Orderly Set
- Italeri German Horse drawn Convoy Kit #6437
- Italeri Accessories Kit #407
- Academy Allied & German Tank Supplies Set I # 1382
All kits in 1/35 scale
This article was originally published in IPMS Stockholm Magazine in March 2005
