Tarangus Viggen - erfarenheter från andra sidan Nordsjön
Postat: 26 dec 2014, 06:36
Så här vid årets slut skickar jag en hälsning till alla byggare med en önskan om ett ännu bättre modell- och byggår!
Skickar också med en julhälsning från min brittiske vän Andy som för många är känd från Britmodeller under pseudonymen General Melchett. Han har under december kämpat med en Tarangus Viggen och vill dela med sig av sina erfarenheter. Han hade redan före bygget några gråa hår, och dom har inte blivit färre. Kan tillägg att Viggen är ett av generalens absoluta favoritflygplan.
Hans bygge var tänkt att komma i Airfix Model Worlds februarinummer som kommer om tre veckor; kanske blir det så. Nåväl, jag överlåter ordet till generalen….
Med en önskan om ett Gott Nytt År!
/Jan
As for the Viggen, well, I find more issues as the build progresses! I found a good quality walkaround that I did of a couple of F16 and F4 wing JA-37's taken at the Mildenhall Air Fete back in 1999. So I've transferred the photos to digital and copied them to the PC for ease of use.
I know some of your modellers are building it at the moment, so maybe you'd like to pass on my findings so far…
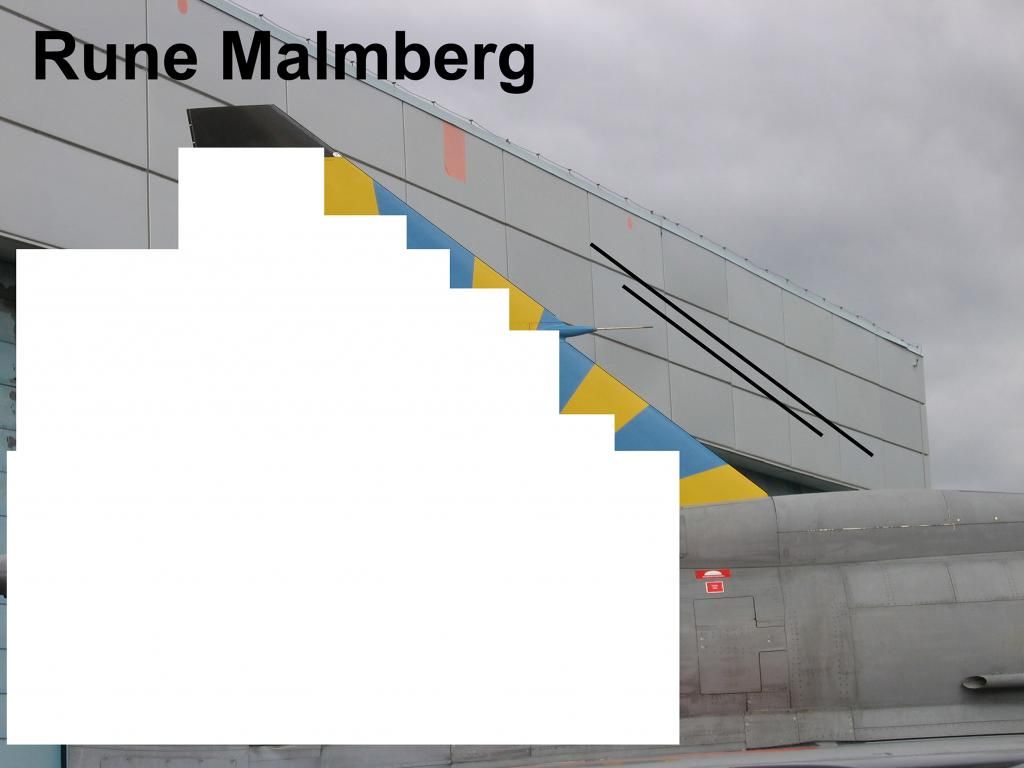
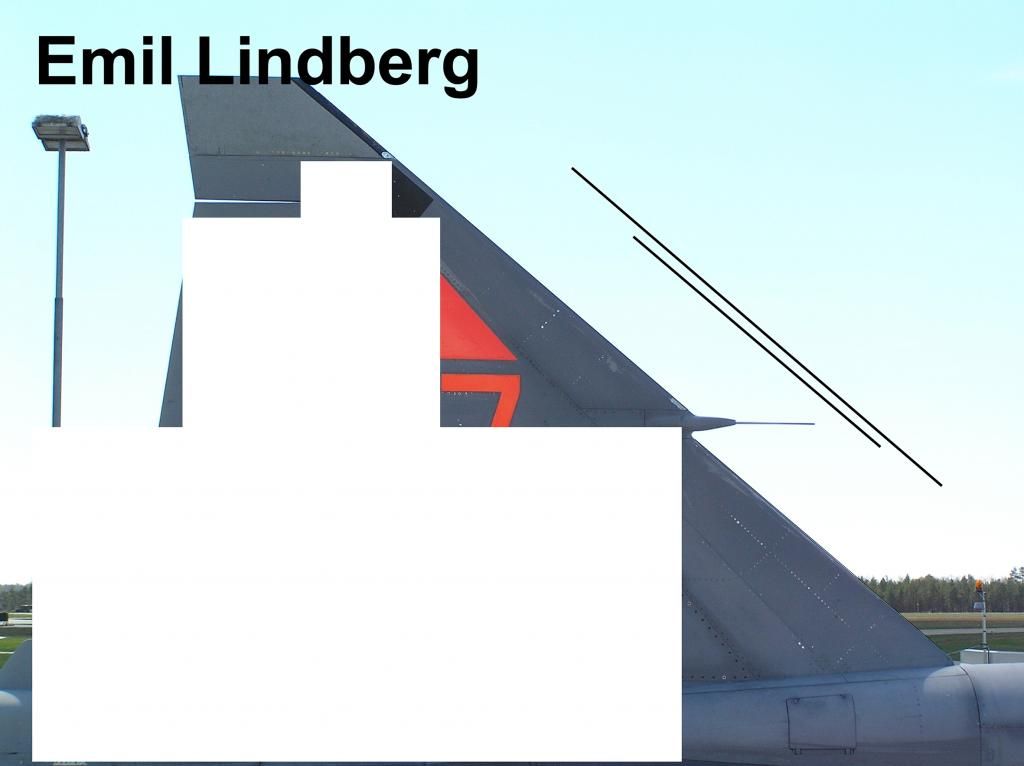
The fin...the pitot is misplaced. Tarangus have it at mid way down the leading edge where it should be lower. It's also the wrong shape so I made one up from scrap resin and added the Master metal pieces.
The leading edges of the fin are set at different angles!!, should be parallel. (cut back and reprofiled with a micro file).
The chord of the top section of the fin is wrong and needs widening 2mm.(I cut off the top half of the fin and rebuilt using stock plastic card, this made reprofiling the leading edge of the fin easier too.
The cockpit is mostly fiction so I adapted the NeoMega one to fit, same with the seat and added all the instruments from Mike Grant decals...looks a 100% better.
The canard elevons are the wrong shape. I only used the front sections but cut back the inner edges to the correct angle and then scratch built the elevons themselves and added the correct hinge fairings underneath as well as the two VG's on top. As fitted the canards are too level and need to be angled down slightly, (I cut the undersides away until they matched all the photos being careful to retain the correct profile).
The canards are too far forward and need to be reset 2mm back, (I just cut the rear of the locating tabs back 2mm). Also the front end plates, (where the canard joins the fuselage), are too blunt and need more pointed.
The intakes have a slight cant where they should be near vertical, (easy fix with a file and Micromesh!).
Canopy is too bulbous...I was going to use the Maestro vac ones but they have the framing in the wrong place so I might well end up making my own vac ones using plunge moulding.
The rear fuselage 'shroud', (section housing the thrust reverser), has a strange fairing on the topsides that need sanding off and filling.
The under fuselage pylons are of incorrect shape and need angling back and forward 45 degrees.
The fuselage mounted blade aerial just behind the rudder is the wrong size, (I used the one from the Airfix kit as it's more accurate).
Main wheels are too thin and need wider diameter, (I added 1.5mm plastic card stock to add this). The size is correct though. (Maestro ones are much too thick).
Nose wheels have no detail at all so I'm using Maestro ones, (about the only parts that can be used on this kit).
The small ball sensor at the very end of the rear fuselage is absent, (made up using a piece of scrap resin).
Weapons rails are the wrong size so I used spares from various spares I had. The weapons come from many sources too.
The wing mounted anti collision/nav lights are in the wrong place! ...should be at the end of the wings just ahead of the flap/ailerons but Tarangus have them next to the wing bullet fairings for some strange reason.
As you can see there are quite a few errors and these are only the ones that I've found so far !...I'm sure there are more ! This of course will all be highlighted in the article but also increases the build time considerably...so much for a quick build!! ....(Wish Hasegawa or Tamiya had done it !)......
Hope this helps someone..
All the best and thanks again for the images
Andy
Skickar också med en julhälsning från min brittiske vän Andy som för många är känd från Britmodeller under pseudonymen General Melchett. Han har under december kämpat med en Tarangus Viggen och vill dela med sig av sina erfarenheter. Han hade redan före bygget några gråa hår, och dom har inte blivit färre. Kan tillägg att Viggen är ett av generalens absoluta favoritflygplan.
Hans bygge var tänkt att komma i Airfix Model Worlds februarinummer som kommer om tre veckor; kanske blir det så. Nåväl, jag överlåter ordet till generalen….
Med en önskan om ett Gott Nytt År!
/Jan
As for the Viggen, well, I find more issues as the build progresses! I found a good quality walkaround that I did of a couple of F16 and F4 wing JA-37's taken at the Mildenhall Air Fete back in 1999. So I've transferred the photos to digital and copied them to the PC for ease of use.
I know some of your modellers are building it at the moment, so maybe you'd like to pass on my findings so far…
The fin...the pitot is misplaced. Tarangus have it at mid way down the leading edge where it should be lower. It's also the wrong shape so I made one up from scrap resin and added the Master metal pieces.
The leading edges of the fin are set at different angles!!, should be parallel. (cut back and reprofiled with a micro file).
The chord of the top section of the fin is wrong and needs widening 2mm.(I cut off the top half of the fin and rebuilt using stock plastic card, this made reprofiling the leading edge of the fin easier too.
The cockpit is mostly fiction so I adapted the NeoMega one to fit, same with the seat and added all the instruments from Mike Grant decals...looks a 100% better.
The canard elevons are the wrong shape. I only used the front sections but cut back the inner edges to the correct angle and then scratch built the elevons themselves and added the correct hinge fairings underneath as well as the two VG's on top. As fitted the canards are too level and need to be angled down slightly, (I cut the undersides away until they matched all the photos being careful to retain the correct profile).
The canards are too far forward and need to be reset 2mm back, (I just cut the rear of the locating tabs back 2mm). Also the front end plates, (where the canard joins the fuselage), are too blunt and need more pointed.
The intakes have a slight cant where they should be near vertical, (easy fix with a file and Micromesh!).
Canopy is too bulbous...I was going to use the Maestro vac ones but they have the framing in the wrong place so I might well end up making my own vac ones using plunge moulding.
The rear fuselage 'shroud', (section housing the thrust reverser), has a strange fairing on the topsides that need sanding off and filling.
The under fuselage pylons are of incorrect shape and need angling back and forward 45 degrees.
The fuselage mounted blade aerial just behind the rudder is the wrong size, (I used the one from the Airfix kit as it's more accurate).
Main wheels are too thin and need wider diameter, (I added 1.5mm plastic card stock to add this). The size is correct though. (Maestro ones are much too thick).
Nose wheels have no detail at all so I'm using Maestro ones, (about the only parts that can be used on this kit).
The small ball sensor at the very end of the rear fuselage is absent, (made up using a piece of scrap resin).
Weapons rails are the wrong size so I used spares from various spares I had. The weapons come from many sources too.
The wing mounted anti collision/nav lights are in the wrong place! ...should be at the end of the wings just ahead of the flap/ailerons but Tarangus have them next to the wing bullet fairings for some strange reason.
As you can see there are quite a few errors and these are only the ones that I've found so far !...I'm sure there are more ! This of course will all be highlighted in the article but also increases the build time considerably...so much for a quick build!! ....(Wish Hasegawa or Tamiya had done it !)......
Hope this helps someone..
All the best and thanks again for the images
Andy