…with a Good Dose of (unnecessary) Weathering
by Anders Isaksson
The North American P-51 Mustang and its variants need no further presentation. Being the first ”true” Mustang, the B version made its first flight in 1942 and entered active service in 1943. It was credited with more air-to-air victories than any other fighter of World War II.
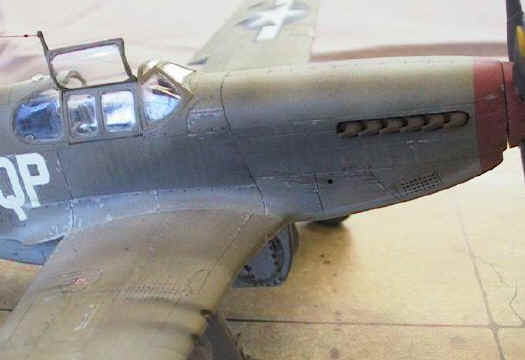
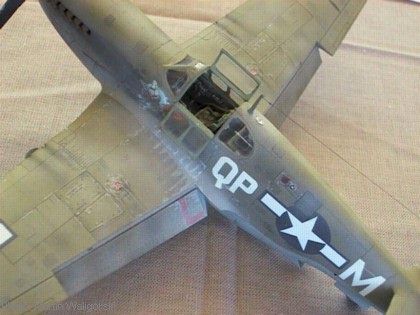
This is my P-51B Mustang finished in the standard scheme of Olive Drab and Neutral Gray. The kit is Tamiya’s 1/48th scale offering. Although an excellent model when built straight from the box it was detailed with a resin cockpit from Verlinden. The markings are a slightly odd selection of decals from both Aeromaster and those provided by Tamiya, but more on that later…
Construction
Since this is a modern kit the fit of parts and featured details are of a high standard, meaning that assembly was completed without any major problems. A little filler was needed around the main air intake, but I suspect this has more to do with my lack of patience when building than a flaw in the kit. I tend to rush through the basic assembly as fast as possible to be able to spend more time on painting and weathering.
 The various components of the Verlinden P-51B Cockpit detail set (article number 1182) as pictured on the box top. The set consists of resin parts complemented by a piece of copper wire. No photo-etched parts are utilized.
The resin parts for the cockpit were painted and assembled following the somewhat sparse instructions provided in the Verlinden kit. A bit of fiddling and dry-fittting of the different parts was required to get everything together, but on the whole no major problems were encountered.
A little surgery is needed to remove the molded detail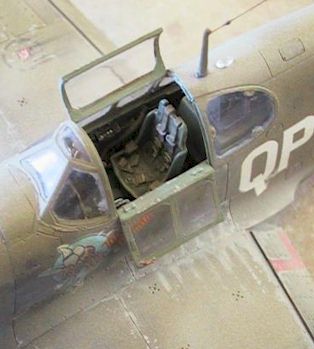 on the kit side walls but once this is done everething fitted in place almost instantly.
I hand painted the completed interior using Humbrol Interior Green and picked out various knobs and levers using Humbrol red, white and aluminium. The instrument faces were painted matt black and dry brushed with white to bring out the detail of the dials. The seat belts were picked out using Humbrol Khaki Drill with aluminium used for the buckles.
When thoroughly dry everything was finally washed with a mix of black and brown oil color and dry brushed with Interior Green mixed with white oil color to bring out detail.
With the cockpit completed and masked off, all basic assemblies were finished and the model was now ready for painting.
Painting
With this model I wanted to make a weathered and generally well-worn example. Using the acrylic range from Model Master (the ones in plastic bags) I started out with applying a base coat of Neutral Gray to the undersides of the model using my airbrush. After sufficient drying time the next step was to mask off the undersides and apply Olive Drab to the top. Everything went well, but I had repeated problems getting a good transition between the green and the gray along the fuselage sides. I had to make several tries using Post it-notes attached at a distance from the surface to get a reasonably ”fuzzy” demarcation line between the two colors.
I finished off by mixing a lighter shade of Olive Drab which was applied in an irregular pattern over the basic coat to achieve a faded look and to provide a good base for further weathering. A few panels were masked of using more Post It-notes and painted in the lighter shade. Since the moving tail surfaces of the Mustang were covered in fabric they recieved an even lighter shade of the same mix to emphasize the difference in materials. However, the trim tabs were made of metal and they were later hand painted using the original Olive Drab. I also used the original shade to simulate a replacement hatch on the left side of the fuselage. To complete the effect I had to cut out the corresponding portion of the ”Star and Bar” decal on the left side (see inset photo)
A final coat of Model Master clear gloss was applied and the model was now ready for the decals.
Markings
I had my mind set on portraying an aircraft serving somewhere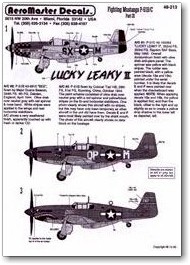 in the Far East during World War II. The Aeromaster sheet number 48-213 has a suitable set of decals featuring a machine of 26th Fighter Squadron, 51st Fighter Group in China 1944 – perfect for a sun-bleached and dusty aircraft operating in a field environment.
The markings of this aircraft were fairly simple with a set of yellow bands and numbers on the tail along with the standard national insignia. In addition the aircraft featured a shark mouth, just like the one commonly seen on the P-40.
I started with applying the shark mouth, which was provided as two separate halves and designed to be joined together under the nose. A third part was supplied to fill the space around the small air intake under the nose. And this was where trouble began. The two main halves just did not match up against each other on the underside. I fiddled around with both main pieces of the mouth trying to get them in a postition where the two halves would fit together. When they finally broke and completely lost their shape I got tired of the whole thing and threw them away.
These decals were obviously not designed to fit the curves of the Tamiya kit. I also found the decals a bit thick and difficult to soften. However, this could be because I used the Humbrol variant of decal setting solutions. May be the decals would have worked better with another brand, such as Micro Set and Sol.
Disappointed after the shark mouth disaster, I opted for the second alternative: QP-M of the 334th Fighter Squadron in the 4th Fighter Group based at Debden, England in April 1944. This alternative required me to use the white recognition bands provided in the Tamiya kit. However I did not expect the decals for the white stripes to look as good as ones that are actually painted on. Being a bit lazy, I simply opted to finish the model without them. This would also make weathering easier, letting me concentrate on weathering a single green top side.
I decided to continue with what I had left of the markings, which forced me to use a mix of AeroMaster and kit decals until every major marking were in position. With no other setting solution at hand I decided to continue with the Humbrol liquids, but used them more sparringly this time. A few decals featuring small stencilling came off during the process but overall it worked out OK.
As just a little setting solution was used I got a few spots of silvering, which I tried to fix by poking the silver areas with a sharp needle and applying more setting solution. I did not manage to eliminate all of the silver areas but I decided it would have to do. Now I had a P-51 which was painted and with decals applied – minus the white recognition bands.
Weathering
With the decals completely dry I decided to wait with the final coat of clear flat and instead moved on to the weathering process. Again using Post it-notes (what would modellers do without them?) I masked random panels and lightly dry brushed their edges using Humbrol Olive Drab. Compared to the original acrylic coats these spots were a bit darker and successfully simulated touch-ups of fresh paint applied in the field. I also used a piece of Post it-notes with a small rectangle cut out to apply spots of Olive Drab on various places of the airframe.
On this model I wanted to try to simulate the inner 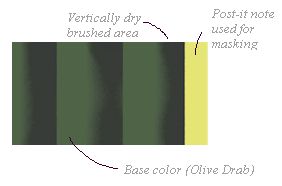 structure of the air frame in various location on the model. A great place to simulate this effect is the area behind the exhaust pipes where smoke from the engine darkens the fuselage panels. The effect of the internal structure was achived by using a post it-note held at an angle perpendicular to the air flow and dry brushing a dark mix of Humbrol matt black and olive drab along the edge of the paper. The rough sketch on the right is an attempt to explain my method.
I started under the cockpit and gradually moved closer to the exhaust area, continuing all the way under the exhaust pipes. Since I had applied a large decal (the pilot’s personal artwork) to the left side just in front of the cockpit I feel that I achieved more success on the left side. This was the first time I tried something like this and I believe the technique could be worth to develope further.
Satisfied with the dry brushing and general discoloration of the model’s surface I applied a coat of Model Master clear flat, in order to blend everything together and get a uniform finish.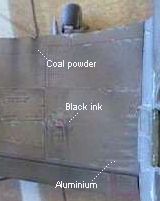 When it had dried I used powder from a coal pencil to simulate traces of soot from the guns as well as adding a little more depth to the engine exhausts. The powder was applied with a dry, fine brush. I used a black ink pen to simulate oil leaks and fuel spilled around the fuel caps on top of the wings. The ink was applied in a small dot on the surface and immidiately streaked in the direction of the air flow using a finger.
For scratches and exposed metal I used Humbrol aluminium applied with a fine brush. Also here I tried to simulate the internal structure by brushing the aluminium in a pattern along the left wing root where I thought the heaviest wear would occur. This was repeated in a smaller area on the right side as well.
The final stage of the weathering was to apply dust. To simulate this I used Model Master’s acrylic sand. Heavily thinned it was applied as a light mist with my airbrush, with a little extra applied on and around the wing roots where I imagined the mechanics and pilot would walk. Although I tried to be light on the touch I think the dust look a little coarse in a few places on the model, and the reason for this could be that the mixture still was not thinned enough. Too make things worse I discovered that some nasty silvering once again occured on some of the decals as I applied the dust color. The silvering seemed to appear only on the right side of the model. Not so good, but definitely too late to try to do something about it…
Final assembly
The final stages involved unmasking the cockpit and attaching the clear parts. Next the landing gear was added and an antenna wire made from stretched sprue was superglued to the tail and radio mast. The wire recieved isolators made from drops of white glue, and was finally painted dark gray.
A final application of sand colored pastel powder on a few spots of the model completed the project.
Since the markings are not 100% correct I now have a European-theatre Mustang that looks like it has served in a hot and dusty environment like the Far East. Oh, never mind, it still looks like a Mustang…
This article was originally published in IPMS Stockholm Magazine in August 2000.


