World’s first jet makes a tiny model in 1/72nd scale
by Martin Waligorski
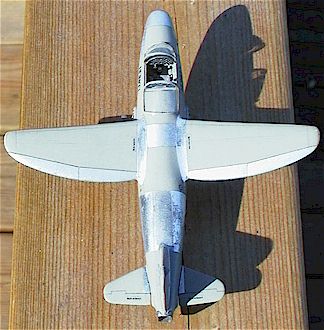
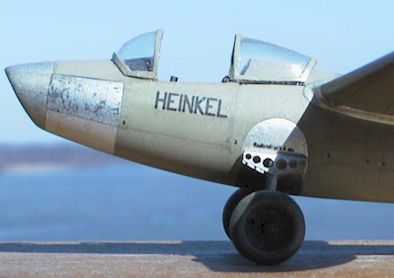
To be honest, I am particularly fond of the model photos presented here: for once, I effectively managed to disguise the scale of my creations! What appears to be the full scale aircraft on the picture below would in fact fit easily in to palm of one’s hand….
Heinkel He 178, the world’s first turbojet aircraft was successfully flown just days before the outbreak of World War II. Its career was short – devised as a proof-of-concept platform for the first experimental jet engine, only two prototypes were built before Heinkel moved on to more full-blown jet designs leading to He 280 twin-engine fighter. After the trial period, the V1 prototype was deposited in Berlin Air Museum but was destroyed during a bomb raid later in the war.
Very little documentation of the He 178 programme survives  until today. A photograph of the design model, two other of the V2 prototype in front of the hangar at Marienehe and an extremely bad-quality film footage from the V1’s first flight showing it from a distance rolling down the runway – that’s about it. What we know from textual sources is that there were significant changes between the two prototypes. The V1 had a typical Heinkel elliptical wing which in V2 was changed to a trapezoid one. Also, the V1 was flown with fixed undercarriage in place of the fully retractable unit of the V2.
In view of these very limited references, all published drawings of the He 178 are reconstructions.
In the box
The Heinkel He 178 was the third injection-molded kit produced by the Czech company Condor back in mid-1990s. I believe it might be still available under the MPM label. I first saw it at the time of its first release. Considering my interest in early German jets, the choice was simple: I had to have it.
Back in these days, Condor focused on simple kits with a minimum of parts, and this was certainly the case with this one (other ones being the V2 rocket and a set of German gliding bombs). Major parts were two fuselage halves, two one-piece wings and ditto horizontal stabilizers. Surface detail was fine with somewhat vaguely defined recessed panel lines. Other detail parts were quite crude. One-piece transparent canopy was of very bad quality. A small photo-etched fret provided Eduard-style instrument panel plus a few other details.
Surprisingly, the kit contained no decals – however it can be disputed whether the V1 carried any markings. On the box there was a good-quality box art showing the V1 in RLM 02 finish. The reverse side contained a color painting showing cockpit interior. The depicted layout was, of course, purely hypothetical.
Accuracy? Because of lack of references, you guess is as good as mine… However, I have compared airframe parts to a set of 3-view drawings published in a Japanese book German Jets in World War II – and they matched perfectly, as if the mouldings were based on them. The finished model looks like a pugnacious little aircraft fairly similar in proportions to the published photo of the V2, and I could not find anything in it not matching this fuzzy film footage.
Later, Condor has released the same basic kit in 1/48. Although I haven’t seen it, I believe that my comments are generally applicable also to the larger kit.
Construction
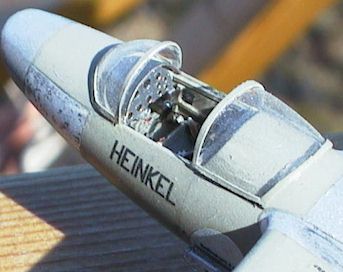
Early on, I decided to discard all small parts of the kit  leaving only main components plus wheels and photoecthed parts. This way the construction started from scratch-building the cockpit. As the factual layout is not known, I stuffed it with generic detail like scratchbuilt seat, ribs and various boxes on sidewalls, and Bf 109-style rudder pedal. To simplify the process, I used tiny electronic parts for boxlike objects of different sizes and colors. Cockpit sidewalls and floor were painted in RLM 02 with the seat, instrument panel and associated forward decking in RLM 66. It all came out very neat and provided a nice focal point of the model – which now had to be built with open cockpit…
The kit does not provide any bulkhead for the nose intake, so something has to be put there. Again, there are no references, so I opted for a splitter plate, believing that there would be two air channels in the sides of the bulbous fuselage around the cockpit. Another possible option would be, I think, a single air duct leading below the cockpit floor.
I have also scratch-built the tail jet pipe retaining the rectangular cross-section of the kit part. After this the major airframe component were put together. Some filler had to be used at the wing roots.
Painting and ageing
I airbrushed the entire model with Gunze Sangyo RLM 02 acrylics. Misting many layers of heavily diluted paint provided a very smooth, true-to-scale semi-gloss surface which did not require further treatment.
The known film footage of V1 show the aircraft in with many surface panels left in natural metal. I replicated these using two different techniques. For curved surfaces like the wing roots, fuselage nose etc. I simply masked them and airbrushed with Gunze Sangyo Sliver. Larger panels on the fuselage were covered with Matte Aluminum Bare Metal Foil. As they appear too shiny and uniform, I have created stain effects with airbrush-applied black oil wash mixture. The procedure proved to be very hard to master, but eventually created very good natural-looking burn marks and stains.
The somewhat faint panel lines were then carefully enhanced with grey wash.
As stated before, the kit contained no decals, but I didn’t  like the idea of leaving the model with no markings whatsoever. Most of Heinkel’s pre-war prototypes carried a factory name in capital letters on the front fuselage, painted in black. I created mine in a computer drawing program, copying the style of lettering from – if I remember correctly – a close-up photo of He 100 prototype which had been tested in Marienehe during the same period as He 178. I have then added some more stencils like ”no hold” ”no step”, ”tyre pressure” etc. copying the original texts and symbols seen on the early marks of the Bf 109.
The decals were then printed on a clear decal film from Techmod using an ordinary black-and-white laser printer using a clear decal. I was concerned about the heat generated in the printing process, but it affected the decal film only slightly. The decals were then applied in suitable places, with one or two color fuel triangles from the decals spares box rounding off the effect.
Finishing details
I scratch-built the fixed undercarriage using the kit wheels and a photo-etched mount contained in the kit.
The last part of the project was the canopy. Sadly the kit part could not be saved due to bad quality of the plastic, so I decided to mould a new one. After filling with epoxy putty the kit part was used as a mould. Then several new transparencies were shaped in the traditional male-female moulding process. I have also made some extra shapes in thin styrene sheet. The two parts – transparent and solid – were sandwiched together and the canopy framing carefully cut out in the solid outer part. It took a few canopies to get everything right.
I chose to have the opening part of the canopy slid back as in the photo of the V2 prototype.
Conclusion
Despite its small size and ”boring” one-color paint scheme, I still thoroughly like this model. Due to the simple character of the project, I could focus on trying some new tricks – like those natural metal panels, sandwich- moulded canopy, or homemade decals. Due to the time spent on details and finish the result looks more interesting than ”boring”. It even brought me a contest prize… and it is a highly probable reproduction of a very significant aircraft. Small models rule!
This article was originally published in IPMS Stockholm Magazine in March 2001.


