A Diorama in 1/72 Scale
by Jonas Dahlberg
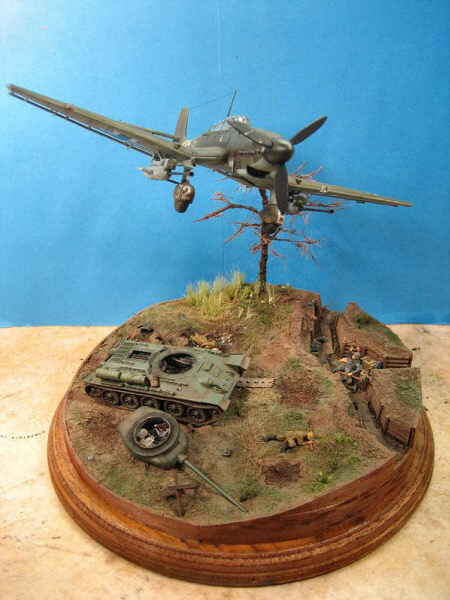
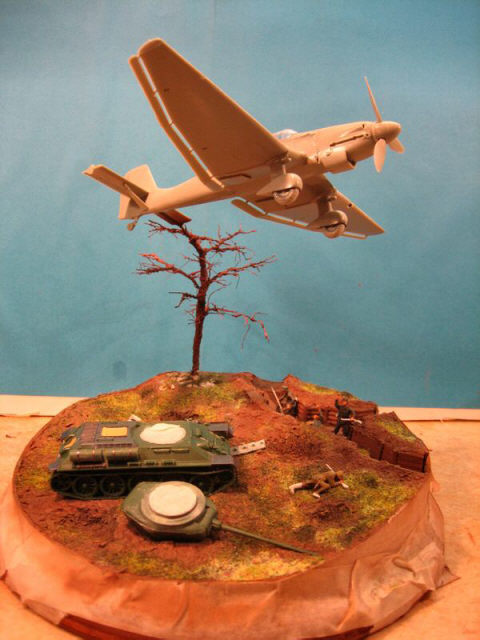
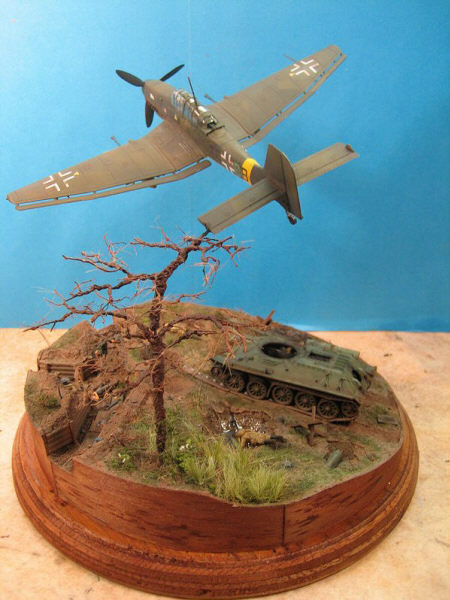
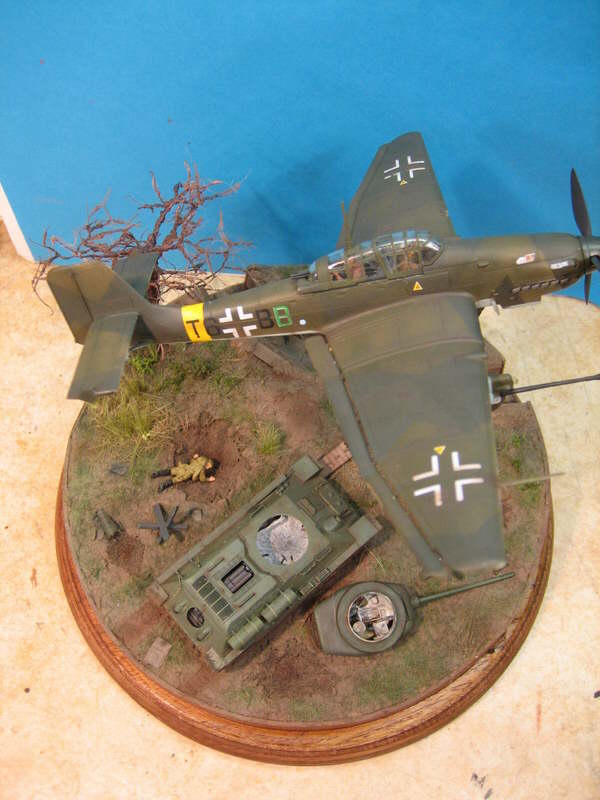
The diorama shows a section of the Eastern Front under attack by the Red Army in the early spring of 1944. The T-34 tank has just had its turret blown off by the tank-busting Junkers Ju 87 Stuka piloted by Hans-Ulrich Rudel.
Hans-Ulrich Rudel pioneered the anti-tank Junkers Ju 87G with its 37mm Bordkannone and remained the best of the tank buster pilots for the rest of the war. In total, Rudel claimed 519 tank ’kills’. The Ju 87G-1, introduced in 1943, was the last version of the Stuka to be mass-produced. By then the Stuka had lost its role as a dive-bomber to become a full-time tank killer. Bombs were replaced by two 37 mm guns mounted under the wings. These had a hitting power that could penetrate the top armour of contemporary Soviet tanks. Soon, these aircraft earned nicknames such as Kanonenvogel (cannon bird) and Panzerknacker (tank cracker). In the hands of pilots such as Hans-Ulrich Rudel they were highly effective against the Russian tanks formations until right until the very end of the war.
The diorama base was scratchbuilt from Oasis floral foam, wood, Celluclay, plaster and plasticard. The tree is wire covered in Flexi-Bark. The Stuka model is Academy’s Junkers Ju 87G-1 built straight out of the box. The tank comes from Revell’s T-34/85 kit with added detail from Eduard’s photoetched set. All figures are from Preiser. The entire diorama including the tank and the plane has been airbrush-painted with Tamiya acrylics. Weathering was done with acrylics, oils and pigments.
The Composition
This Ju 87G diorama was originally planned to be a maintenance one, showing off the 3,7 cm cannon in great detail. When planning the diorama, however, I wasn’t happy with the way it turned out. I realized that the best way to expose the cannon was to show them from below, which meant that the Stuka had to fly. Since I had an unbuilt T-34 from Revell on the shelf the idea was born to show off the cannon by including a blown-up tank in the diorama. So the idea was born.
I always tackle a diorama as a project where planning is a predominant element. That means that the first thing I do is working up the composition and trying to think over the entire building process so that any foreseeable issues are solved early on. In this case, getting the Stuka to fly without resorting to an obvious clear acrylic road was the biggest challenge. After some experimenting I found a solution in the inclusion of a tree and a really stiff wire (Piano wire). After this crucial issue had been solved the rest turned out to be a fairly straightforward build.
The photo below shows the first diorama mock-up.
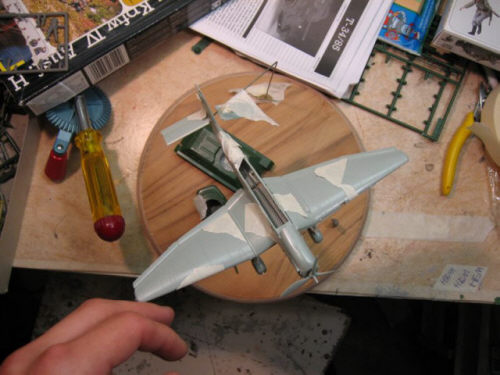
Diorama planning. If you look closely you can se the stiff wire that runs at the bottom of the fuselage.
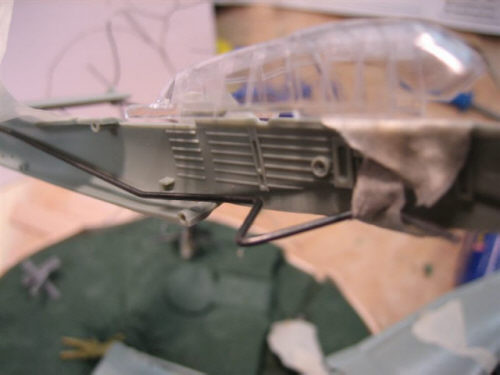
Under the cockpit the wire was bent in a V-shape thus giving the plane a degree of lateral stability
When building dioramas I prefer to build all models and major assemblies simultaneously. For the ease of reading I have separated each part for this article though.
Building and Painting the Diorama
The diorama base is a piece of round plywood turned on my lathe. The first thing I did was to cut and glue down the pieces of Oasis that formed my basic terrain. In the foam I cut out shell craters and the trenches as well as adding a slight slope that would help expose my tank. After that the wooden sides were formed from moistened balsa wood and held in place with a few spikes until they dried.
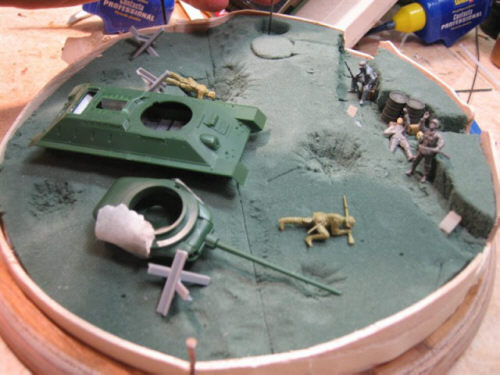
Diorama terrain done with Oasis.
Next I added reinforced sidewall detail and some planking to the trench. This was cut from plasticard of different sizes. After that a layer of Celluclay mixed with earth from my wife’s flower pots (don’t tell) was laid at the top of the Oasis When this was dry I soaked the shell craters in PVA glue and added small stones and sand. Sand and stones were also added inside the trench.

I pre-shaded the terrain with a red brown colour. I added this colour in all the craters, at the tree roots, bends and corners of the trench and the tank tracks. Next I sprayed a layer of Tamiya Flat Earth over the whole scene and added some general highlights at the protruding points of my terrain with Tamiya Buff. This highlight colour was also applied to the piles of dirt and around the trench.
When the base coat had dried I brushed on a layer PVA glue and added a mix of Static Grass (railroad grass), real grass, Natural Fibres and Woodland Scenics field grass. This was then again airbrushed with Tamiya flat earth and several shades of green.
Dry brushing was done with oils in a number of different shades. I ended up using some MIG pigments to add greater variety to the terrain colours.
The Tree
In almost any diorama a tree is a perfect background element which helps to balance the composition. Its trunk and branches give height without overpowering. I have already described how I used piano wire to hold the Stuka in the air. I realized though that having a tree hanging out of the left side of the aircraft would make painting of the Stuka difficult. After some consideration I decided to build the tree in two pieces – one large hollow trunk attached to the diorama base and some small branches attached to the Stuka.
The tree was done simply by using wire of different sizes twisted around a hollow plastic rod to form the trunk and branches. This was then coated with Flexi-Bark from Green Scene. Flexi-Bark is a very useful material that does not only provide texture but is also flexible enough to allow the tree branches to be repositioned afterwards. Exactly what I needed!
One problem I ran into was the fact that a tree that stands at a heavily shelled area would probably not have many leaves (or branches) left. The branches, however, were necessary to hide the supporting wire for the Stuka, so I decided to leave out all leaves but provide good detail on the branches.
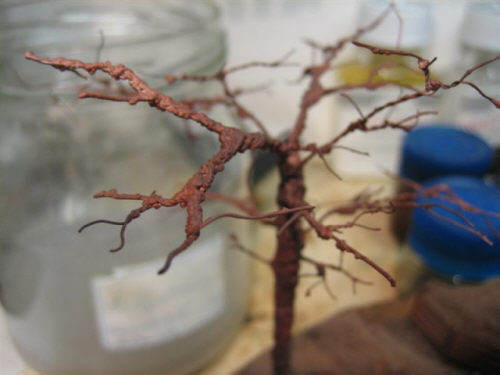
The wire and Flexi-Bark tree before applying field grass.
After the Flexi-bark had dried I coated the very ends of the branches with PVA glue and scattered small amounts of field grass over it. This looked like a mess once dry but with a scissor and some patience it was easy to cut off excessive grass and bring out a very detailed tree.
The entire tree including the stump attached to the Stuka was airbrushed red-brown and washed with flat black acrylics. High lights were added using Tamiya Buff sprayed from above.
The Plane
This is my second airplane model ever built so I was a little nervous about getting started. I decided to have it look pretty dirty. The first step was to build and paint the cockpit. I added a pilot and a navigator using different figure parts from Preiser. One word on Preiser: if you are building 1/72 dioramas and haven’t used their figures you should really try them – they are excellent!
I added some small details like wires and crew equipment to the cockpit and painted it.
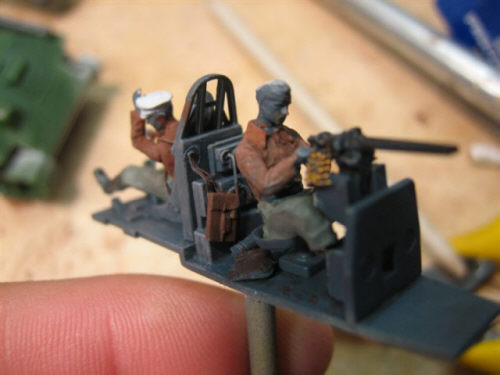
Cockpit with figures detailed and base painted.
Next came the actual fuselage. A lot of dry-fitting was necessary to make sure that the wire wasn’t interfering with the cockpit floor. When I was happy with the fit I glued the halves together. Since I’m a novice at building aircraft models I started by adding liquid glue to both fuselage halves, rather than using tape to hold them together and then let the capillary action of the glue fill the gap for me.) This meant that I had to spend some time cleaning up the joints afterwards and re-scribing the panel lines. Learning from my mistakes I glued the rest of the pieces together without having to re-scribe anything. Ha!
Once the plane was glued together I primed it with Biltema Car primer and masked off the cockpit area. After that I roughly pre-shaded all panel lines with Panzer Grey. After that a light coat of 30% sky blue and 70% White was misted on making sure the pre-shade was visible. Then I masked of the bottom side of the plane and added a custom mixed Olive Green as the first colour. More masking and the second colour of Black Green was added.
Before adding the decals I sprayed the plane with Tamiya Clear. Microset and Microsol ensured that the decals went on smoothly. After that I post-shaded all panel lines with 10% flat earth and 5 % red brown with 85% Thinner.
Once dry I added brown, black, red and yellow oils at specific points such as access panels et c and dragged the oil out with a moistened brush thus creating a streaked effect on the entire plane. When that had dried I sprayed on a thin coat of matt varnish to tone down the gloss.
I added pastels mainly at the exhaust but also to give some variety to the dirty underside of the wings and fuselage.
Last thing was to add some metallic scratches to some of the access panels and were the crew mount the aeroplane.
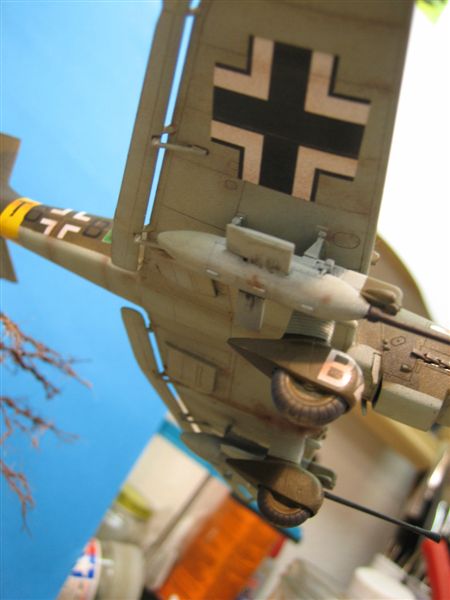
The model after preshading, base coat, varnish, decals and post-shading but before application of
oils, pigment and metal chipping.
The Tank
The tank is based on Revell’s T34/85 with a photoetched set from Eduard. The clever thing about this set is that it contains the basic interior needed to model a T-34 without the turret. I decided to remove two hatches, one for the engine and one for the transmission, to get that true blown-up look that I was after. After some extensive detailing of the tank using etched bits and scratchbuilt items it was ready for painting.
I first primed the model with a generic Car Primer (Biltema) and then pre-shaded it with Panzer Grey. Initially, to save time, I decided to use the same colour on the tank as on the plane but ultimately rejected the idea. When building dioramas this is an easy mistake to make. In nature, no two objects are exactly the same in colour!
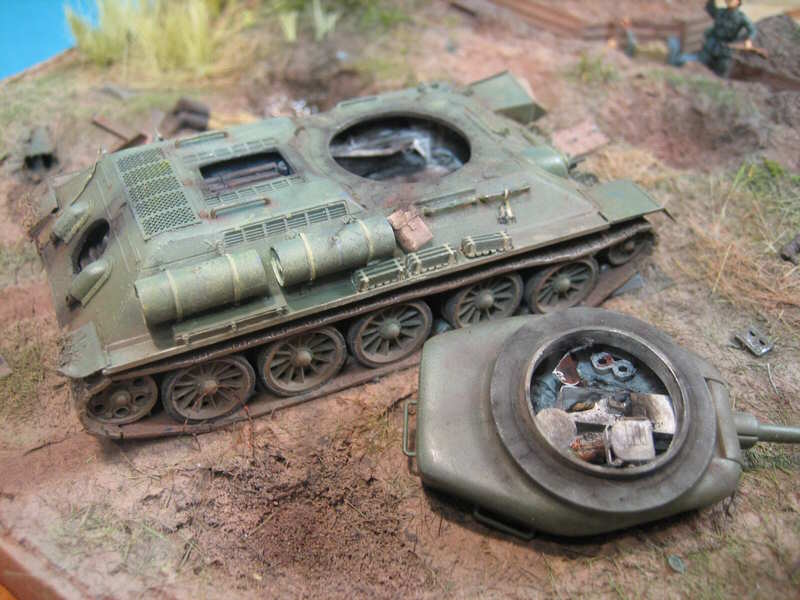
The base coat added was therefore NATO Green. Then I post-shaded all recesses with a red-brown shade and painted the entire caterpillar drive with flat Earth.
I used artists’ oils to create streaking and scratches and then used pastels to further enhance the dirty look. Dark grey and brown pastels were used on all interior components to give a hint of the violent explosion that occurred just a couple of seconds ago.

The tank before primer and painting.
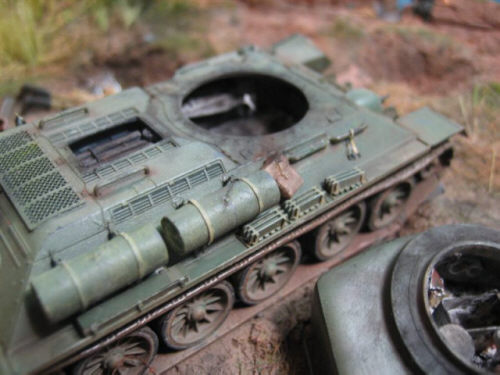
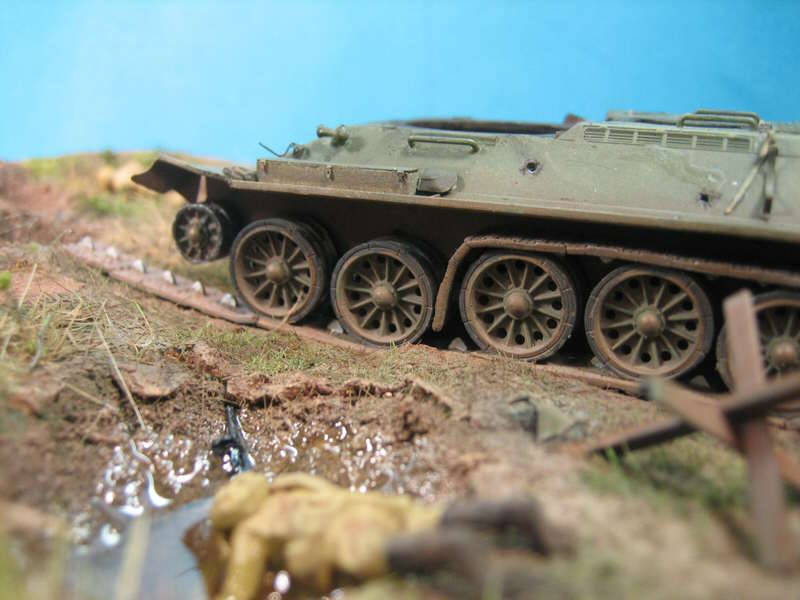
The finished tank
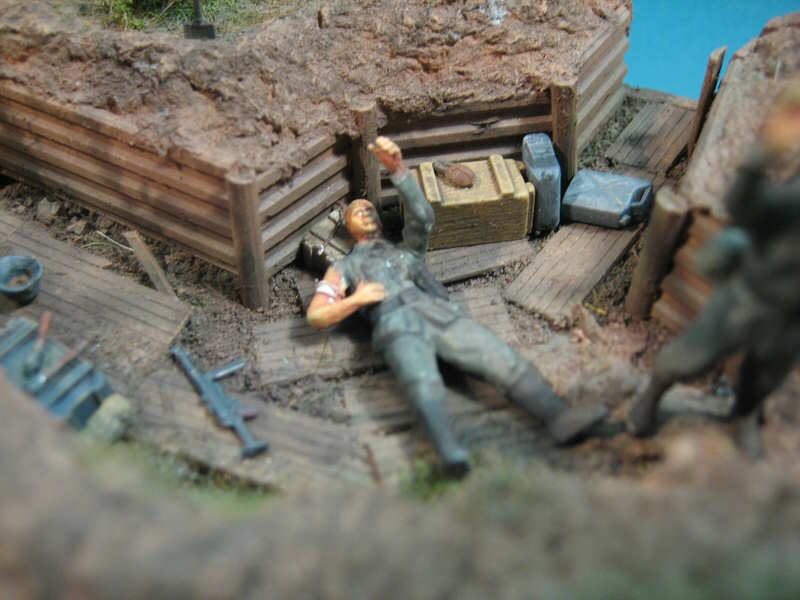
The Figures
The figures were all built using various Preiser multi-pose sets. Among them used were Panzer Grenadier and Russian Infantry. The figures were all painted in the following order: base coated, dark shadows, shading, highlights. I used acrylics for brush-painting and then pastels for dirt and grime. The faces and hands were coated with Desert Yellow, followed by a wash of Burnt Sienna.
The Completed Diorama
When all subassemblies were complete I put them all together and happily showed the diorama to a good friend. Well, let’s just say that he had a few comments: after praising it for ”one of the coolest diorama ideas he had seen” he jotted down at least 15 things to fix or improve. I did pick-up some ideas and rejected some.
Anyway I’m quite happy with how it turned out!

This article was originally published in IPMS Stockholm Magazine in November 2006