by Barry Davidoff and Tomas Kladiva
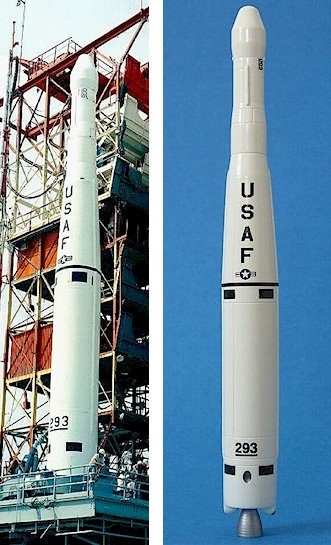
The Thor Able Star that launched the Courier 1B Communications satellite on October 4, 1960 from Cape Canaveral and New Ware model of this Thor Able Star built by Thomas Kladiva
 Tomas Kladiva is one of the world’s premiere spacecraft modellers. Not only is he a fine modeller, but he is also an expert on the actual spacecraft and rockets and especially the Russian space program. He is the founder and CEO of New Ware which produces the world’s largest range of spacecraft models. Tom spends much of his spare time creating new masters and designing new kits for the ever expanding line. Professionally, Tom is a computer systems engineer in Ostrava in the Czech Republic. Like the proverbial shoemaker, his many activities allow him to actually build only a few of the kits his company produces.
After corresponding with him on the Internet for several years I met him and another expert space modeller, Andi Wuestner, at a space conference in the little German town of Morgenröthe- Rautenkranz during May 2003. The entire town of only 800 turns out every year to support the conference which usually has several astronauts and cosmonauts asguest speakers. The town is home of the first German cosmonaut, Sigmund Jahn so it was selected for a museum that contains one of the best space collections in Europe. The collection includes an outstanding variety of spacecraft models including many built from very rare kits. In front of the museum, which is currently being greatly enlarged with funds provided by the European Commission, is the Mig-21 flown by Sigmund Jahn that was the prototype for the Revell kit issued in 2004.
When Tom sent me photos of his recently completed Thor Able Star, I asked him to share his techniques for building the model. The rocket is one of the simpler kits in the New Ware line and is extremely well detailed. The kit is composed of only 5 resin parts and 7 decals. Although the kit is easily completed in one or two weekends, his techniques are applicable not only to spacecraft models, but to any type of any resin model including armour, airplanes and automobiles. One of Tom’s guiding principles in designing kits for New Ware is that modellers can create superb models through the use of ordinary tools and techniques.
Although the Thor Able Star launched one of the first American reconnaissance satellites, the rocket was well publicized during its flights, which aided New Ware in creating an accurate replica. The prototype for Model is Thor-Able Star Serial number 293 which launched Courier 1B, the first telecommunications satellite to receive and relay messages through transponders. The history of the Thor-Able Star rocket and two of its most important missions is in the companion article “Thor-Able Star The Rocket that Launched Telecom And an Irony of the Cold War” in this issue of the IPMS magazine.
The model is in 1/144 scale which is the most popular scale for rocket launchers and compliments the other launchers in the same scale in the New Ware line. The model is 167 mm long which makes it within scale of the actual height of 79.3 feet.
The model is cast by Special Hobbies, the Czech modelling company. New Ware specifies that a high grade of resin produced by Axson, a French company, is used for its models. The resin has a very fine grain that rarely has pinholes and can be sanded easily to produce extremely smooth finishes.
New Ware uses a modular system to produce its vast array of spacecraft launchers. First stages, second stages and payloads are cast individually so that may be combined into ever more variants and to provide greater detail. The Thor rocket is cast separately from the Able Star second stage and payload shroud. The same casting of the rocket is used to produce models of two other short body Thor variants; the Thor Agena D and the Delta E. Similarly, other second stages, such as the Agena D used in the Atlas Agena D- Lunar Orbiter/Mariner is used for four other New Ware kits. Tom calls this reuse of modular components his “Lego system of rocket science.”
In actuality, the re-use of proven components has been one of the cornerstones in the evolution of the space program. The Thor rocket was modified and led to the long line of Delta rockets as detailed in the companion article. The Able second stage was taken originally from Vanguard and upgraded with a re-startable capability for the Thor-Able Star.
Building the Resin Kit
In assembling any resin kit, often the longest chore is removing the pour plugs. According to Tom, “Pour plugs unfortunately are an essential part of the casting process. In designing the moulds, New Ware attempts to place the plugs in as inconspicuous places as possible. On fine detail parts Special Hobbies is able to cast the part so it is connected to main pour plug with just a very thin resin connection. On larger pieces that require details on all the visible surfaces, the part will be cast in two pieces that are connected at a natural panel line. For example, in order that the base plate of the Thor rocket could be engraved with a series of concentric circle details it is cast separately from the main body.”
In the following sequence of photos Tom shows his method of removing the pour plug at the bottom of the Able second stage. This method is based upon his experience in the actual casting process and creating many of the masters for the New Ware line.
Figure 1 -Tom first uses a razor saw to remove most of the pour plug from the second stage. Approximately 1-2 mm of the plug is left on the part which then will be removed by sanding.
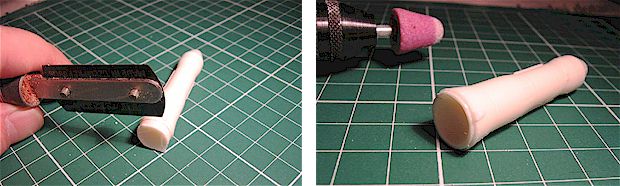
Figure 1 & 2. Separating resin parts from casting blocks
Figure 2– An unusual method used by Tom is to hollow out the bottom of the part with the pour plug attached with a Dremel tool. This step greatly reduces the amount of resin that will have to be removed from the pour plug by sanding. It also provides far better control of the final shape of the part during the sanding process. A bowl of water should be placed underneath the part so that most of the resin dust falls into the water rather than remaining airborne. It also is important to do the grinding and sanding in a well ventilated room.
Figure 3-After the part has been hollowed out with the Dremel tool, the final shape of the part is marked with a pencil. The guidelines show which side of the part needs the most sanding and assist in preventing too much material being removed from the part.

Figure 3 & 4. Sanding the mating surface
Figure 4-A needle file is then used to remove most of the remaining pour plug. If the part is large or a significant amount of material needs to be removed, the Dremel tool is used. ’

- Figure 5, 6 & 7. Sanding to a perfectly flat surface
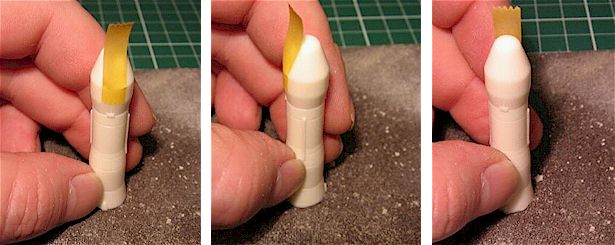
Figure 5-8 The remainder of the ridge formed by the hollowed out pour plug is removed by sanding. Tom starts with medium wet and dry sandpaper (120 grit) and sands in one direction. It is important that the surface be perfectly flat so that the part is sanded evenly. Many modellers place the sandpaper on glass or a large ceramic tile. In removing resin plenty of water is used both to prevent clogging and to reduce dust and debris.
After removing some of ridge, the part is turned ninety degrees (90°) and sanded again. In this series of photos Tom marked the second stage with a piece of masking tape to show the initial direction of sanding. After more material is removed the part is rotated another 90°. The part is carefully checked frequently against the pencil marks to prevent too much material from being removed. On certain detail parts, Tom also uses a ruler after the part has been sanded to ensure that the part has the proper dimensions.
Figure 8– Each direction of sanding part takes only a little time since the part has been hollowed out and only a small part of the ridge needs to be removed. When most of the ridge has been removed the part is again checked. The hollowed out section of the second stage has been marked with a pencil to show that the will be attached to the first stage by only a thin rim.
Many rockets, since they are long and thin, have a high centre of gravity. To provide greater stability in building large rocket launchers, the stages can be attached by using stainless steel or brass rods. The centre of the stage is located and holes are drilled in the resin to accommodate the metal rods. On certain rockets that are not solid resin, a metal rod passes through all the stages and attaches to the base to provide a keel for the entire rocket. The base then provides the weight needed to lower the centre of gravity.
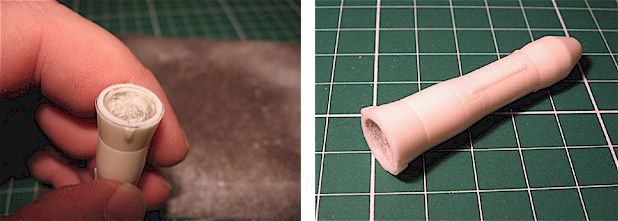
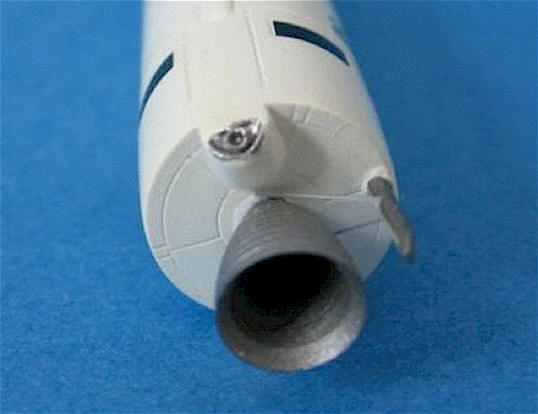
Figure 8 & 9. The part ready for assembly
Figure 9- The second stage of the Thor Able Star is shown with the pour plug removed. The second stage is then mated to first stage. New Ware includes on the instruction sheet for most kits a drawings from several views in the same scale as the kit so that all the parts can be aligned properly against the drawings. Tomas meticulously researches each model and detailed painting schemes are included in the drawings. Tom is always pleased to hear from all modellers building his New Ware kits and has added to the instruction sheets additional information which has been suggested by other modellers.
- Figure 10. Gluing the stages together with white glue
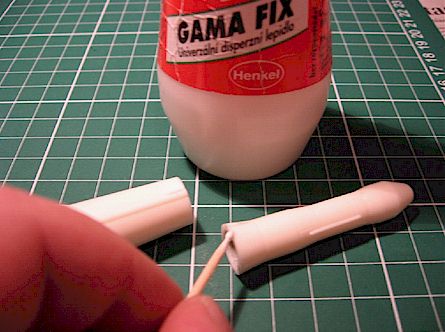
Figure 10-11- In aligning the stages properly white glue is an essential tool. White glue provides the right degree of adhesion to hold the parts together so they can be compared with the drawings. It is important to compare the model with different views on the drawings so that the stages align in all three dimensions. Since white glue takes a few minutes to dry the parts can be manoeuvred to provide exact alignment and to provide the least of amount of sanding and filling. Once the parts are properly aligned they can then be permanently bound using super glue.
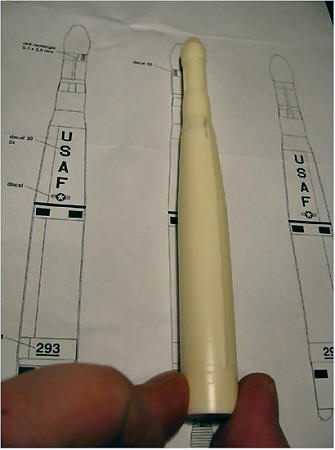
Figure 11. Watching for correct alignment
Figure 12- Once the stages are glued together the sanding and filling process begins. Since New Ware uses a fine grain resin, the parts sand to a very smooth finish. In filling small gaps from removal of the pour plugs, Tom uses Tamiya putty which dries to a hard consistency. In the photo the finished model is shown next to a tube of Tamiya putty for size comparison
Often I prefer to use baking soda (Sodium bicarbonate, NaHC03) and super glue. The baking soda is applied to fill in the gap and then just a small drop of super glue is applied. The baking soda serves both as a filler and as a catalyst to polymerize the cyanoacrylate super glue. The parts are then sanded within a few minutes while the super glue hasn’t hardened completely. Baking soda and super glue can be used to fill large areas within minutes by applying it in thin layers.
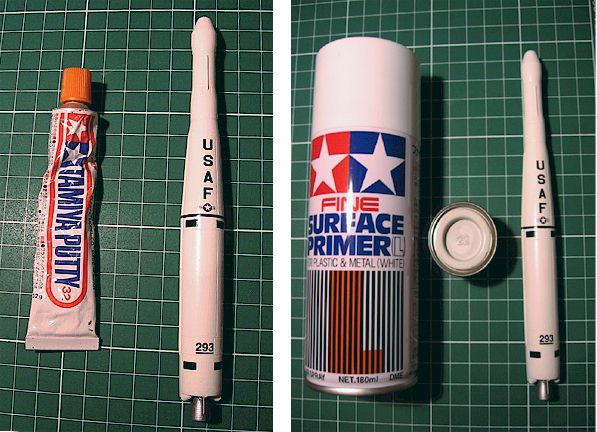
Figure 12 & 13. Filling and priming the surface of the model
Figure 13-Once the parts are sanded to their final shape, it is important to wash all the parts in soapy water in order to remove all traces of the mould release agents used in the casting process. According to Tom “Modellers frequently forget to wash their resin models and paint may not adhere properly. Due to the mould release agents the paint may run during air brushing or chip at a later time unless the parts are washed carefully.”
New Ware rockets have fine engraved panel lines that are similar in quality to those on Dragon or Trumpeter injection moulded parts. The Thor used liquid oxygen and kerosene as its fuel. Many rockets are painted gloss white to reduce thermal absorption and keep the liquid oxygen at the correct temperature. In order to produce a high gloss that preserves all the panel lines, Tom uses a thin coat of Tamiya white surface primer which has a flat white finish. Another excellent alternative is the white primer produced by Games Workshop for their Warhammer figures. In some countries it is marketed under the Citadel or Armory brand.
Painting and Markings
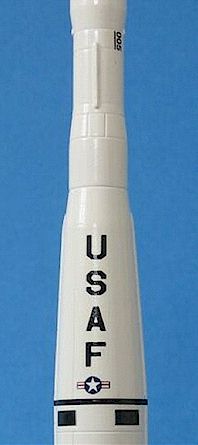 After priming the rocket and correcting any defects that are revealed Tom uses two light coats of Humbrol gloss white (#22). The combination of gloss white applied over flat white provides a thinner and more even gloss finish than if the gloss white was applied directly to the resin. The rocket engine was airbrushed Revell Steel (#91). A useful colour for the interior of many rocket engine bells is Testors Metalizer exhaust.
New Ware provides a very comprehensive decal sheet containing all the markings for the entire fleet of Thor variants with over 30 different decals. Only a small portion are used on the Thor Able Star and their exact positions are shown on the full scale drawings on the instruction sheet. Since the large decal sheet is printed only in black and white there is a separate colour sheet with the stars and bars.
The decals for New Ware kits are produced by Avi Print, which supplies most of the decals for Eduard and MPM. The decals strike a functional balance between thinness and strength. They are thin enough to apply evenly over compound curves. Complex patterns can be moved once applied to the surface to their exact position without splitting. The few decals which provide complete markings for the Thor Able Star applied easily to the gloss white Humbrol paint. To protect the paint and decals a light coat of Future was applied. On other rockets which are less glossy Testors semi-gloss provides the right sheen.
Final Details
In building the Thor-Able Star Tom added the turbo-pump supports on the first stage engine with stretched spruce. By heating the plastic spruce evenly and pulling gently, plastic rod with a constant diameter can be produced easily.
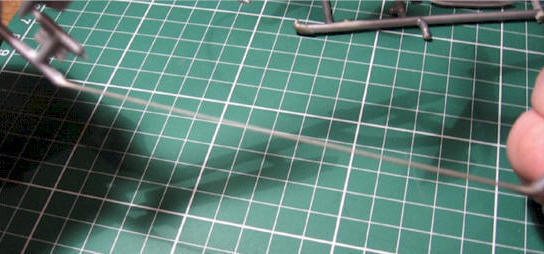
Stretching sprue
The location and length of the supports is shown on the scale drawings in the instructions. Since the supports are only 0.3-0.5 mm thick, the supports could not be cast in resin. Thin brass or stainless steel wire also could be used for the turbo-pump supports. The photo below shows the supports after they were hand painted white on the finished model.
Summary
The Thor-Able Star is an excellent project for one or two weekends. Anyone modeller following the above sequence of steps can build a kit equal to those of the owner of a model company!
This article was originally published in IPMS stockholm Magazine in March 2006