Building Italeri’s kit, part I: Construction, painting and some other bits
by Anders Isaksson

Background
I found myself looking a break from the usual projects and wanted to build a model out of the box, without the usual photoetched and resin accessories together with too many references. Also, I wanted to stay away from anything with a multidude of large and small wheels along with individual track links as this would only increase time until completion as well as decrease motivation.
With these criterias in mind I once again decided to ignore the stack of unbuilt models in my closet and instead went to the hobby shop in search of a suitable subject. The choice fell on Italeri’s kit of the LAV-AT (kit no. 263 and by Italeri designated LAV-25 TUA). The basic moulds have been used to produce a number of different LAV versions and I choose the AT variant as it seemed like a fairly simple design, allowing me spend a minimum of time on the construction of the kit.
The model
While searching the internet for some refernce pictures on painting and marking I stumbled on Merner Kaumpfhofer’s article at armorama.com (look in the section on armor features). With the somewhat pessimistic title of LAV-AT: A lesson in frustration? I could see trouble coming up. The article was very informative and provides plenty of good pictures of the built-up kit, along with a summary of the major short-comings (both regarding detail and basic dimensions) of the Italeri kit.
However, I was determined to not let the various drawbacks described in the article get me down, so instead I went ahead and began cutting plastic.
Construction
Sure, I wanted this to be a fast project without distractions that would make me go looking for add-ons. Italeri obviously thought along the same lines, providing no room for a commander beneath the commander’s hatch, just the plain hull roof!
As mentioned before this was to be an out-of-the-box project. Concequently, a minimum of time was spent on construction. To save time I omitted the interior of the rear passenger and ammunition compartment and left the rear doors closed. I also closed up all crew hatches except the commanders hatch, which was to recieve an left-over figure from Verlinden to add a little human element to the model.
Construction turned out to take more time than expected, the reason for this being the need to clean up extensive mould separation lines from almost every component. Also some filler was needed to close a number of gaps as well as eliminationg a fair number of sink marks all over the model.
Sure, I wanted this to be a fast project without distractions that would make me go looking for add-ons. Italeri obviously thought along the same lines, providing no room for a commander beneath the commander’s hatch, just the plain hull roof.
If following the instructions to the letter there will be minor errors when constructing the TOW launcher as some parts are shown reversed in the instructions. I did not bother to correct these errors but choose to follow the assembly suggested by Italeri.
The only slight modifications made to the model was turning the wheels, making it necessary to do some cutting of the steering of the front chassis. I also tried to make the tires look ’weighted’ by placing the compleded model on a hot, flat surface of a frying pan, carefully watching as the tires began to soften and deflate under the weight of the model. I would not call this technique a complete success but it still looked a lot better than before.

What’s for dinner? Placing the completed model in a frying pan set at moderate heat helped softening the tires to produce a slightly deflated look to simulate the weight of the vehicle.
With the model finally completed it is time to begin the fun: painting and weathering!
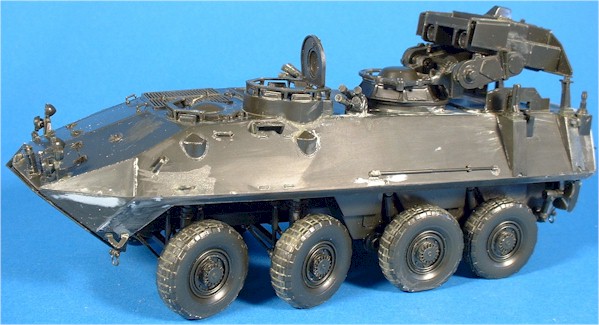
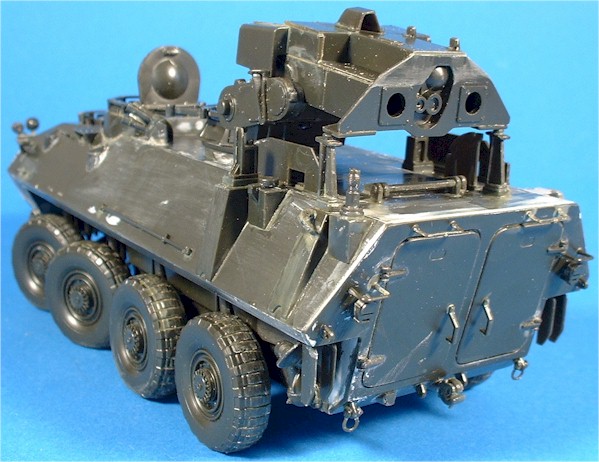
Images of the finished but unpainted model.
Painting
To paint the camouflage I used the Tamiya line of NATO colours, released at the same time as the Tamiya Leopard 2A5 model. For masking I decided to try blue-tack rolled in thin sausages with pieces of paper tissue used to cover the areas between each blue-tack sausage.

I first applied a general base coat of XF-69 NATO Black which convienently forms one of the three colours of the camouflage.

At this time my model was attacked by aliens… The areas to remain black are masked using the blue-tack and paper tissue.

The next colour, XF-67 NATO Green is applied.

Things are getting a bit complicated as more blue-tack and paper tissue is positioned on the model. With all black and green areas masked off the final colour XF-68 NATO Brown is applied.

All masking is removed to show the final result, the NATO
tri-colour camouflage with slightly soft demarkation lines.
To avoid the need of handpainting or applying complicated
masking to the wheels were all finished in the NATO Black and set aside for the weathering.
In this overall view of the painted hull a few shiny spots can be seen. These are residue from the blue-tack and I found that these will disappear as more colour coats are applied.

At this stage I decided to try a little post-shading. I simply loaded my airbrush with the three camouflage colours (well, one at a time) and made a number of passes over the entire model, following corners and crevises. I am not sure about the results but I like the way this treatment made the colours blend together. It also helped tone down the few shiny spots left by the blue-tack.

To keep things simple the only marking I used
on this model was the common chevron.
Tamiya masking tape was used to form the chevron and a thin coat of Nato Black or NATO Green (depending on the underlying colour was all that was needed.
Following pictures of the real vehicle a chevron was applied to each side of the vehicle as well as one of the rear doors.
With the markings applied a coat of Vallejo 060 Satin Varnish was applied to the entire model. Realistic or not, the model will now have a slightly shiny surface that will form a nice contrast to the weathering that will follow.

The final stage of painting was to pick out details like the tools, periscopes and lights. Appropriate Humbrol colours were used and they were applied using a small pointed brush.

This concludes the construction and painting of the model. In part II the fun continues as I will weather the vehicle!
Continue to LAV-AT Out Of The Box (Part II)
This article was originally published in IPMS Stockholm Magazine in January 2003.