by Martin Waligorski
In the first part of this article (click here for part one ) I described a few techniques to produce scale markings by painting rather then decals. I have also shown examples from my own modelling table, where these techniques coupled with a bit of patience produced painted markings as good as – or sometimes better than – decals.
A subject left for this final part of the series is painting markings of circular shapes. As said before, you will need good masking material enabling you to produce razor-sharp color edges. Other general rules mentioned in part one will also apply. A detail perhaps worth noting is that I use airbrush for all but tiny paint jobs. I haven’t verified whether my experiences are equally applicable for brush painting, although I have a general feeling that they should be.
Everything is best explained with real-life examples, so I’ll continue with two more stories from my own projects.
Scenario 5. RAF Peculiarities
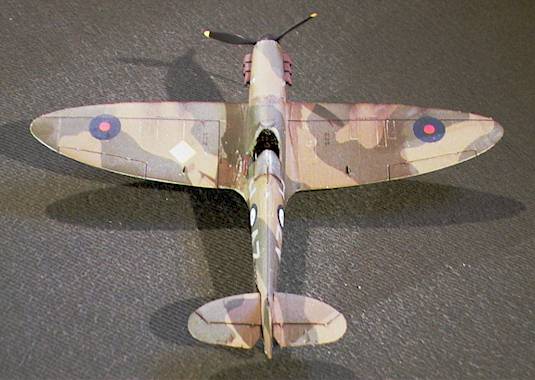
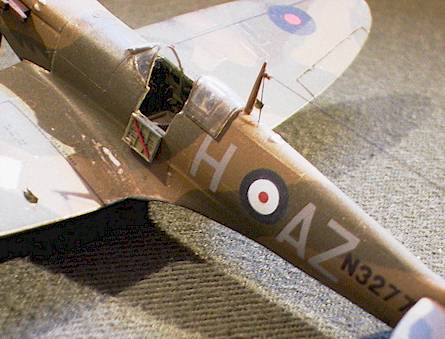
Although the Royal Air Force of the World War II is generally known for more camouflage discipline than other combatant air forces, the variations of size and shape of the RAF roundel is an entirely different story. The initial war period in particular resulted in many variations of the same basic marking. A couple of years ago, when building a 1/72 model of Spitfire Mk. I (good old Airfix), it turned out that my chosen subject aircraft from the Operation Dynamo, AZ*H of no. 234 Sqn. featured unusual small-diameter upperwing roundels which I couldn’t find on any easily available decal sheet. This prompted my first attempt to produce these roundels by painting.
Faced with the task of creating a circular mask of exact 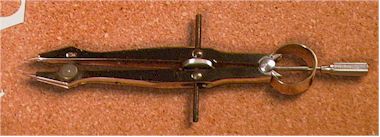 diameter, I needed to find proper cutting tool. After some experiments I arrived at a makeshift tool made from drafting compass by replacing its pencil end with a tip of hypodermic needle. The sharp end of the needle, angled correctly, turns the compass into a miniature knife. After placing a piece of masking tape on a glass surface, the knife worked just good enough to cut tidy circles in it.
Masks for the outer ring of the roundels were then attached to the model and sprayed Humbrol Roundel Blue. The paint was thinned slightly less than usual as an extra precaution against paint creeping under the masks.
The process was then repeated for the red circle of the wing roundels. For tri-color fuselage markings, the search in decal scrap box resulted in two inner circles of exactly correct size. These were cut out from a larger decal using the very same tool, and applied to the model.
Scenario 6. Insignia Blue
I mentioned before that some colors just do not appear correctly in print. Actually, one good example of this effect is the RAF Roundel Blue. On model decals, this color is most often represented as very dark marine blue. While this is correct for the factory-fresh color, the original paint weathered easily into a lighter shade of deep indigo blue, not unlike the brighter pre-war roundel blue, which is tricky to capture accuretely in print. Humbrol used to have this color in their enamel range (no. 189). Sadly, it has been discontinued a few years ago, but I still happen to have a tinlet in good condition which I occasionally use to improve the markings of RAF aircraft models.
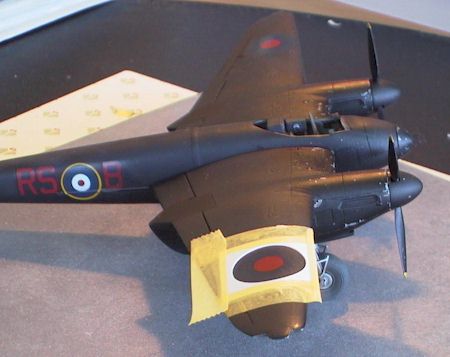
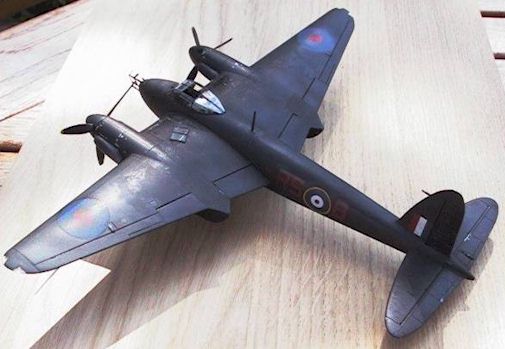
In my recent project – the all-black Tamiya Mosquito NF Mk. II – the printed blue of the decal roundels was so dark that the markings almost disappeared on the black background. Because of this and because I generally wanted to give more weathered look to the airframe, I opted for painting once again.
At this stage I have already perfected the technique of producing circular masks from thin sheet plastic (see full description in Tech Tips: Masking Wheels from February 2001), and it felt natural to use it here. After some consideration I also opted for leaving the inner red circle unmasked, for once trusting my airbrushing skills.
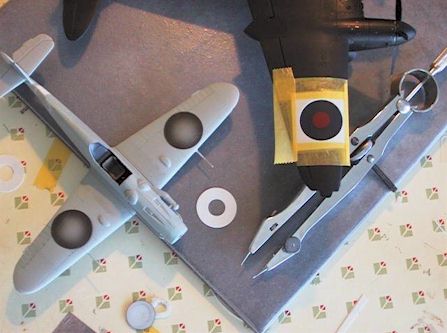
However confident, I made a couple of trial passes on a scrap model, in this case an Italeri Bf-109G abandoned in my drawer. The adjacent picture clearly shows the extent of airbrushed area; note how sharp is the outer edge of the circle.
There are other elements on the picture that are worth mentioning. The pre-cut hollow circle mask proves that multiple circles can be cut and airbrushed in one go, thus solving the problem of centering multiple layers of painted circles on top of each other. To the right, a mask is attached to the model ready for paint application. Due to the flexibility of thin styrene sheet the masks can conform tightly to most wing and fuselage curvatures in 1/72 scale.
The remaining part was only a quick airbrush work. Small overspray which found its way to the red circle was simply wiped out while still wet using a cotton swab soaked with thinner.
The partially painted roundels helped considerably in the overall task of enlivening the all-black model. I also have now a proven technique with which I wouldn’t hesitate to paint the roundels from scratch next time.
Conclusion
This overview would not be complete without mentioning the ready-made vinyl paint masks available from many manufacturers. For example, Eduard produces pre-cut masks for Japanese Hinomaru, USAF stars-and-bars, RAF roundels, Luftwaffe crosses in different scales and many variants. For multicolor markings, masks all provided for all painting steps. Everyting is accompanied by clear instructions. Although I have not used these products myself, I expect the results to be excellent.
When starting the first article of this short series, my aim was to de-mystify the subject of painted markings by showing what an average modeller could achieve. Judging from the e-mail response I received, there were people who found these descriptions useful. In such case I’m entirely satisfied and would like hereby to encourage readers to more experiments. For example, is there a reliable way of producing fine masks for RAF squadron letters or Luftwaffe fighter numerals? If you have the answer, please let me know.
This article was originally published in IPMS Stockholm Magazine in September 2001.
