by Martin Waligorski
This article describes a few techniques I have tried and used to paint markings on scale models. I hope to show that you don’t need to rely solely on decals for giving that final touch to your model. In fact, many types of markings can be easily painted with only a little bit of patience, giving you extra freedom in the choice of modelling subjects.
Allright, I can hear you asking: Why on Earth paint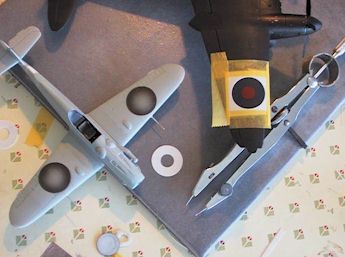 any markings when you have decals for just about anything? True, the choice of quality decals is very good these days. Still it may be not enough if your intention is to replicate a particular aircraft not directly provided by the decal/kit – manufacturer, or if you encounter any problems with the decals at hand.
Decal Headaches
While providing a great way to include color detail on the models, decals also have a number of disadvantages. I can think of several reasons for a decal to be less than ideal solution.
The first potential problem is availability. Do you have a decal exactly matching the desired marking on your model? Are size and proportions of the markings right? How about the shape of lettering? While custom-made decals can be made using the graphics software and a special printer, there’s a great deal of markings that can also be painted directly on the model. And even custom-made decals may posess other decal deficiencies described below.
Decals inherit the limitation of the printing process. Some colors are extra difficult to replicate correctly in print; tricky shades of camouflage colors usually fall victim to these limitations. Taking the World War II RAF colors for example, the usual source of headache is the Sky color of squadron letters. I also find that the reds and the blues can be reproduced in print with only a limited depth of color, causing many national markings to look quite lifeless. Swedish AF fans will know how vivid is the correct blue color of the Swedish roundel – and how rare are the decals that resemble the correct shade.
A major problem that I’m sure most readers will be familiar with is that all decals are more or less transluscent. For decals applied on dark backgrounds, the dark shade will invariably show through, spoiling the intended impression of color.
Also, decals do not work well on complex surfaces like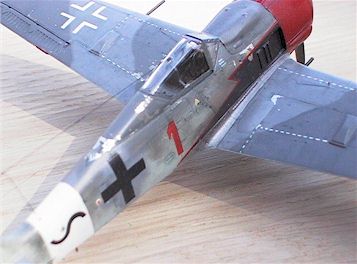 spinners, noses, edges, as well as surfaces with sizeable moulded-in detail.
Decals need to be of good quality, and they require good preparation. The reaction to decal setting solutions, clear decal film showing after the application and sometimes silvering are the three variables which I find difficult to control unless having previously worked with decals from the same source. Given that decal application takes place towards the end of the modelling project, it is all too easy to spoil the overall result.
Lat but not least, bad quality decals my be printed off-register, may curl or break beyond repair during application and so on.
Summarizing, decals are great to use if of excellent quality and available. If not — well, either your demands are modest and the available decals can be accepted, or the rest of this article might be of interest to you.
The Tools
Enter the high school of masking: to paint markings you will need masking material able to produce pefectly straight, uniform and knife-sharp color edges.
Your best friend will be a good quality masking tape. 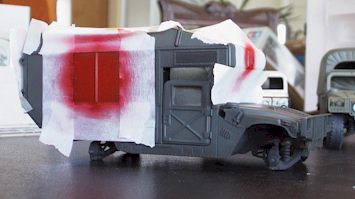 I can recommend using Tamiya’s own masking tape, which I have used myself and found excellent. However, I have also been using stock paper masking tape from a hardware store with prefectly acceptable results. The quality requirements for the tape are fairly simple. The tape must be able to adhere very tightly to the masked surface, but at the same time not peel the underlying paint – or indeed decals – on removal. It needs to be thin and elastic to follow the curves of your model. It needs to be pre-cut on a piece of glass without loosing its adhesive abilities. If, like Tamiya, it also has the prefectly straight edges, it will save you a lot of extra cutting.
I can also think of using other fine masking materials like soft vinyl foil or Bare Metal Foil, but I have not tried these.
As for the tools, you will need a piece of glass or a ceramic tile for cutting the designs, a sharp hobby knife, a steel ruler and a high quality measuring compass. A Q-tip might be handy to press down the edges of your masks.
Before commencing any real project, you might also want to practice your painting/airbrushing technique to ensure prefectly sharp color edges with no unneccessary build-up of paint or – God forbid – the paint runing and creeping underneath your masking. I find that using some extra thinner and airbrushing in multiple coats of thin, quickly-drying mist works best for me. Usually I also carefully remove all masks while the paint is still wet to prevent any paint build-up along the edges.
Since much of the masking and painting must be done in stages, you will win much time by sticking to acrylic paint for your markings. When thinly applied, acrylics will dry to the touch in a minute or two, allowing you to mask and spray several consecutive steps of the design in a single airbrushing session. With oil-based enamels, you will usually have to wait overnight between the steps.
I will describe a few simple real-life scenarios from my own modelling table. I hope that they will provide enough basis for other modellers to find their own applications. I have deliberatly ordered the examples starting from the simplest.
I’d like to point out that all my aircraft models are in 1/72 scale, so you should not have any problem to produce even the smallest designs with masking and painting… well maybe except stencils.
Scenario 1. Concealing the Carrier Film
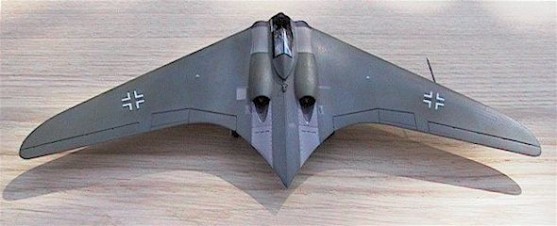
This example is about improving the faulty decal rather than replacing it entirely. While the setting liquids like Micro Set and Micro Sol certainly are a good investment, sometimes they fail to make the decal carrier film disappear entirely, leaving a visible layer of clear decal. In such case the final coat of clear varnish may not conceal the decal area entirely. This is what happened to me with wing crosses of my Horten Ho IX V3 model (kit and decals by Revell).
Another problem worth mentioning if you’re not 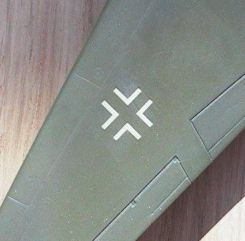 careful with surface preparation for the decals is silvering. In 90% of cases, silvering is mostly – if not exclusively – seen on clear decal areas.
Several approaches have been proposed before to these problems, one of them being trimming out the clear decal film before applying the actual decal. It is easy to see that it would add all too much extra work with designs like the Luftwaffe crosses shown here on my model.
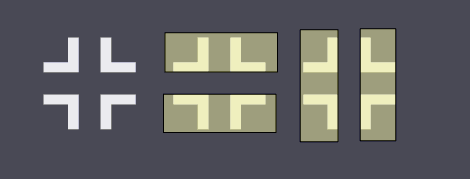
The effective remedy is to paint over the clear decal film with the underlying camouflage color. To do it on the Ho IX, I first masked the horizontal bar of each cross with strips of masking tape, sprayed a thin coat of camouflage color (RLM 82). After a moment to let the acrylic paint dry I removed the tape, re-masked for the vertical bar and sprayed again. Final result can be seen on the close-up picture. The diagram below explains the two masking steps taken.
When masking over the decalled areas such as above, special care should be taken to the low-tack masking tape over the decals to prevent peeling off the actual decal when removing masking. Always remember to remove masking tape carefully!
Scenario 2. Star designs
While on the subject of improving decalled markings, the usual problem is the white color of the decal. First of all, white tends to be extra transluscent on dark backgrounds. Furthermore, most manufacturers print white as pure white rather than off-white which in my humble opinion would be more appropriate for the scale. If either is a problem to you, you may still attempt to apply the decal and then overpaint the white portions of it with the white shade of your choice.
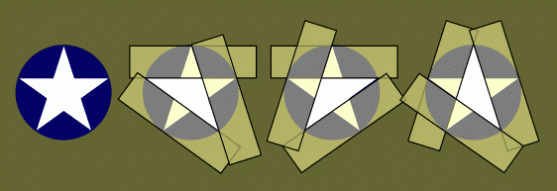
For more complex designs, painting in stages is essential to save time. For example, the easiest way of improving the white of the USAF star would be to mask a series of triangular areas rather than the entire star design at once.
As can be seen, there are only one more masking and painting stage than in the previous example. Painting the star markings is less complex than it seems!
Scenario 3. Field Repaints
During the war it was the praxis of many forces to tone down the brighter elements of national markings for extra concealment in difficult operational conditions. Such is the genesis of RAF type ”B” roundel and Luftwaffe crosses without the black ”core” so widespread during the latter half of the conflict.
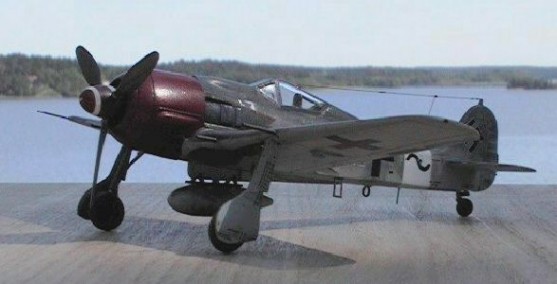
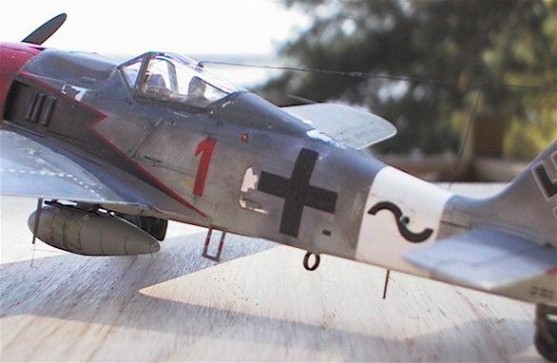
When done in field conditions, repainting of marknings could often result in somewhat sloppy results, often with non-standard proportions. In my chosen Fw 190 subject, the Rammjäger aircraft of IV./JG 3, the white of the fuselage crosses was roughly oversprayed with another color. Naturally, there was no suitable decal showing the desired effect. I used a standard cross decal and oversprayed it on the model, emulating the order of events on the original machine.
First an ordinary cross decal was applied. Then I cut strips of Tamiya tape to mask off the black areas. Given the small size of the area, I needed pieces of tape of the width exactly corresponding to the width of the bars of the cross. Good quality compass is an invaluable tool for taking such exact measurements.
First, I have attached a few pieces of Tamiya masking tape to a flat piece of glass, taking extraq care to ensure that all were dead straight. Then the exact width of the black area was measured and traced on the tape. Finally I used a steel ruler and a sharp Xacto knife to carefully cut the strips of desired width.
After masking off the cross, its white surrounds were lightly oversprayed with the appropriate shade – in this case RLM 75, ensuring that the white of the decal still showed through in places. The result is visible on the picture below.
By the way, a reliable masking tape allows for even more intricate paint jobs if you have a patient hand. Although the appropriate decal was provided, the black lightning area behind the cowling of my Fw 190 has been painted. Applying the decal would be much more difficult because of the cooling gills protruding in the middle of the area.
Scenario 4. Red Cross
As you can see from examples described above, there is nothing unusual in masking and painting rectangles and crosses. So far we have used decals as useful guidelines for masking, now it’s time to try something more challenging!
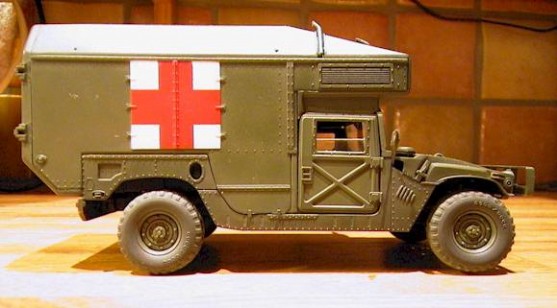
Although the Academy M997 Humvee Ambulance kit released in early 1990s was excellent, the provided decals were not. In my sample the white was very transluscent and the red too dark. Besides, the cross designs were to be applied on top of the hatches containing considerable amount of raised detail like hinges, rims, and rivets. Considering this painting the markings appeared as a much better choice.
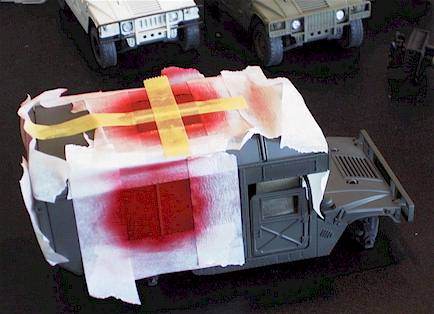 The sequence of masking and painting is shown on the picture to the left. First, the entire square area of the red cross marking has been masked (white tape, see the side of the vehicle).
I used wide strips of masking tape from the hardware store to prevent any overspray on the original camouflage. The entire squares received then two or three coats of Post Office Red resulting in a unifiorm vivid red surface.
When dry, step two was commenced. Using the measurement compass, the precise width of the cross arms was established for each marking – all being of different sizes. Appropriate strips of Tamiya masking tape (yellow) were pre-cut. They were then applied to the model and carefully centered on their respecitve areas using Mk. I Eyeball – an ”instrument” which I often find more reliable for those micrometer adjustments than rulers and triangles.
After this step I sprayed another three coats of off-white on 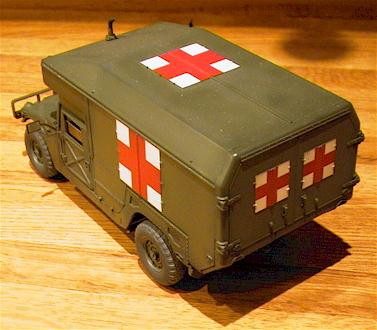 each marking area. All masking material was then removed revealing the red cross designs. All was not perfect though: some touch-ups were needed here and there, especially as a result of paint creeping along the raised edges of the hatches, where the tight fit of the mask was particularly difficult to achieve. The blemishes were dealt with one by one in exactly the same way as for the clear decal film of the Horten Ho IX model.
After a few touch-ups I had a vehicle with prefectly crisp ambulance markings, which were so much more ”combatible” with the rest of the model than any decal could ever be – I hope that you will agree.
Summary
As can be seen, There is nothing very difficult in saving, improving or even replacing marking decals by painting directly on the model. The described techniques can be adopted to many polygon shapes, like dashes, stripes, arrows, rectangles, crosses, stars and so on. Also letters with letters no curved contours, like X, V, L can be produced with these techniques.
To be able to do more, you will need to do shapes with curved edges. In the next installment I will show you how.
Continue to Part Two of this article
This article was originally published in IPMS Stockholm Magazine in July 2001.
