The IAI Mirage V Dagger from the Falklands War
by Ricardo Dacoba

A Short Lesson of Modern History
After the experience of the Six-Day War, the Israeli Air Force approached Avions Marcel Dassault with a requirement for the development of a simplified version of Mirage III.
The result of these specifications was the Mirage 5J, designed initially as a ground-attack aircraft with Mach-2 performance and capable of carrying 4000 kr of ordnance. The prototype made its inaugural flight on May 19th, 1967, but the planned delivery of 50 aircraft to Israel was soon embargoed by the French government.
The embargo came as a bitter disapointment to the Israelis, and they quickly undertook a series of actions which would allow them to get the aircraft anyway. Even if not all facts have been revealed until this day, it would seem that through various channels Israel gathered sufficient spare parts for the IAI (Israel Aircraft Industries) to assemble one complete aircraft and then prepare for its series production in Israel. Other companies were involved in this undoubtedly complex intelligence undertaking, like Bet-Shemesh which worked up the production facility for the copied Snecma Atar 09 engine.
The first aircraft of this eries (serial S-0.501) was baptised Nesher (Eagle), and made its first flight on September 10th, 1969, only two years after the French original.
The Nesher retained the same airframe as the Mirage 5, characterised by a high-swept delta wing of 56° 35′ with six underwing hardpoints. However, many of the internal systems were different, the fuel system, the ejection seat and so on.
C-436 Dagger
This aircraft was received by Argentina on July 29th, 1981.
On May 24th the following year, this machine piloted by Horacio Mir Gonzalez, participated with Escuadrilla Azul (blue Squadron) in the attack on Royal Navy ships off the Falkland Islands, using 500 kg bombs and receiving hits from AA fire. Five days later, the same airplane was destroyed on the ground at Estrecho de San Carlos as a result of the impact of BAE Rapier missile.
The Model
Starting with the 1970s Heller kit of the Mirage IIIC and a high quality conversion set from RD Resin (shameless plug here, RD Resin is my own brand), I began with the transformation of Mirage IIIC to Mirage V Dagger.

Resin parts for the conversion: 1700-litre drop tanks, the nose cone, and cockpit components.
Fuselage
The first thing that I did it was to replace the kit cockpit with a new one cast in resin. The original heavy fuselage sidewalls of the kit had to be thinned down considerably to accept the new cockpit plug.
The next step was sawing off the nose cone along the appropriate panel line and installing a characteristic replacement nose of the Dagger.
After the nose and the cockpit ther came the most difficult part of the conversion. The Mirage V’s fuselage was lengthened in comparison with Mirage III. On the model, this had to be done by inserting an extension plug behind the cockpit and beneath the engine air intakes. The plug contains a solid cross-section of the fuselage plus the integrated splitter plates and cones for engine air intakes. Installing the plug is not difficult, but because of its placement it did take some careful puttying and sanding to make it blend entirely with the compound shape of the fuselage in the area. Needless to say, the air intakes were left off and attached only after all the sanding has been completed to my satisfaction.

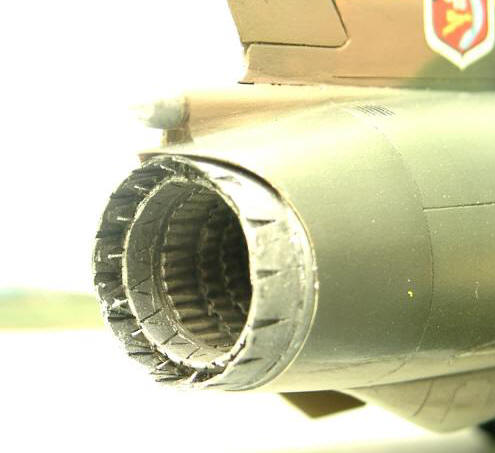
The converted nose and a new jet pipe
With this work completed, I could glue the fuselage halves together. After that, another conversion piece was added, the Atar 9C jet pipe inserted from behind.
The Dagger had also a new aerodynamic blister beneath the rear fuselage, an appropriate resin part was added accordingly.
Having finished the fuselage modifications, I double-checked all the seams, blended them in with Tamiya putty where necessary and left to dry for a day or two.
Scribing panel lines
At this stage of the work I already began the ominous task of re-scribing panel lines. Mind you, this was the old Heller kit, If you opt to do the same conversion using the new Eduard Mirage III you will probably avoid most of this part. Anyway, the scribing is always much easier if done before the final assembly of the airframe. I worked on it in stages and it was eventually completed before the wings and the fuselage were mated together.

Wings
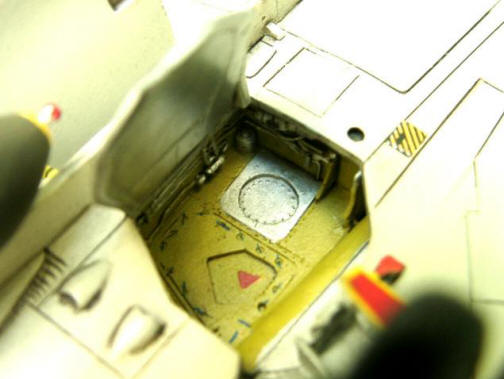
The first task on the wings was to cut off a triangular section of the upper section just above the wheel wells to allow the new resin wheel well plugs to be installed. This was a difficult task requiring maximal attention, since alignment of these pieces was very important in order to avoid using excessive amounts of putty.
Having finished the wheel bays to my satisfaction, I glued the wing halves together, puttying and sanding where necessary.
Final Assembly
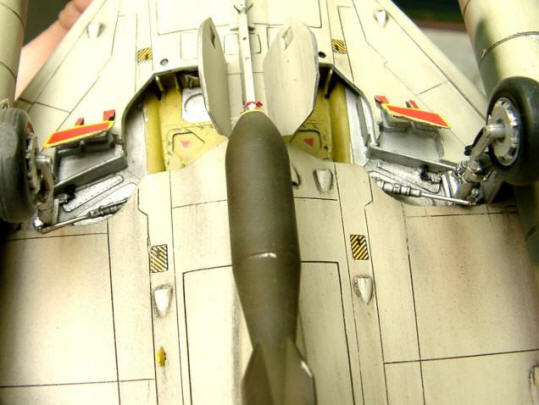
The wings were offered to the fuselage and glued step-by-step using cyanoacrylate glue for strength. With the basic airframe completed, I moved on to the underwing fuel tanks. I wanted to depict my model with the two 1,700 litre tanks. Each one was a five-piece resin assembly and cast with a low-density resin because using regular resin would make them overly heavy adding dangerously to the strain on the model’s undercarriage.
Painting
With the correctly assembled, sanded and scribed model it’s time for painting. I started off with a coat of primer to reveal any remaining blemishes. Having discovered one or two flaws, these were dealt with and then the offending spots re-primed.
The camouflage pattern is based on two greens and a brown tone known from USAF Southeast Asia schemes. I used both acrylic and enamels, as I feel equally confident with both and have a habit of picking a shade that best suits the need at hand. The colours are:
- Dark Green FS34079
- Medium Green FS34102
- Medium Brown FS30219
- White FS36622.
The nose cone was painted in matt black representing the plastic radome of the original.

The decals were combined from several sets of Aerocalcas and other Mirage-related sheets.
With the decals in place and sealed, I applied weathering to the airframe. All surfaces were washed with brown gouache for a moderately ”aged” look. Then I used pastels to simulate footprints on walkways, oil and liquid streaks and so on.
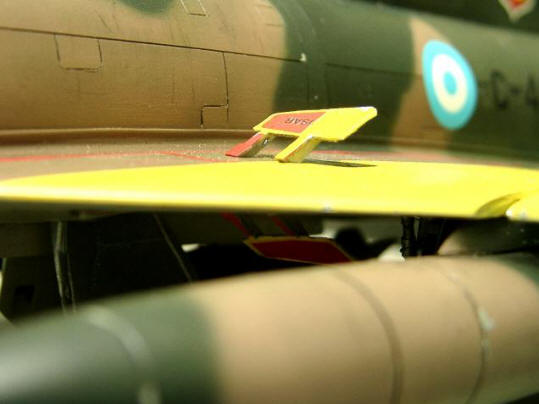
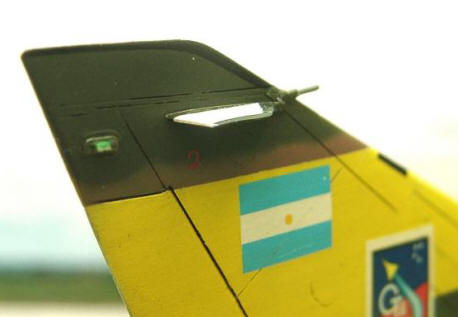
The yellow wing stripes were applied only on top of all the weathering, since they were freshly-painted operational markings on the real aircraft, too. Applied for the Falklands campaign, the stripes on the wings and the empennage were 1 meter in width, and were painted on fixed surfaces only, ending with the elevon hinge line. I paid special attention to the selection of the yellow shade to obtain convincing yet not exaggerated contrast between the old of the camouflage and the new of the yellow panel.
Final Bits
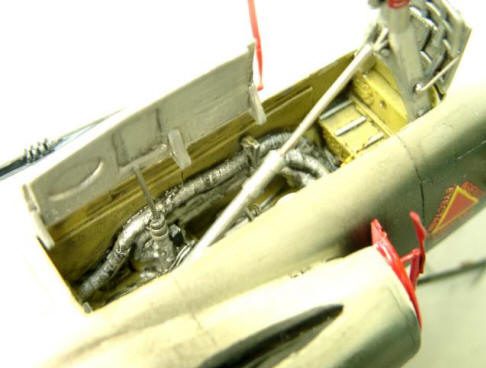
The undercarriage legs were detailed with copper wire for hydraulic and electrical lines. Some parts like the retraction jacks were resin replacement parts.
The pitot tube was made from a hypodermic needle, turned on a lathe for a correct conical shape.
I also added some accessories such as the boarding ladder which I have soldered from copper wire.
Acknowledgements
I’d like to thank Luis Gómez, Roberto Ferraris, Guillermo Sentis, Diego Hoff. Guillermo Gebel, Alejandro Serra of Escuadrilla 6 De Caza, and to all those that contributed with data and photos for the accomplishment of this project.

References
- IAI Dagger & Finger, Colección Fuerza Aérea Argentina Nº1, Jorge Núñez Padín.
- Halcones Sobre Malvinas, Ediciones del Cruzamante, Cáp. Pablo Marcos Carballo.
- Argentine Air Forces in the Falklands Conflict, Warbirds Illustrated No. 45, Salvador Mafé Huertas & Jesús Romero Briasco.
This article was originally published in IPMS Stockholms Magazine in October 2004.